
Committing Snapshot copies to WORM

You can use SnapLock for SnapVault to WORM-protect Snapshot copies on secondary storage. You perform all of the basic SnapLock tasks on the SnapVault destination. The destination volume is automatically mounted read-only, so there is no need to explicitly commit the Snapshot copies to WORM; therefore, creating scheduled Snapshot copies on the destination volume using SnapMirror policies is not supported.

Before you begin

  • The source and destination aggregates must be 64-bit.

  • The source volume cannot be a SnapLock volume.

  • The source and destination volumes must be created in peered clusters with peered

    SVMs.

    For more information, see the Cluster Peering Express Guide.

  • If volume autogrow is disabled, the free space on the destination volume must be at least five percent more than the used space on the source volume.

About this task

Note
You cannot rename a Snapshot copy that is committed to the WORM state.

You can clone SnapLock volumes, but you cannot clone files on a SnapLock volume.

Note
LUNs are not supported on SnapLock volumes. Although it is possible to move LUNs onto a SnapLock volume using legacy technology, this is not a supported operation, nor is any other operation involving LUNs on a SnapLock volume.

For MetroCluster configurations, you should be aware of the following:

  • You can create a SnapVault relationship only between sync-source SVMs, not between a sync-source SVM and a sync-destination SVM.

  • You can create a SnapVault relationship from a volume on a sync-source SVM to a data-serving SVM.

  • You can create a SnapVault relationship from a volume on a data-serving SVM to a DP volume on a sync-source SVM.

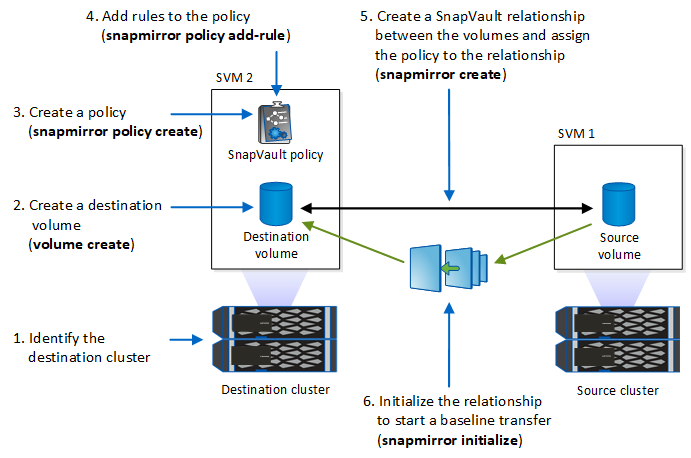
The following illustration shows the procedure for initializing a SnapVault relationship:


This illustration shows the procedure for initializing a SnapVault relationship: identifying the destination cluster, creating a destination volume, creating a policy, adding rules to the policy, creating a SnapVault relationship between the volumes and assigning the policy to the relationship, and then initializing the relationship to start a baseline transfer.
  1. Identify the destination cluster.
  2. On the destination cluster, install the SnapLock license, initialize the ComplianceClock, and create a SnapLock aggregate, as described in Configuring SnapLock.
  3. On the destination cluster, create a SnapLock destination volume of type DP that is either the same or greater in size than the source volume: volume create -vserver SVM_name -volume volume_name -aggregate aggregate_name -type DP -size size

    Note
    The SnapLock mode, Compliance or Enterprise, is inherited from the aggregate. Version-flexible destination volumes are not supported. The language setting of the destination volume must match the language setting of the source volume.

    Example

    The following command creates a 2 GB SnapLock Compliance volume named dstvolB in SVM2 on the aggregate node01_aggr :
    cluster2::> volume create -vserver SVM2 -volume dstvolB -aggregate node01_aggr -type DP -size 2GB
  4. On the destination cluster, set the default retention period, as described in Setting the default retention period.
  5. On the destination SVM, initialize the SnapVault relationship: snapmirror initialize -destination-path destination_path

    The initialization process performs a baseline transfer to the destination volume. SnapMirror makes a Snapshot copy of the source volume, then transfers the copy and all of the data blocks it references to the destination volume.

    Example

    The following command initializes the relationship between the source volume srcvolA on SVM1 and the destination volume dstvolB on SVM2 :
    SVM2::> snapmirror initialize -destination-path SVM2:dstvolB