
Replacing the DIMMs

To replace the DIMMs, locate them inside the controller and follow the specific sequence of steps.

About this task

  1. If you are not already grounded, properly ground yourself.
  2. Check the NVMEM LED on the controller module.
    You must perform a clean system shutdown before replacing system components to avoid losing unwritten data in the nonvolatile memory (NVMEM). The LED is located on the back of the controller module. Look for the following icon:

  3. If the NVMEM LED is not flashing, there is no content in the NVMEM; you can skip the following steps and proceed to the next task in this procedure.
  4. Unplug the battery:
    Attention
    The NVMEM LED blinks while destaging contents to the flash memory when you halt the system. After the destage is complete, the LED turns off.
    • If power is lost without a clean shutdown, the NVMEM LED flashes until the destage is complete, and then the LED turns off.
    • If the LED is on and power is on, unwritten data is stored on NVMEM.

      This typically occurs during an uncontrolled shutdown after Data ONTAP has successfully booted.

    1. Open the CPU air duct and locate the NVMEM battery.


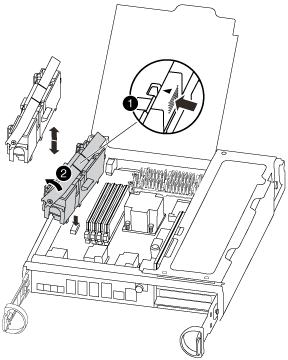
      NVMEM battery lock tab
      NVMEM battery
    2. Locate the battery plug and squeeze the clip on the face of the battery plug to release the plug from the socket, and then unplug the battery cable from the socket.
    3. Wait a few seconds, and then plug the battery back into the socket.
  5. Return to step 2 of this procedure to recheck the NVMEM LED.
  6. Locate the DIMMs on your controller.
    Note
    Each system memory DIMM has an LED located on the board next to each DIMM slot. Verify that each DIMM is operating properly using the LED states.
  7. Note the orientation of the DIMM in the socket so that you can insert the replacement DIMM in the proper orientation.
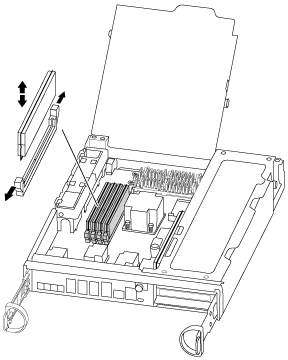
  8. Slowly push apart on the two DIMM ejector tabs, on either side of the DIMM to eject the DIMM from its slot, and then slide it out of the slot.
    Attention
    Carefully hold the DIMM by the edges to avoid pressure on the components on the DIMM circuit board.

    The following illustration shows the location of system DIMMs:


  9. Remove the replacement DIMM from the antistatic shipping bag, hold the DIMM by the corners, and align it to the slot.
    The notch among the pins on the DIMM should line up with the tab in the socket.
  10. Make sure that the DIMM latches on the connector are in the open position, and then insert the DIMM squarely into the slot.
    The DIMM fits tightly in the slot, but should go in easily. If not, realign the DIMM with the slot and reinsert it.
    Attention
    Visually inspect the DIMM to verify that it is evenly aligned and fully inserted into the slot.
  11. Push carefully, but firmly, on the top edge of the DIMM until the latches snap into place over the notches at the ends of the DIMM.
  12. Locate the NVMEM battery plug socket and squeeze the clip on the face of the battery cable plug to insert it into the socket.
    Make sure that the plug locks down onto the controller module.
  13. Close the controller module cover.