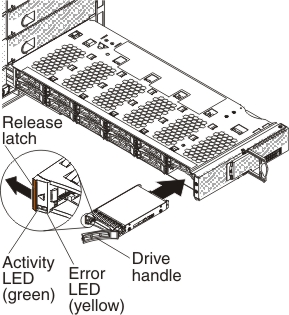
Installing a hot-swap drive
The storage expansion node supports up to 12 hot-swap SAS or SATA 2.5-inch hard disk drives or solid-state drives.
Before you install a hot-swap drive in the storage expansion node, complete the following steps:
- Read Safety and Installation guidelines.
- See the illustration in Drive drawer for the locations of the drive bays.
Attention
To ensure proper cooling and protect system data integrity, do not operate the storage expansion node for an extended period of time with the drawer open. Keep the drive drawer closed when you are not installing or removing drives.
To install a hot-swap drive, complete the following steps.

- Open the drive drawer as far as necessary to access the drive bay that you want to use.
- Touch the static-protective package that contains the drive to any unpainted metal surface on the Flex System Enterprise Chassis or any unpainted metal surface on any other grounded rack component; then, remove the drive from the package.
- Press the orange release latch on the drive to release the drive handle.
- Slide the drive into the bay until it is firmly seated in the connector.
- Lock the drive in place by closing the drive handle.
- Close the drive drawer.
- Check the drive status LED on the control panel on the front of the storage expansion node to make sure that the drive is operating correctly (see Control panel for the location of the drive status LED).
Give documentation feedback