Installing a Cisco Nexus 3232C cluster switch in a rack
You can install the Cisco® Nexus 3232C switch in a rack with the standard brackets that are included with the switch.
You must have reviewed the initial preparation requirements, kit contents, and safety precautions.
- For each switch, you must supply the eight 10-32 or 12-24 screws and clip nuts to mount the brackets and slider rails to the front and rear rack posts.
- You must use the Cisco standard rail kit to install the switch in a rack.
Note
The jumper cords should be included with your switches. If they were not shipped with the switches, you can order them from Lenovo (part number X1558A-R6).
- Install the rack-mount brackets on the Nexus 3232C switch chassis.
- Position a front rack-mount bracket on one side of the switch chassis so that the mounting ear is aligned with the chassis faceplate (on the PSU or fan side), and then use four M4 screws to attach the bracket to the chassis.
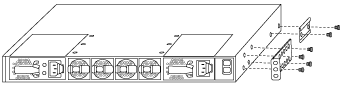
- Position a front rack-mount bracket on one side of the switch chassis so that the mounting ear is aligned with the chassis faceplate (on the PSU or fan side), and then use four M4 screws to attach the bracket to the chassis.
- Install the clip nuts in the square hole locations for all four IEA posts.
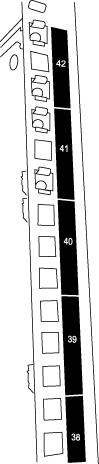 The two 3232C switches will always be mounted in the top 2U of the rack RU41 and 42.
 - Install the slider rails in the rack.
- Position the first slider rail at the RU42 mark on the back side of the rear left post, insert screws with the matching thread type, and then tighten the screws with your fingers.
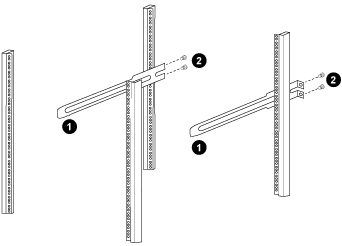
1. As you gently slide the slider rail, align it to the screw holes in the rack.
2. Tighten the screws of the slider rails to the rack posts.
- Position the first slider rail at the RU42 mark on the back side of the rear left post, insert screws with the matching thread type, and then tighten the screws with your fingers.
- Install the switch in the rack.AttentionThis step requires two people: one person to support the switch from the front and another to guide the switch into the rear slider rails.
- Position the back of the switch at RU41.

1. As the chassis is pushed toward the rear posts, align the two rear rack-mount guides with the slider rails.
2. Gently slide the switch until the front rack-mount brackets are flush with the front posts.
- Attach the switch to the rack.
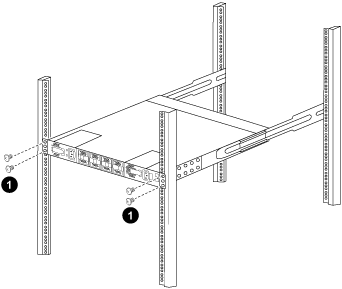
With one person holding the front of the chassis level, the other person should fully tighten the four rear screws to the rack posts.
- Position the back of the switch at RU41.
Give documentation feedback