Configuring LDAP
If you want the storage virtual machine (SVM) to get user information from Active Directory-based Lightweight Directory Access Protocol (LDAP), you must create an LDAP client, enable it for the SVM, and give LDAP priority over other sources of user information.
Before you begin
The LDAP configuration must be using Active Directory (AD).
If you use another type of LDAP, you must use the command-line interface (CLI) and other documentation to configure LDAP.
You must know the AD domain and servers, as well as the following binding information: the authentication level, the Bind user and password, the base DN, and the LDAP port.
- Set up an LDAP client for the SVM to use:
- Add either the AD domain or the AD servers.

- Click Binding, and specify the authentication level, the Bind user and password, the base DN, and the port.
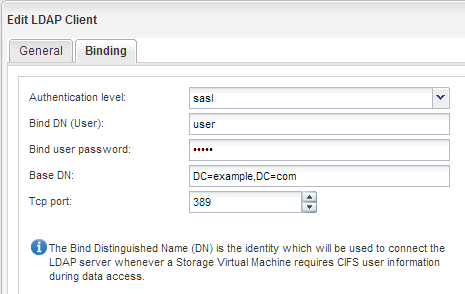
A new client is created and available for the SVM to use. - Add either the AD domain or the AD servers.
- Enable the new LDAP client for the SVM:
- Select Enable LDAP client, and click OK.
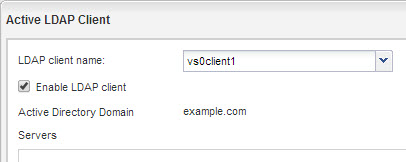
The SVM uses the new LDAP client. - Select Enable LDAP client, and click OK.
- Give LDAP priority over other sources of user information, such as Network Information Service (NIS) and local users and groups:
- Navigate to the SVMs window.
- Select the SVM and click Edit.
- Click the Services tab.
- Under Name Service Switch, specify LDAP as the preferred name service switch source for the database types.
- Click Save and Close.
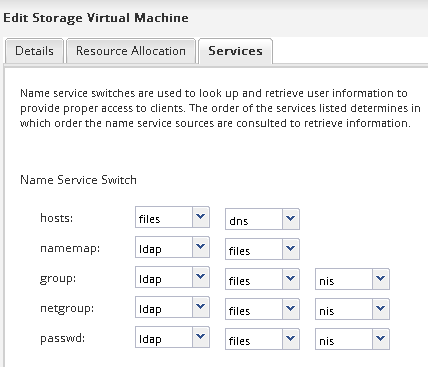 LDAP is the primary source of user information for name services and name mapping on this SVM.
Give documentation feedback