
Place controller online

You bring the controller online to confirm the storage array is working correctly. Then, you can collect support data and resume operations.

Perform this task only if your storage array has two controllers.

  1. As the controller boots, check the controller LEDs and the seven-segment display.
    Note
    The figure shows an example controller canister. Your controller might have a different number and a different type of host ports.
    When communication with the other controller is reestablished:
    • The seven-segment display shows the repeating sequence OS, OL, blank to indicate that the controller is offline.
    • The amber Attention LED remains lit.
    • The Host Link LEDs might be on, blinking, or off, depending on the host interface.
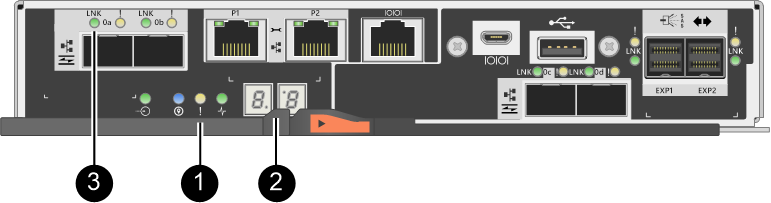
    Attention LED (amber) Seven-segment display
    Host Link LEDs 
  2. Bring the controller online using ThinkSystem System Manager or the SMcli tool.
      1. Select Hardware.
      2. If the graphic shows the drives, select Show back of shelf.
      3. Select the controller you want to place online.
      4. Select Place Online from the context menu, and confirm that you want to perform the operation.

      The system places the controller online.

      1. Open a system terminal and change current directory to the same directory of SMcli executable.
      2. Execute one of the following SMCli commands:
        For controller A: set controller [a] availability=online;

        For controller B: set controller [b] availability=online;

        Note
        For more information, see Command Line Interface (CLI) Reference.
  3. Check the codes on the controller's seven-segment display as it comes back online. If the display shows one of the following repeating sequences, immediately remove the controller.
    • OE, L0, blank (mismatched controllers)
    • OE, L6, blank (unsupported HIC)
    Attention
    Possible loss of data access – If the controller you just installed shows one of these codes, and the other controller is reset for any reason, the second controller could also lock down.
  4. When the controller is back online, confirm that its status is Optimal, and check the controller shelf’s Attention LEDs.

    If the status is not Optimal or if any of the Attention LEDs are on, confirm that all cables are correctly seated, and check that the HIC and the controller canister are installed correctly. If necessary, remove and reinstall the controller canister and the HIC.

    Note
    If you cannot resolve the problem, contact technical support.
  5. Collect support data for your storage array using ThinkSystem System Manager.
    1. Select Support > Support Center > Diagnostics.
    2. Select Collect Support Data.
    3. Click Collect.

    The file is saved in the Downloads folder for your browser with the name support-data.7z.

  6. If you are instructed to return the failed part, follow all packaging instructions and use any packaging materials that are provided.
Before you resume normal operations, ensure that you have completed the following steps:
  • For iSCSI HIC adding or replacement:
    1. Ensure that the iSCSI SFPs or dual-protocol SFPs are installed.

    2. Attach cables to the SFPs, and confirm they are connected to the correct iSCSI switch or host.

    3. Power on the hosts.

    4. Configure the ISCSI hosts.

    5. Edit the host partition to update the iSCSI host port IDs.

    6. After the new iSCSI hosts reboot, use the applicable procedures on the hosts to register the volumes and to make them available to your operating system.

  • For FC HIC adding or replacement.
    1. Ensure that the FC SFPs or dual-protocol SFPs are installed.

    2. Attach cables to the SFPs, and confirm they are connected to the correct FC switch or host.

    3. Power on the hosts.

    4. Configure the FC hosts.

    5. Edit the host partition to update the FC host port IDs.

    6. After the new FC hosts reboot, use the applicable procedures on the hosts to register the volumes and to make them available to your operating system. Depending on your operating system, two utilities are included with the storage management software (hot_add and SMdevices). These utilities help register the volumes with the hosts and also show the applicable device names for the volumes.

    7. You might need to use specific tools and options that are provided with your operating system to make the volumes available (that is, assign drive letters, create mount points, and so on). Refer to your host operating system documentation for details.