Complete adding a host interface card
You complete the process of adding a host interface card (HIC) by checking the controller LEDs and seven-segment display, and then confirming that the controller's status is Optimal.
Before you begin
- You have installed any new host hardware needed for the new host ports, such as switches or host bus adapters (HBAs).
- You have all cables, transceivers, switches, and host bus adapters (HBAs) needed to connect the new host ports.
For information about compatible hardware, refer to the DE Series Product Support Site or the the Lenovo ServerProven website.
You have installed ThinkSystem Storage Manager on a management station, so you can use the storage array's command line interface (CLI). If this software has not yet been installed, follow the instructions in the Windows express configuration, VMware express configuration, or Linux express configuration to download and install it.
- As the controller boots, check the controller LEDs and seven-segment display.
- The seven-segment display shows the repeating sequence OS, Sd, blank to indicate that the controller is performing Start-of-day (SOD) processing. After a controller has successfully booted up, its seven-segment display should show the tray ID.
- The amber Attention LED on the controller turns on and then turns off, unless there is an error.
- The green Host Link LEDs remain off until you connect the host cables.
NoteThe figure shows an example controller canister. Your controller might have a different number and a different type of host ports.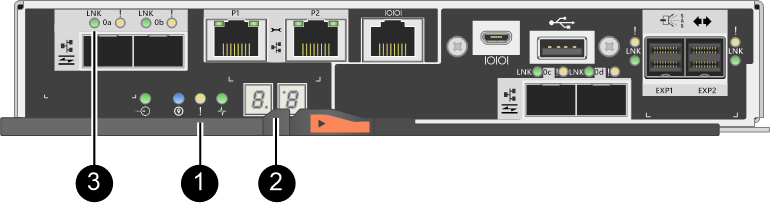
 Attention LED (amber)
 Seven-segment display
 Host Link LEDs
- For iSCSI HIC adding or replacement:
Ensure that the iSCSI SFPs or dual-protocol SFPs are installed.
Attach cables to the SFPs, and confirm they are connected to the correct iSCSI switch or host.
Power on the hosts.
Configure the ISCSI hosts.
Edit the host partition to update the iSCSI host port IDs.
After the new iSCSI hosts reboot, use the applicable procedures on the hosts to register the volumes and to make them available to your operating system.
- For FC HIC adding or replacement.
Ensure that the FC SFPs or dual-protocol SFPs are installed.
Attach cables to the SFPs, and confirm they are connected to the correct FC switch or host.
Power on the hosts.
Configure the FC hosts.
Edit the host partition to update the FC host port IDs.
After the new FC hosts reboot, use the applicable procedures on the hosts to register the volumes and to make them available to your operating system. Depending on your operating system, two utilities are included with the storage management software (hot_add and SMdevices). These utilities help register the volumes with the hosts and also show the applicable device names for the volumes.
You might need to use specific tools and options that are provided with your operating system to make the volumes available (that is, assign drive letters, create mount points, and so on). Refer to your host operating system documentation for details.