Installing a memory module
Use these instructions to install memory modules in the blade server.
The following notes describe the types of direct inline memory modules (DIMMs) that the blade server supports and other information that you must consider when you install DIMMs:
Note
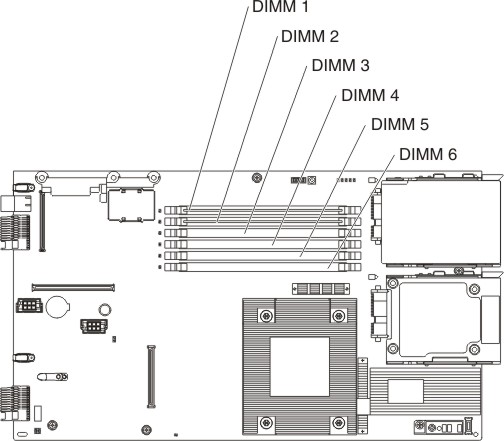
- The following illustration shows the location of the DIMM connectors on the system board.
- The illustrations in this document might differ slightly from your hardware.
- The system board has DIMM connectors.
- The server supports two-way memory interleaving.
- The optional DIMMs that are available for the blade server are 512 MB, 1 GB, 2 GB, and 4 GB. Depending on the memory configuration that is set in the Configuration/Setup Utility program, the blade server can support a minimum of 1 GB and a maximum of 24 GB of system memory on the system board.
- When you install memory, you must install a pair of matched DIMMs. Some blade server models come with one DIMM installed in DIMM slot 1. In this case, you must order and install a second matched DIMM in DIMM slot 2. Install the DIMMs in the order shown in the following table.
Table 1. DIMM configuration Pair DIMM pairs and location First DIMM 1 and DIMM 2 Second DIMM 3 and DIMM 4 Third DIMM 5 and DIMM 6 Table 2. DIMM Population Rule Configuration DIMM 5 and DIMM 6 DIMM 3 and DIMM 4 DIMM 1 and DIMM 2 1 X X Single rank 2 X Single rank Single rank 3 Single rank Single rank Single rank 4 X X Dual rank 5 X Dual rank Dual rank 6 Dual rank Dual rank Dual rank 7 X Dual rank Single rank 8 X Single rank Dual rank 9 Dual rank Single rank Single rank 10 Dual rank Dual rank Single rank - All DIMMs in a pair or group must be the same size, speed, type, technology, and physical design. You can use compatible DIMMs from different manufacturers.
- Install only ECC DDR2 667 DRAM with ECC DIMMs. For a current list of supported DIMMs for the blade server, see http://www.ibm.com/servers/eserver/serverproven/compat/us/.
- Installing or removing DIMMs changes the configuration information of the blade server. After you install or remove a DIMM, you must change and save the new configuration information by using the Configuration/Setup Utility program. When you restart the blade server, a message indicates that the memory configuration has changed. Start the Configuration/Setup Utility program and select Save Settings (see Configuration/Setup Utility menu for more information) to save changes.
To install a DIMM, complete the following steps:
- Locate the DIMM connectors. Determine the connector into which you will install the DIMM.
- To install the DIMMs, repeat the following steps for each DIMM that you install:

If you have other devices to install or remove, do so now; otherwise, go to Completing the installation.
Give documentation feedback