Controller-to-stack cabling worksheet template for quad-pathed connectivity
By completing the worksheet template, you can define the controller SAS port pairs you can use to cable controllers to stacks of disk shelves with IOM12 modules to achieve quad-pathed connectivity in an HA pair configuration. You can also use the completed worksheet to walk yourself through cabling the quad-pathed connections for your configuration.
About this task
- This procedure and worksheet template is applicable to cabling quad-pathed connectivity for a quad-path HA or quad-path configuration with one or more stacks.
Examples of completed worksheets are provided for quad-path HA and quad-path configurations.
A configuration with two quad-port SAS HBAs and two stacks of disk shelves with IOM12 modules is used for the worksheet examples.
- The worksheet template allows for up to two stacks; you need to add more columns if needed.
- Quad-pathed connectivity for controller-to-stack connections consists of two sets of multipathed cabling: the first set of cabling is referred to as
multipathed
; the second set of cabling is referred to asquad-pathed
.The second set of cabling is referred to as
quad-pathed
because completing this set of cabling gives you the quad-pathed connectivity from a controller to a stack in an HA pair configuration. - Disk shelf IOM ports 1 and 3 are always used for multipathed cabling and IOM ports 2 and 4 are always used for quad-pathed cabling, as designated by the worksheet column headings.
- In the worksheet examples, port pairs are designated for multipathed cabling or quad-pathed cabling to the applicable stack.
Each port pair designated for multipathed cabling is encircled by an oval that is the color associated with the stack it is cabled to. Each port pair designated for quad-pathed cabling is encircled by a rectangle that is the color associated with the stack it is cabled to. Stack 1 is associated with the color blue; stack 2 is associated with the color orange.
- If needed, you can refer to the
SAS cabling rules
section for information about the controller slot numbering convention, shelf-to-shelf connectivity, and controller-to-shelf connectivity (including the use of port pairs). - If needed, after you complete the worksheet, you can refer to the
How to read a worksheet to cable controller-to-stack connections for quad-pathed connectivity
section.

- Identify the two sets of port pairs to connect to stack 1 by drawing an oval around the first set of port pairs and a rectangle around the second set of port pairs.Both sets of cabling are needed to achieve quad-pathed connectivity from each controller to stack 1 in your HA pair configuration.The following example uses port pair 1a/2b for the multipathed cabling and port pair 2a/1d for the quad-pathed cabling to stack 1.
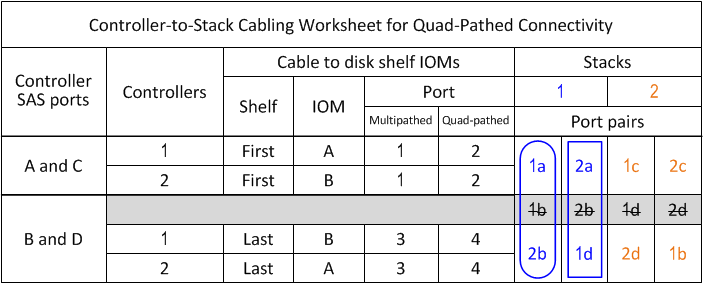
- Identify the two sets of port pairs to connect to stack 2 by drawing an oval around the first set of port pairs and a rectangle around the second set of port pairs.Both sets of cabling are needed to achieve quad-pathed connectivity from each controller to stack 1 in your HA pair configuration.The following example uses port pair 1c/2d for the multipathed cabling and port pair 2c/1b for the quad-pathed cabling to stack 2.
