Hot-swapping an internal disk drive

When a disk drive fails, the storage system logs a warning message to the system console indicating which disk drive failed, the fault LED on the operator display panel illuminates, and the fault LED on the failed disk drive illuminates. You can hot-swap a disk drive while the system remains powered on.

About this task

How you hot-swap the disk depends how the disk drive is being used. By using the correct procedure, you can prevent unwanted AutoSupport notifications from being generated. Depending on your context, disk drives with Storage Encryption might require additional steps before and after the hot-swap. See the applicable Data ONTAP storage management guide for information about the commands that apply to your context.

See the Lenovo Press for information about supported disk drives.

When replacing several disk drives, you must wait one minute between the removal of each failed disk drive and the insertion of the replacement disk drive to allow the storage system to recognize the existence of each new disk.
Note
Always use two hands when removing, installing, or carrying a disk drive.
  1. Properly ground yourself.
  2. Gently remove the bezel from the front of the system.
  3. Physically identify the failed disk drive from the system console warning message and the illuminated fault LED on the disk drive.
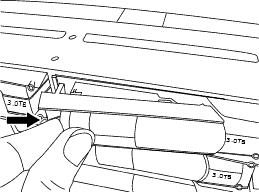
  4. Press the release button on the disk drive face.
    Depending on the storage system, the disk drives have the release button located at the top or on the left of the disk drive face.

    For example, the following illustration shows a disk drive with the release button located on the left of the disk drive face.

    The cam handle on the disk drive springs open partially and the disk drive releases from the midplane.
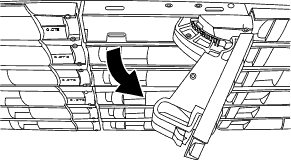
  5. Pull the cam handle to its fully open position to unseat the disk drive from the midplane and gently slide the disk drive out of the disk shelf.
    For example, the following illustration shows a disk drive with the cam handle in its fully open position.


    Note
    Use two hands when removing the disk drives but do not place hands on the disk drive boards exposed on the underside of the disk carrier.
  6. With the cam handle in the open position, insert the replacement disk drive into the disk shelf slot, firmly pushing until the disk drive stops.
    Note
    Use two hands when inserting the disk drive.
    Note
    Wait one minute between removal of the failed disk drive and insertion of the replacement disk drive. This allows the system to recognize that a disk drive was removed.
  7. Close the cam handle so that the disk drive is fully seated into the midplane and the handle clicks into place.
    Be sure to close the cam handle slowly so that it aligns correctly with the face of the disk drive.
  8. If you are replacing another disk drive, repeat Steps 1 through 7.
  9. Reinstall the bezel.
  10. Return the failed part to Lenovo, as described in the RMA instructions shipped with the kit.
    Contact technical support at Lenovo Data Center Support if you need the RMA number or additional help with the replacement procedure.