Adding CIFS and NFS access to an existing SVM
Adding both CIFS/SMB and NFS access to an existing SVM involves creating a data LIF, configuring a CIFS server, enabling NFS, and optionally configuring NIS.
Before you begin
You must know which of the following networking components the SVM will use:
The node and the specific port on that node where the data logical interface (LIF) will be created
The subnet from which the data LIF's IP address will be provisioned, or optionally the specific IP address you want to assign to the data LIF
The Active Directory (AD) domain that this SVM will join, along with the credentials required to add the SVM to it
NIS information if your site uses NIS for name services or name mapping
Any external firewalls must be appropriately configured to allow access to network services.
The time on the AD domain controllers, clients, and SVM must be synchronized within five minutes of each other.
The CIFS and NFS protocols must be allowed on the SVM. This is the case if you created the SVM while following another Express Guide to configure a SAN protocol.
About this task
The order in which you configure CIFS and NFS affects the dialog boxes that are displayed. In this procedure, you must configure CIFS first and NFS second.
- Navigate to the area where you can configure the protocols of the SVM:
- In the Details pane, next to Protocols, click CIFS.

- In the Details pane, next to Protocols, click CIFS.
- In the Data LIF Configuration section of the Configure CIFS protocol dialog box, create a data LIF for the SVM:
- Click Browse and select a node and port that will be associated with the LIF.
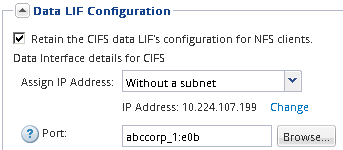
- Click Browse and select a node and port that will be associated with the LIF.
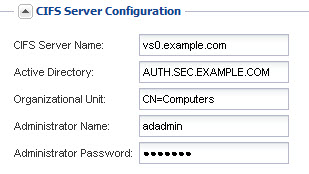
- In the CIFS Server Configuration section, define the CIFS server and configure it to access the AD domain:
- Specify a name for the CIFS server that is unique in the AD domain.
- Specify the FQDN of the AD domain that the CIFS server can join.
- If you want to associate an organizational unit (OU) within the AD domain other than CN=Computers, enter the OU.
- Specify the name and password of an administrative account that has sufficient privileges to add the CIFS server to the OU.
- If you want to avoid unauthorized access to all the shares on this , select the option to encrypt data using SMB 3.0.
- Create a volume for CIFS/SMB access and provision a share on it:
- Specify a size for the volume.
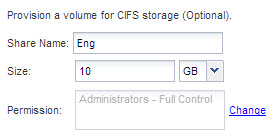
You do not have to specify the aggregate for the volume because it is automatically located on the aggregate with the most available space. - Specify a size for the volume.
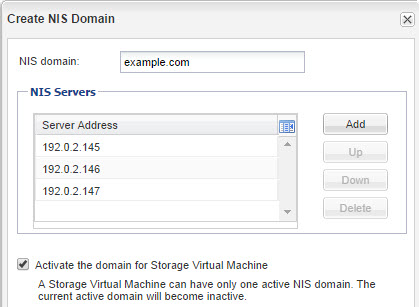
- If your site uses NIS for name services or name mapping, configure NIS:
- In the Services window, click NIS.
- In the NIS window, click Create.
- Specify the domain of the NIS servers.
- Add the IP addresses of the NIS servers.
- Select Activate the domain for Storage Virtual Machine, and then click Create.
After you finish
You must now open the export policy of the SVM root volume.