In-band manual recovery method
This section details the in-band manual recovery method.
To recover the server firmware and restore the server operation to the primary bank, complete the following steps:
- Read the safety information that begins on Safety and Installation guidelines.
- Turn off the server, and disconnect all power cords and external cables.
- Remove the cover (see Removing the cover).
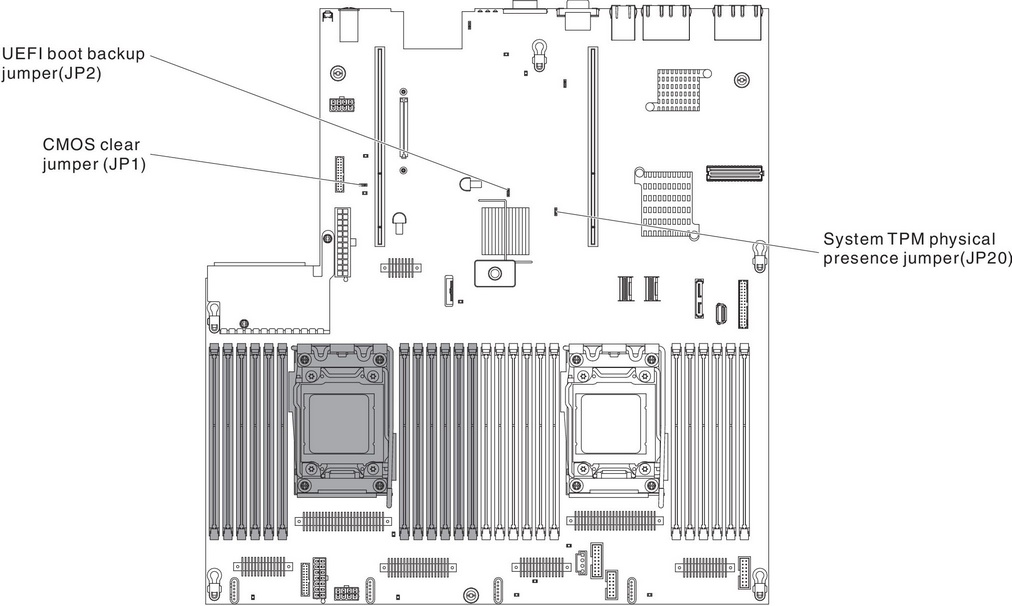
- Locate the UEFI boot backup jumper (JP2) on the system board. Figure 1. UEFI boot backup jumper (JP2) location

- Move the UEFI boot backup jumper (JP2) from pins 1 and 2 to pins 2 and 3 to enable the UEFI recovery mode.
- Reinstall the server cover; then, reconnect all power cords.
- Restart the server. The system begins the power-on self-test (POST).
- Boot the server to an operating system that is supported by the firmware update package that you downloaded.
- Perform the firmware update by following the instructions that are in the firmware update package readme file.
- Turn off the server and disconnect all power cords and external cables, and then remove the cover (see Removing the cover).
- Move the UEFI boot backup jumper (JP2) from pins 2 and 3 back to the primary position (pins 1 and 2).
- Reinstall the cover (see Replacing the cover).
- Reconnect the power cord and any cables that you removed.
- Restart the server. The system begins the power-on self-test (POST). If this does not recover the primary bank, continue with the following steps.
- Remove the cover (see Removing the cover).
- Reset the CMOS by removing the system battery (see Removing the system battery).
- Leave the system battery out of the server for approximately 5 to 15 minutes.
- Reinstall the system battery (see Replacing the system battery).
- Reinstall the cover (see Replacing the cover).
- Reconnect the power cord and any cables that you removed.
- Restart the server. The system begins the power-on self-test (POST).
- If these recovery efforts fail, contact your service representative for support.
Give documentation feedback