Removing the hard disk drive backplane
Use this information to remove the hard disk drive backplane.
Note
This procedure should be performed only by trained service technicians.
- Read Safety and Installation guidelines.
- If the compute node is installed in a Flex System chassis, remove it (see Removing a compute node from a chassis for instructions).
- Carefully lay the compute node on a flat, static-protective surface, orienting the compute node with the bezel pointing toward you.
To remove the hard disk drive backplane, complete the following steps.
- Remove the cover (see Removing the compute node cover).
- For the hard disk drive backplane that you have to replace, disconnect the applicable hard disk drive by pressing the release latch (orange) on the hard disk drive to release the drive handle; then, use the drive handle to slide the hard disk drive approximately 12 mm (0.5 in.) out of the bay. See Removing a hot-swap hard disk drive).
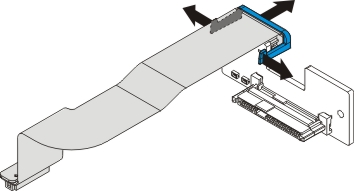
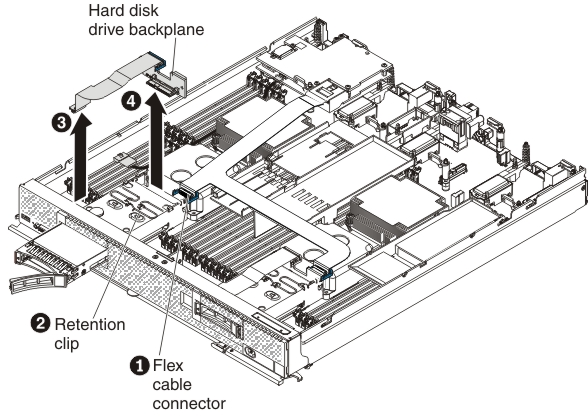
- To disconnect the cable from the hard disk drive backplane that you removed, pull the connector clip away from the cable to unhook the clip from the backplane as you push the cable connector toward the rear of the compute node 1.


- Push the retention clip on the hard disk drive cage toward the rear of the compute node to release it from under the tab; then, slide the retention clip toward the front of the compute node to release the hard disk drive backplane 2.
- Disconnect the hard disk drive backplane cable from the system board 3.
- Lift out the hard disk drive backplane and cable. It might be necessary to pull the backplane toward the front of the compute node before you lift it out of the compute node 4.
If you are instructed to return the hard disk drive backplane, follow all packaging instructions, and use any packaging materials for shipping that are supplied to you.
Give documentation feedback