Installing an I/O expansion adapter

Use these instructions to install an I/O expansion adapter in the PCIe Expansion Node.

Before installing an I/O expansion adapter in the PCIe Expansion Node, read Safety and Installation guidelines.
Statement 21
Graphic illustrating Safety Statement 21
CAUTION
Hazardous energy is present when the blade is connected to the power source. Always replace the blade cover before installing the blade.

To install an I/O expansion adapter in the PCIe Expansion Node, complete the following steps:

  1. Locate the system board I/O expansion adapter connectors (see System board connectors).
  2. Remove the plastic cover from the I/O expansion connector, if one is present.
  3. Touch the static-protective package that contains the I/O expansion adapter to any unpainted metal surface on the Flex System Enterprise Chassis or any unpainted metal surface on any other grounded rack component; then, remove the adapter from the package.
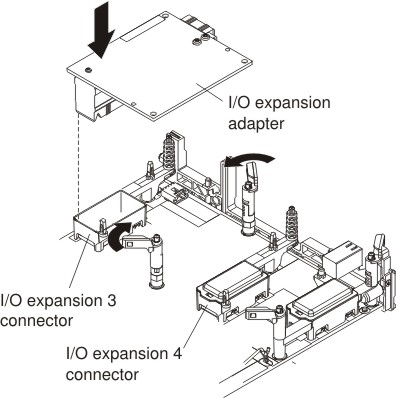
  4. Open the retention clips.

    Graphic illustrating installing an I/O expansion adapter
  5. Orient the plug on the I/O expansion adapter to the I/O expansion 3 or I/O expansion 4 connector on the system board; then, press the I/O expansion adapter into the connector.
  6. Firmly press on the I/O expansion adapter to seat the adapter in the connector.
  7. Close the retention clips.
After installing the I/O expansion adapter, complete the following steps:
  1. Install the cover. See Installing the cover for instructions.
  2. Install the PCIe Expansion Node into the chassis. See Installing the PCIe Expansion Node with compute node host for instructions.