Zum Hauptinhalt springen

Installing the rail kit

Follow the instructions in this section to install or remove the rail kits and servers.

This cabinet supports the following servers and corresponding rail kits. Follow the instructions to install them into the cabinet.

Install the rail kit and SE350 E2 Enclosure (2U2N)

About this task

See the following table to identify the components that come with the rail kit.
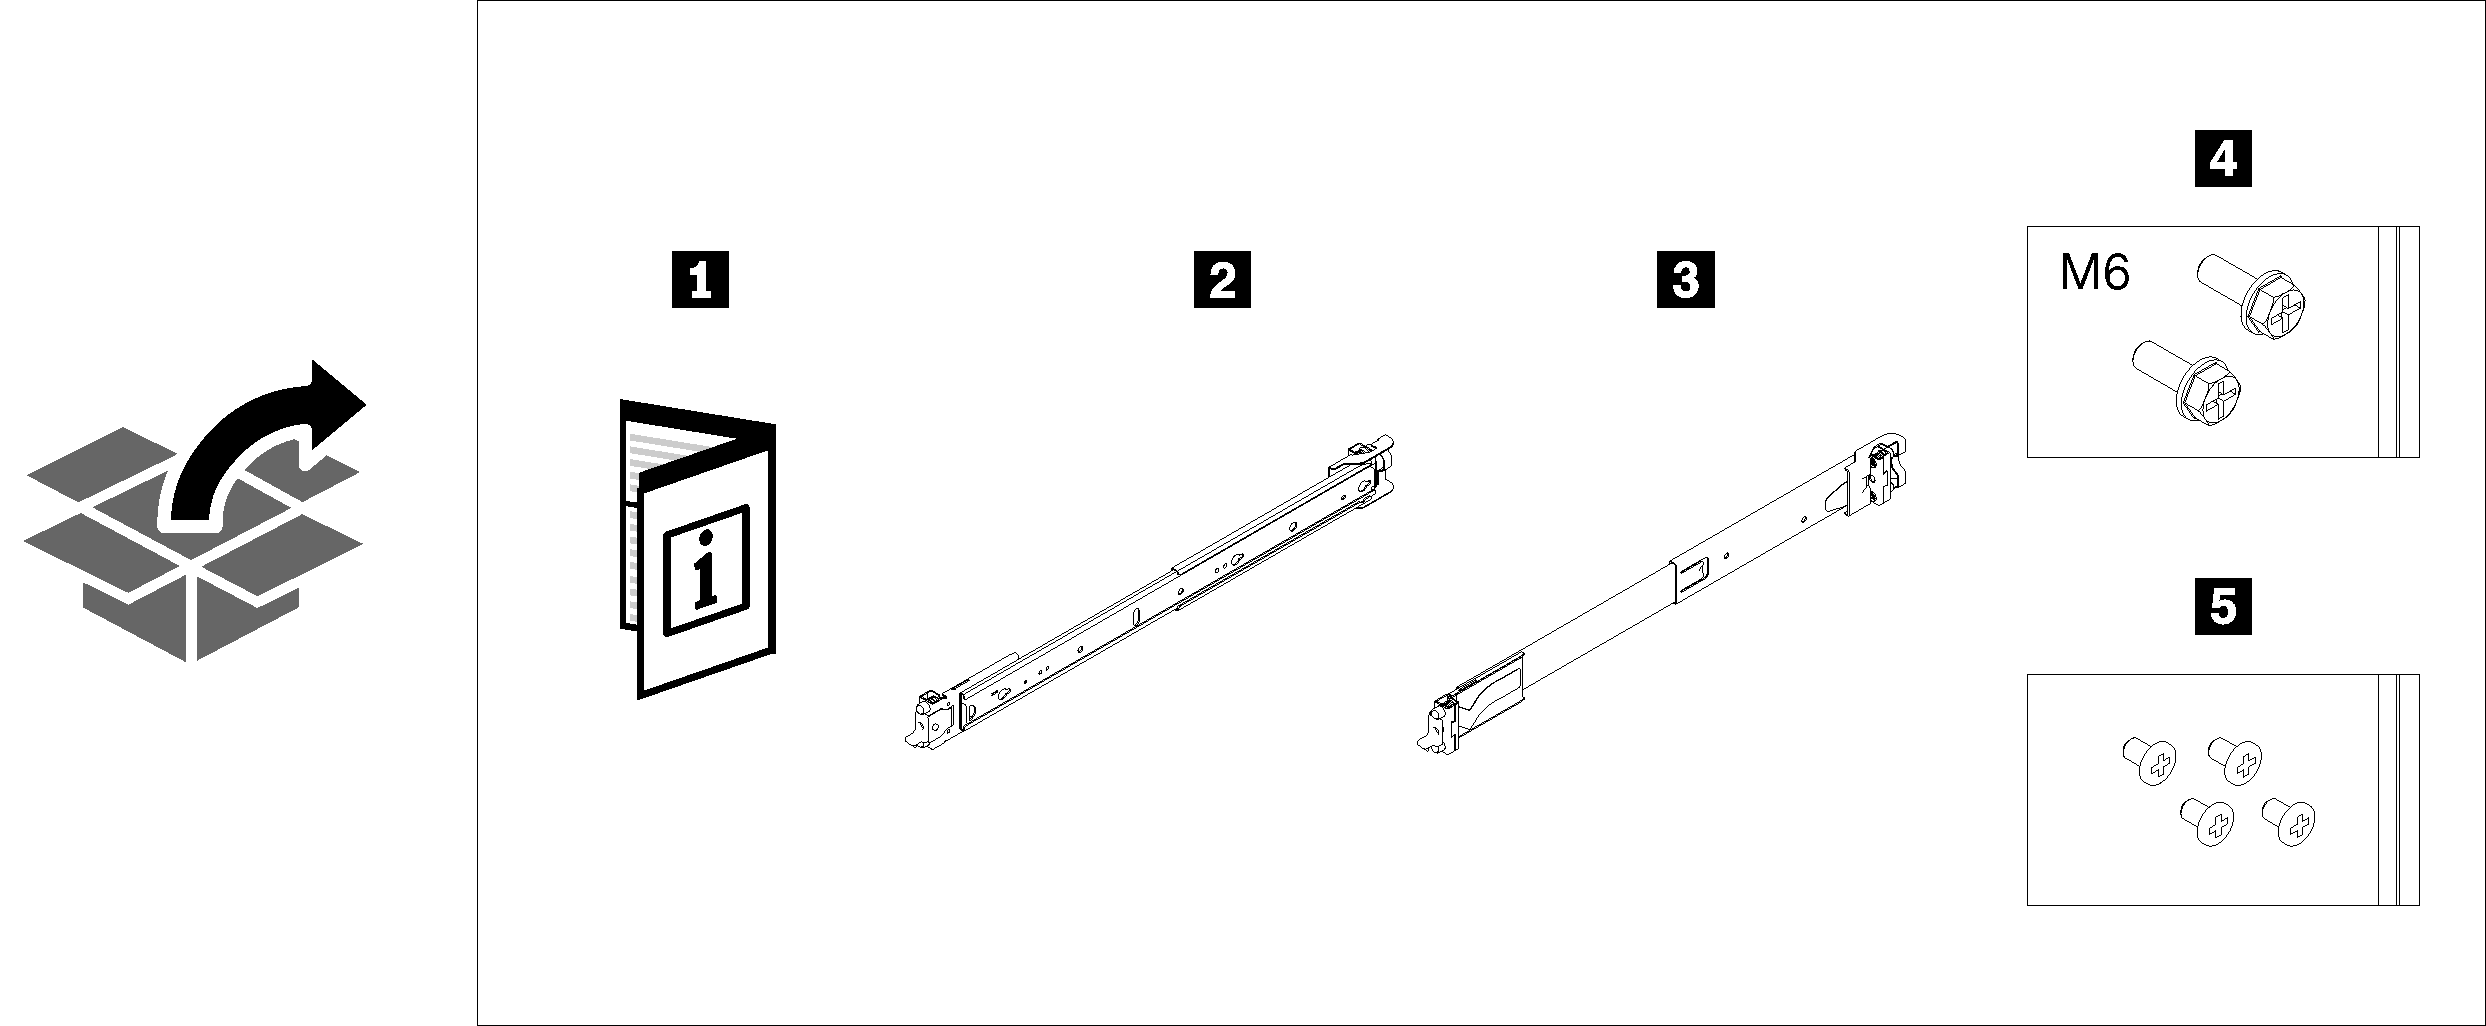
1 Document4 Two M6 screws
2 Left rail5 Four black M3.5 x 5 mm flat head screws with pre-applied threadlocking adhesive
3 Right rail 
The cabinet supports up to three units of SE350 E2 Enclosure and corresponding rail kit. For optimal use of space, it is advised to determine the location to install the rail kits based on the number of units that are installed.
  • One unit: 3-4U

  • Two units: 2-3U and 4-5U

  • Three units: 1-2U, 3-4U, and 5-6U

Note
When installed vertically into this cabinet, the server can be installed with server top facing either right or left. In this section, however, it is illustrated with the top of server facing right as an example.

Procedure

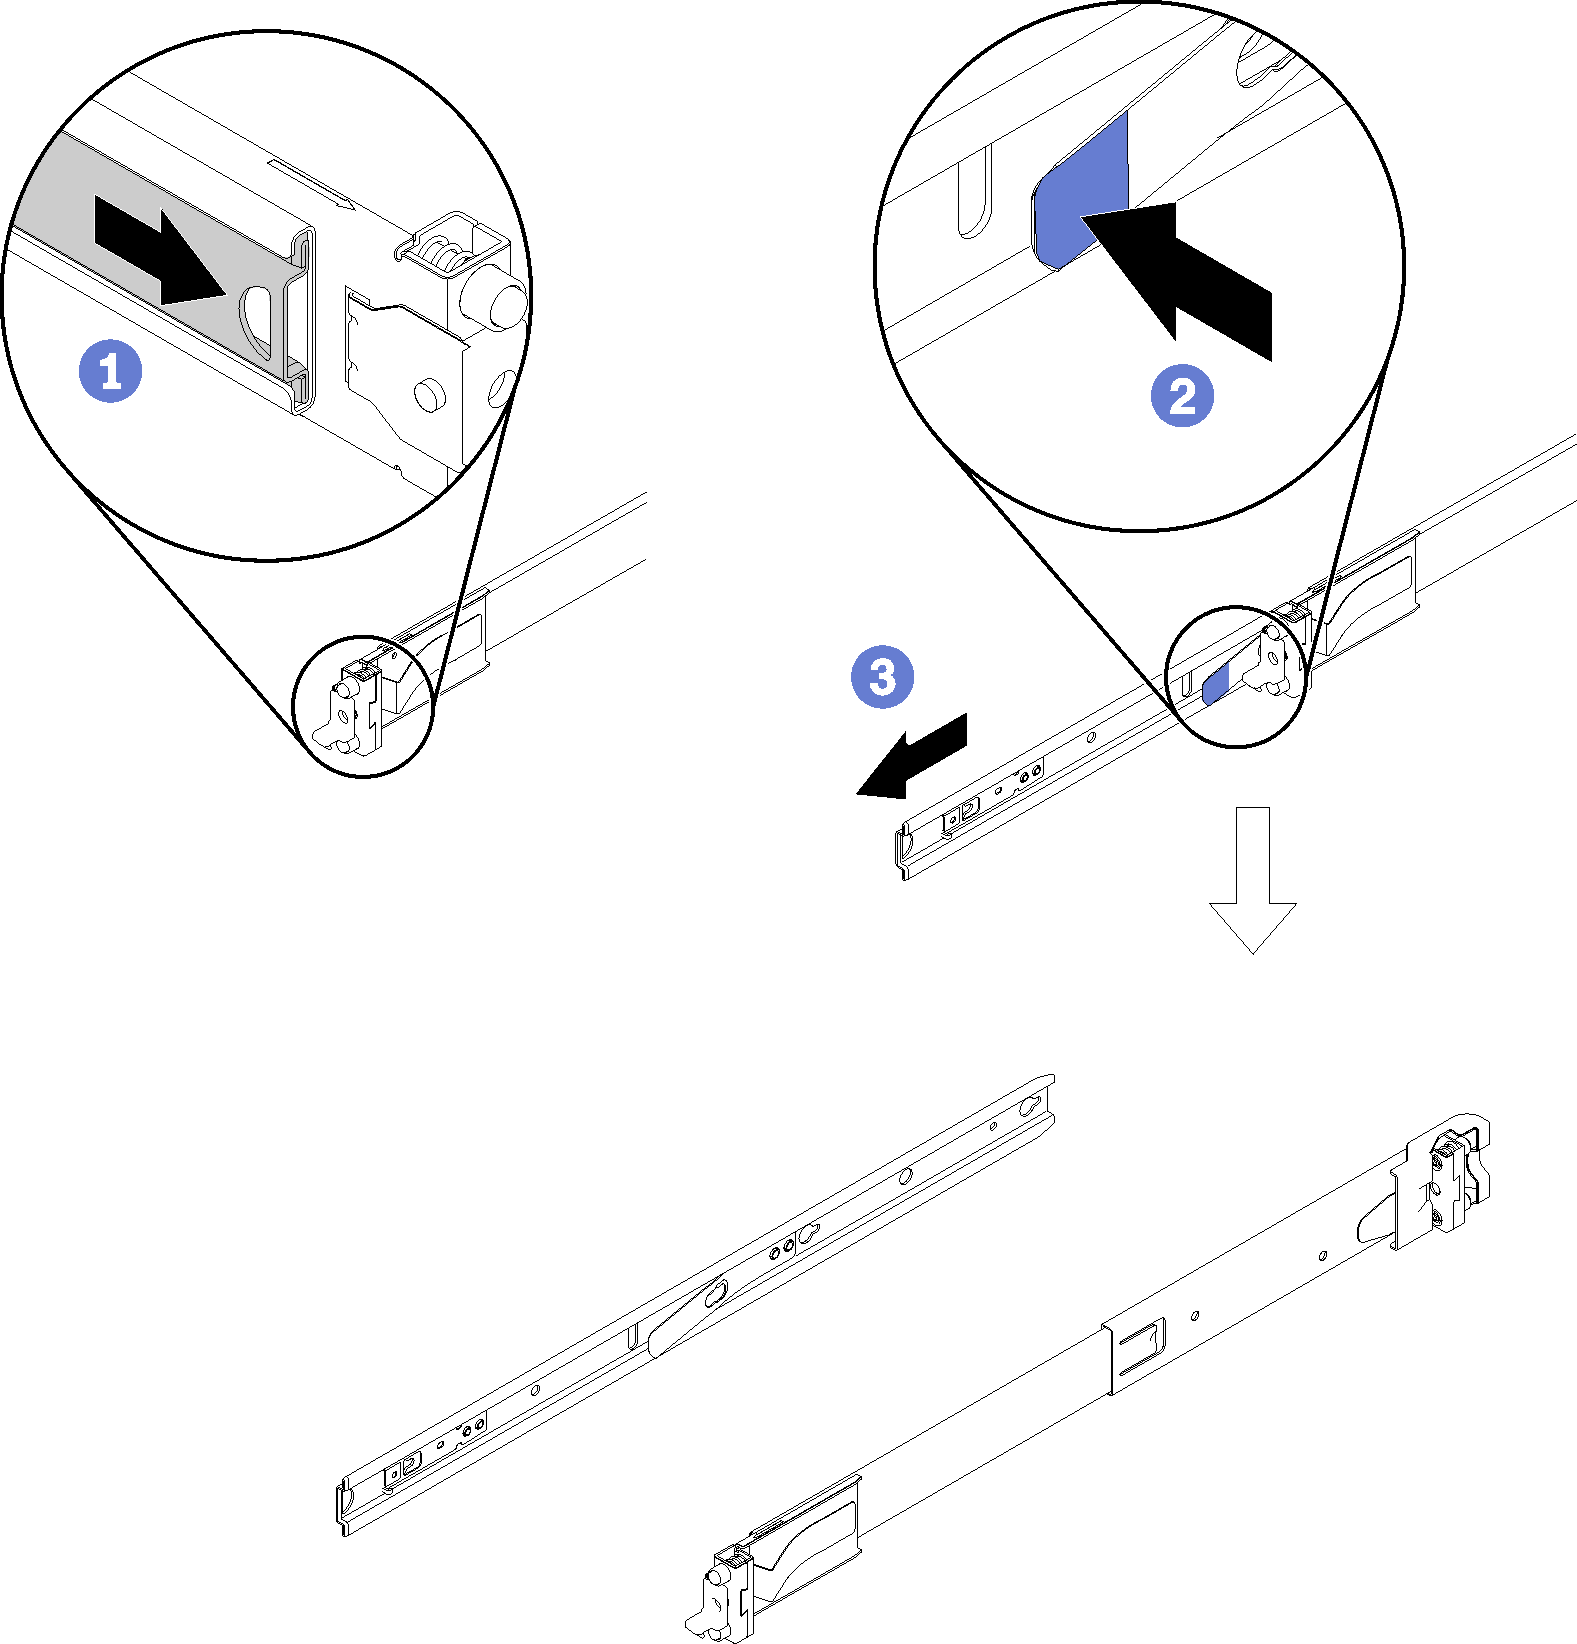
  1. Remove the inner rails.
    Figure 1. Removing the inner rails

    • ① Pull the inner rail outward until the release latch becomes visible.
    • ② Press on the release latch.
    • ③ Remove the inner rail from the outer rail.
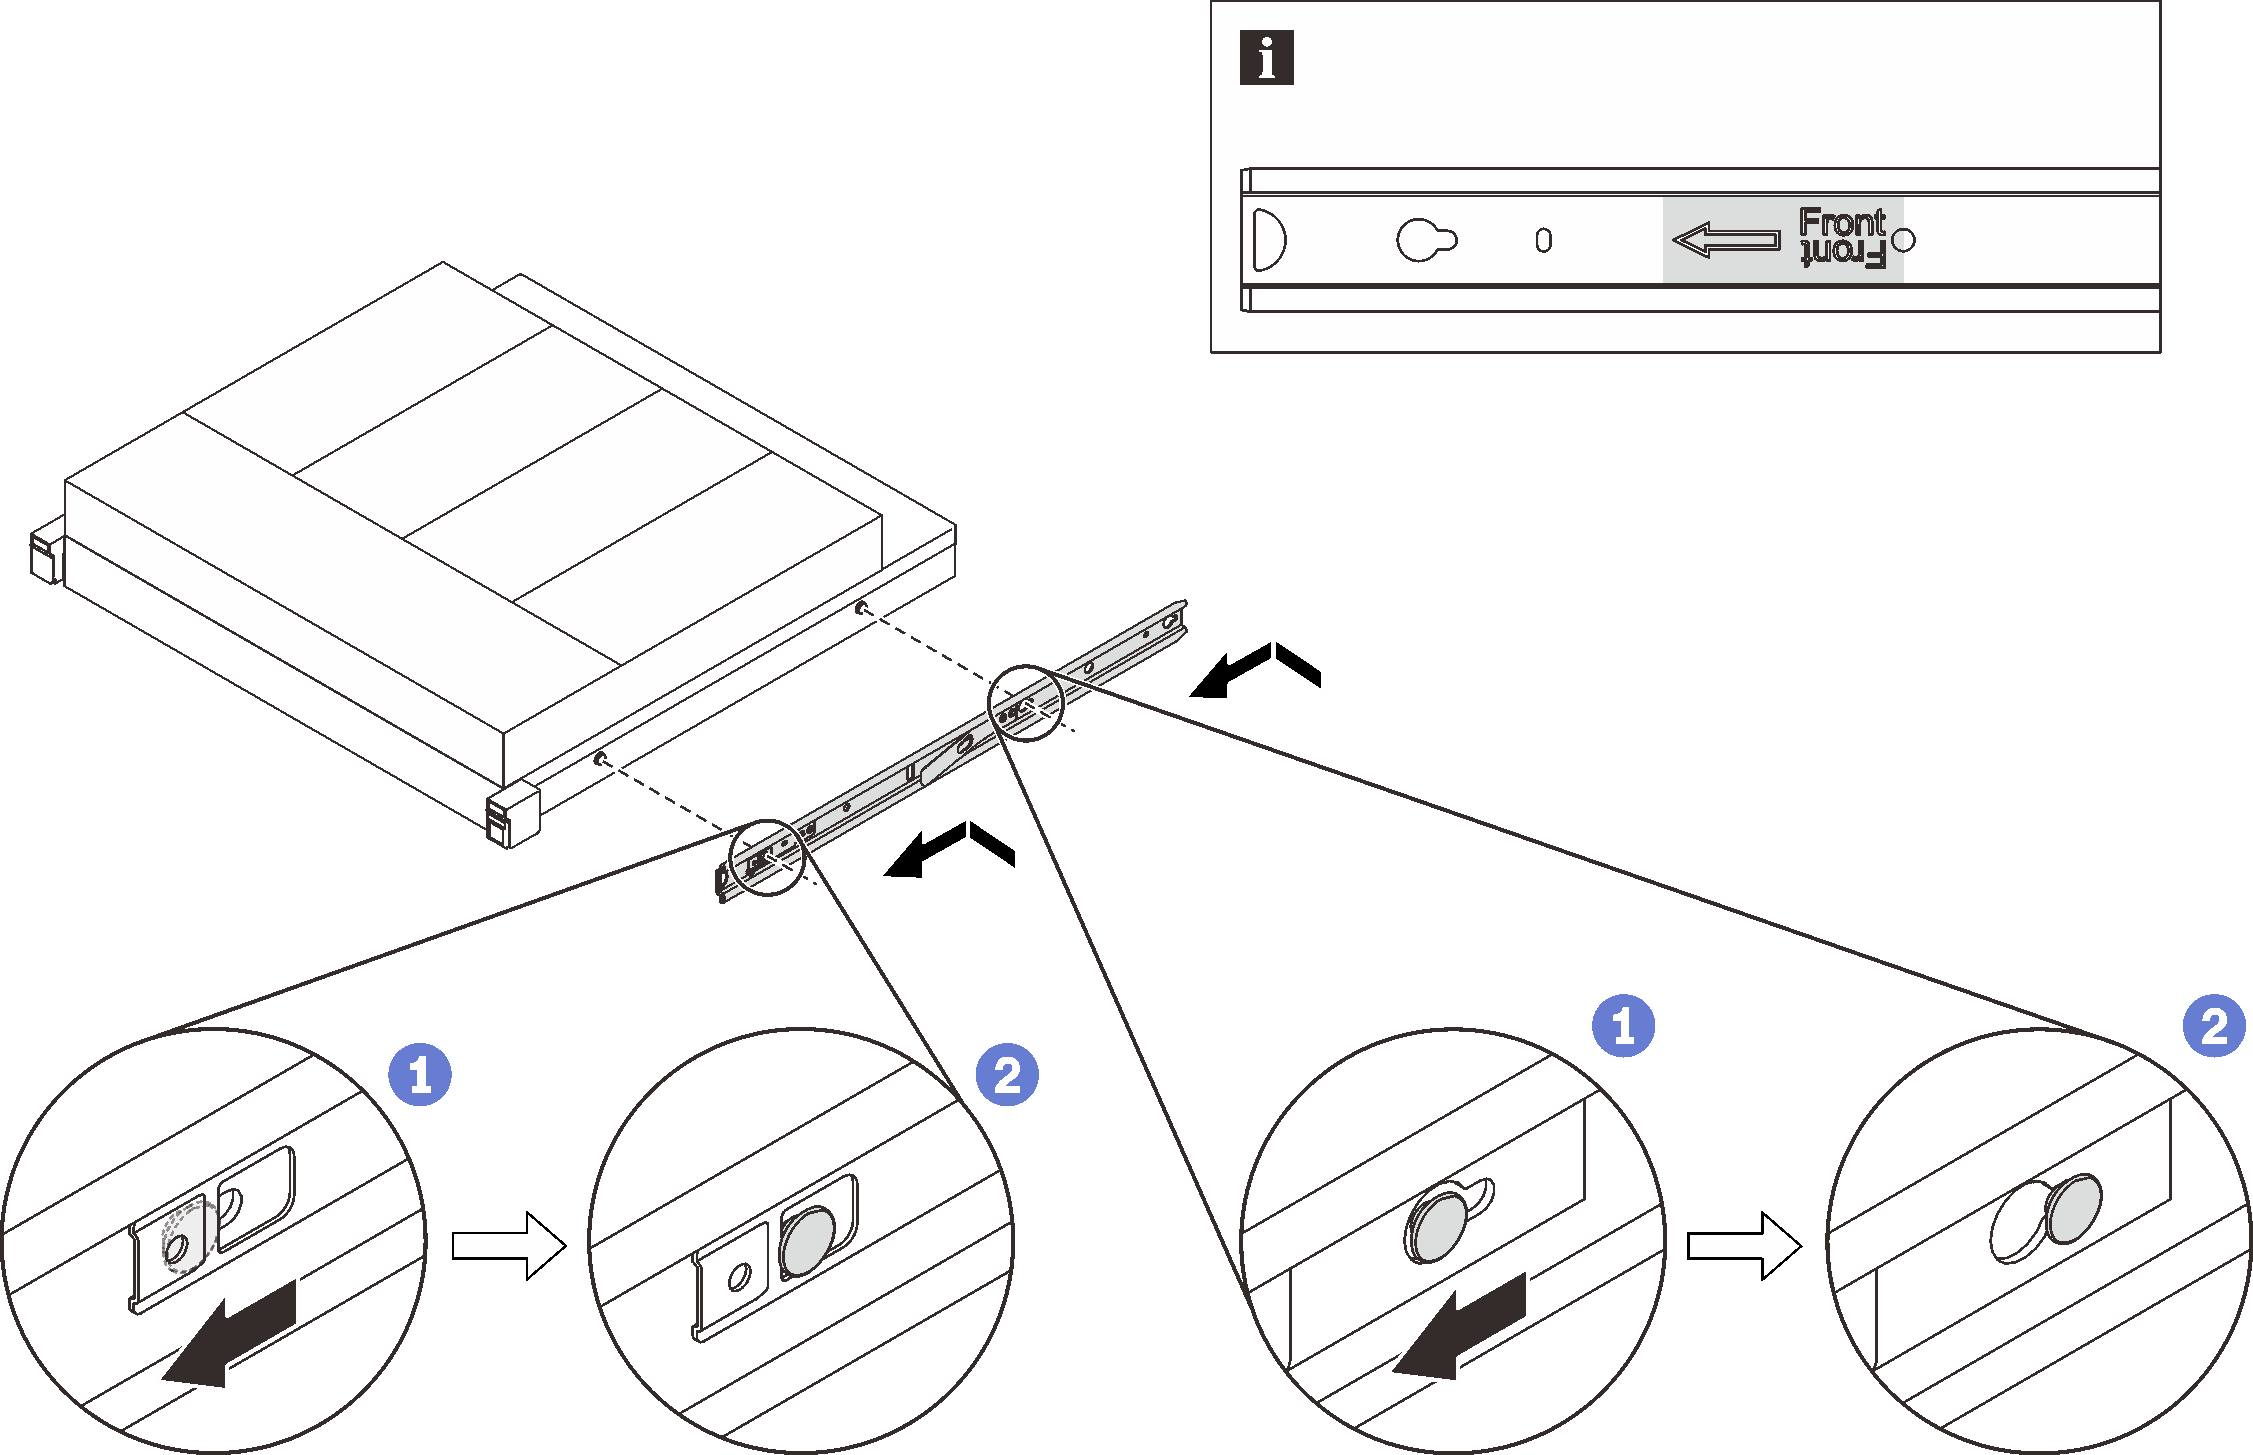
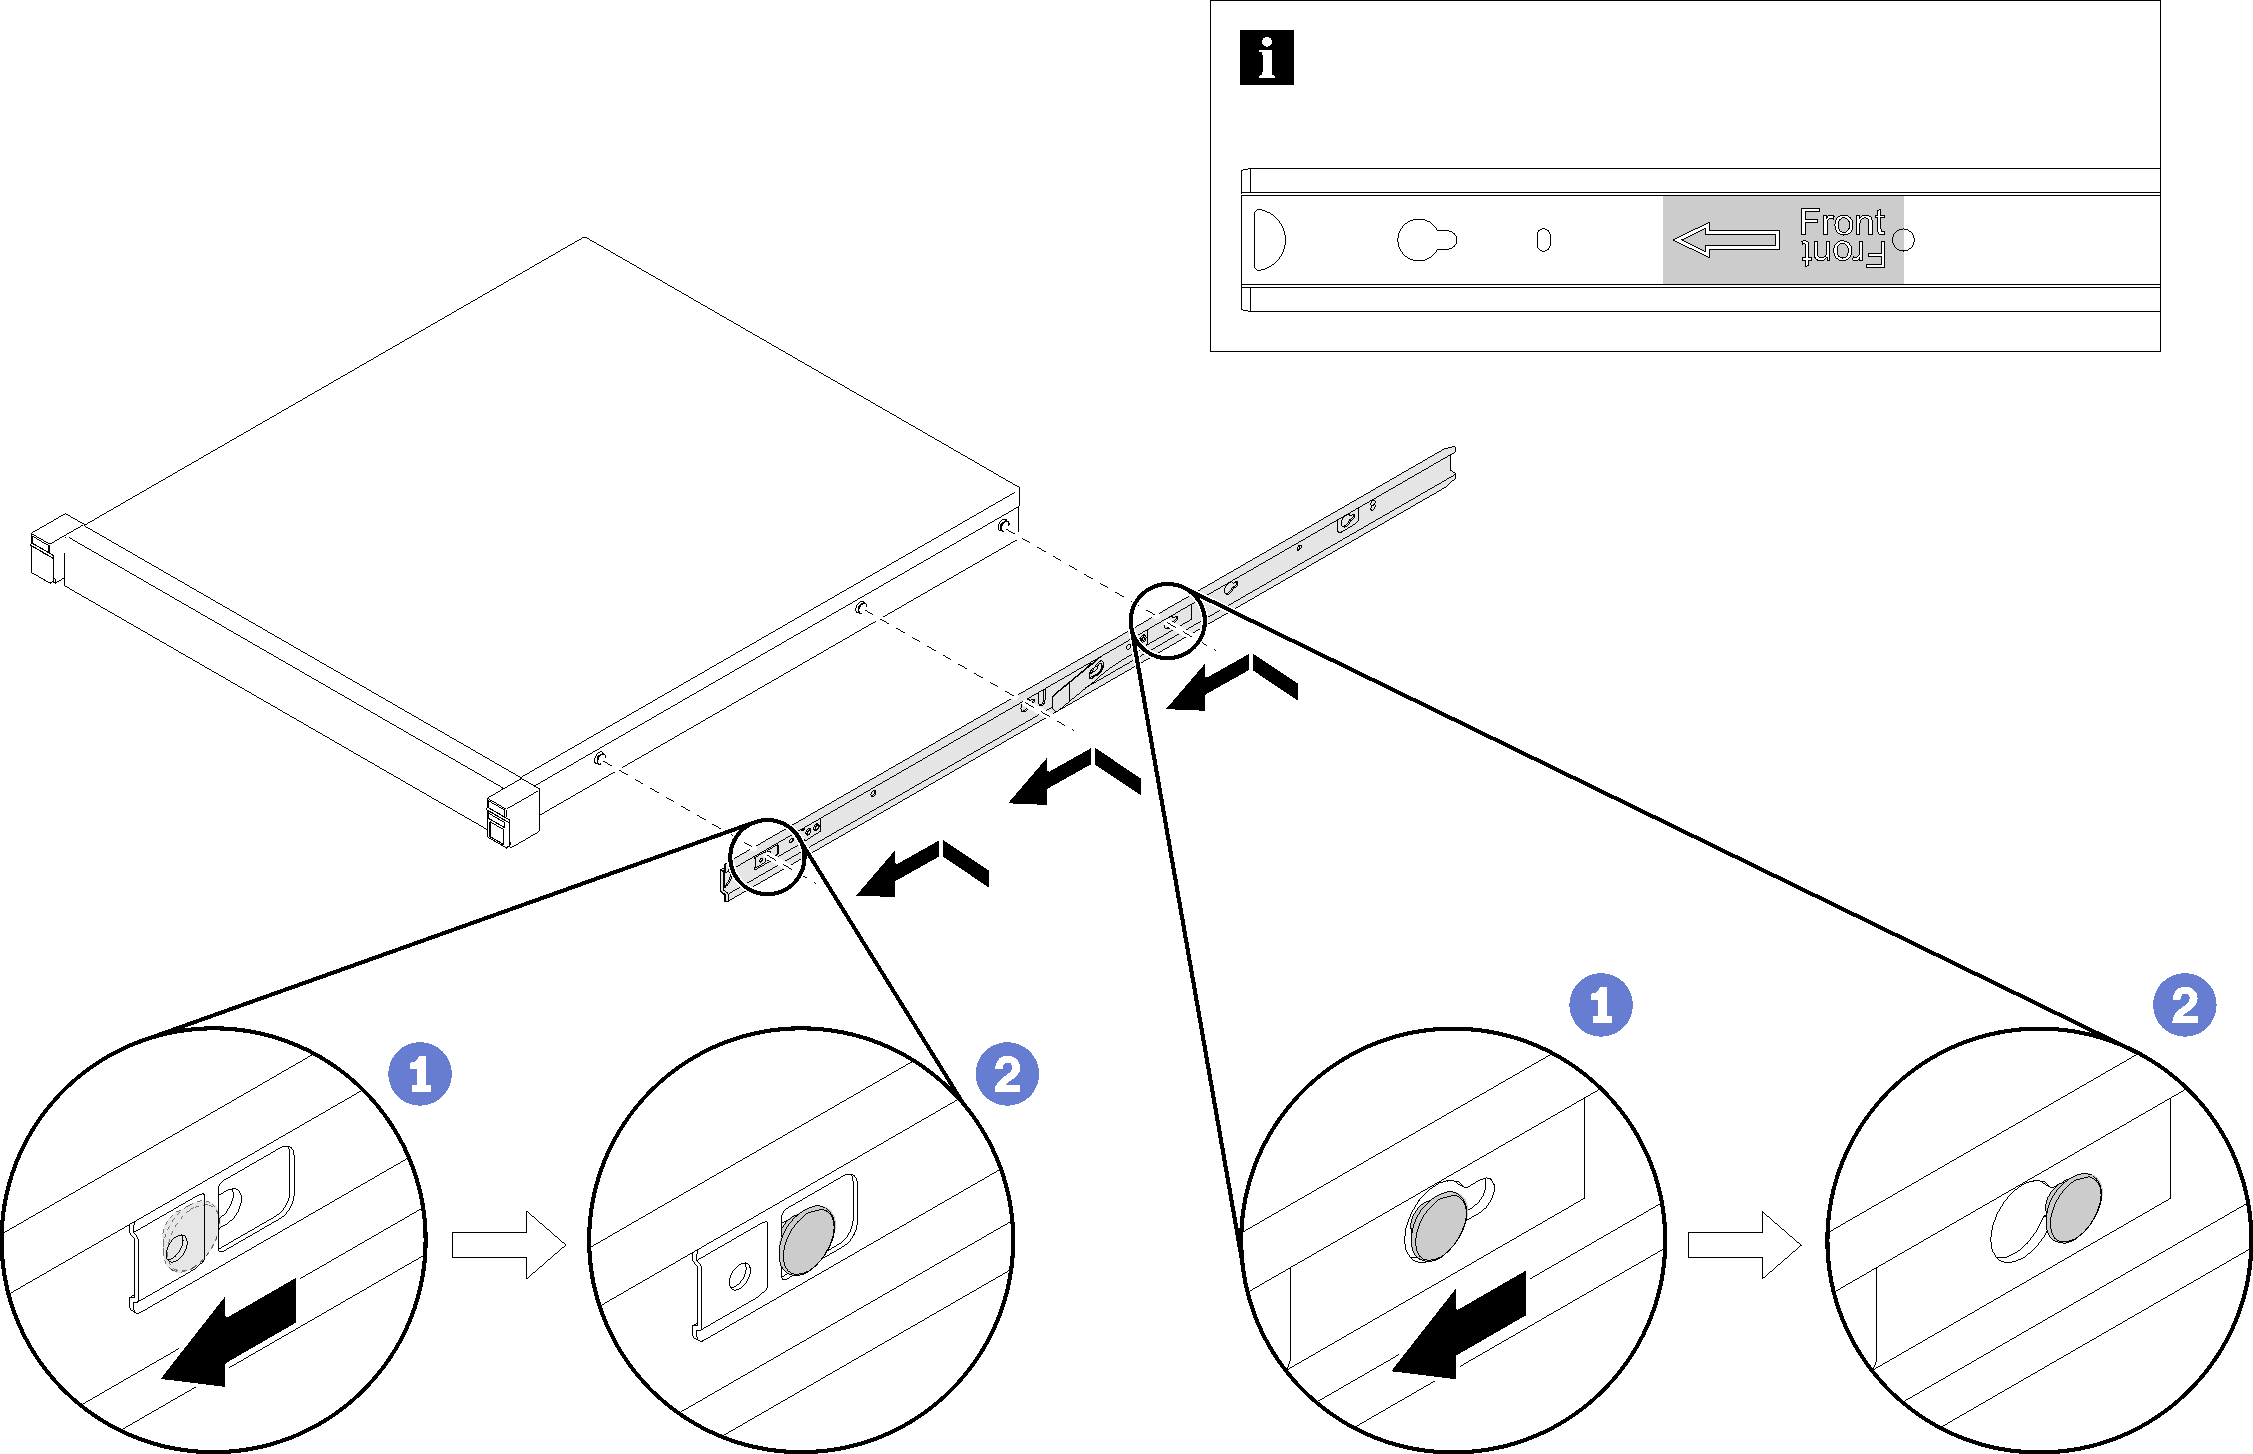
  2. Install the inner rails to the enclosure.
    Figure 2. Installing the inner rails to the enclosure

    • ① Align the mounting holes in the inner rail with the corresponding rail mounting pins on the side of the enclosure.
    • ② Push the inner rail as shown until the mounting pins on the enclosure lock into place with the inner rail.
    Note
    Make sure the stamp “Front” always faces toward the front when assembling the inner rail to the enclosure.
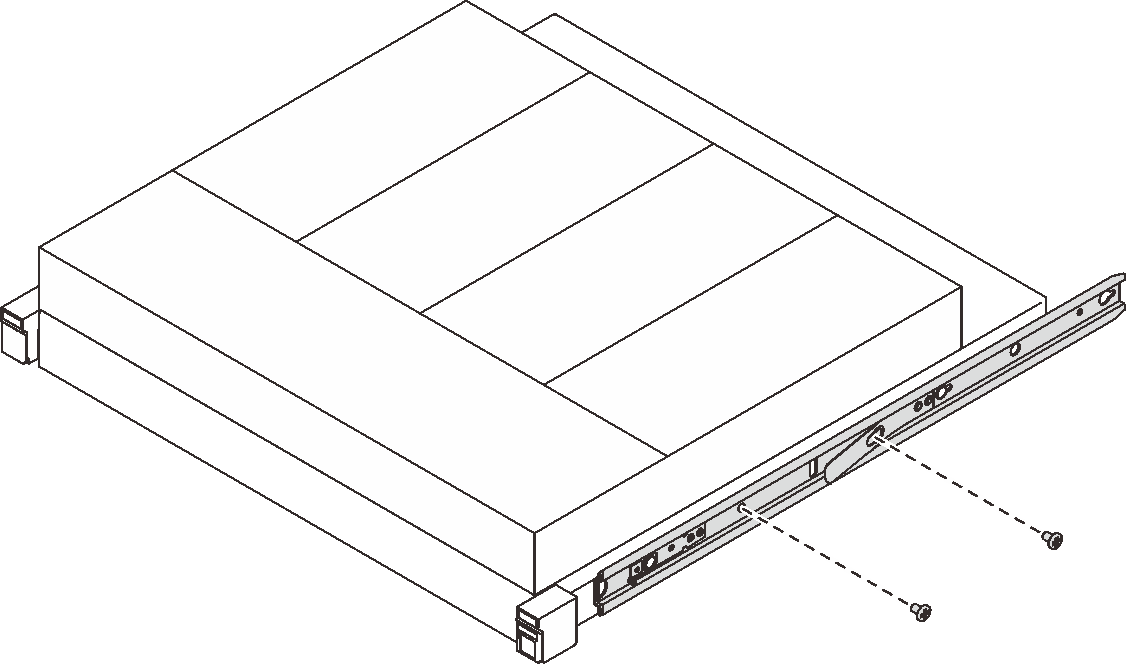
  3. Secure the inner rail to the enclosure with two screws.
    Figure 3. Securing the inner rail

  4. Repeat the previous two steps on the other inner rail.
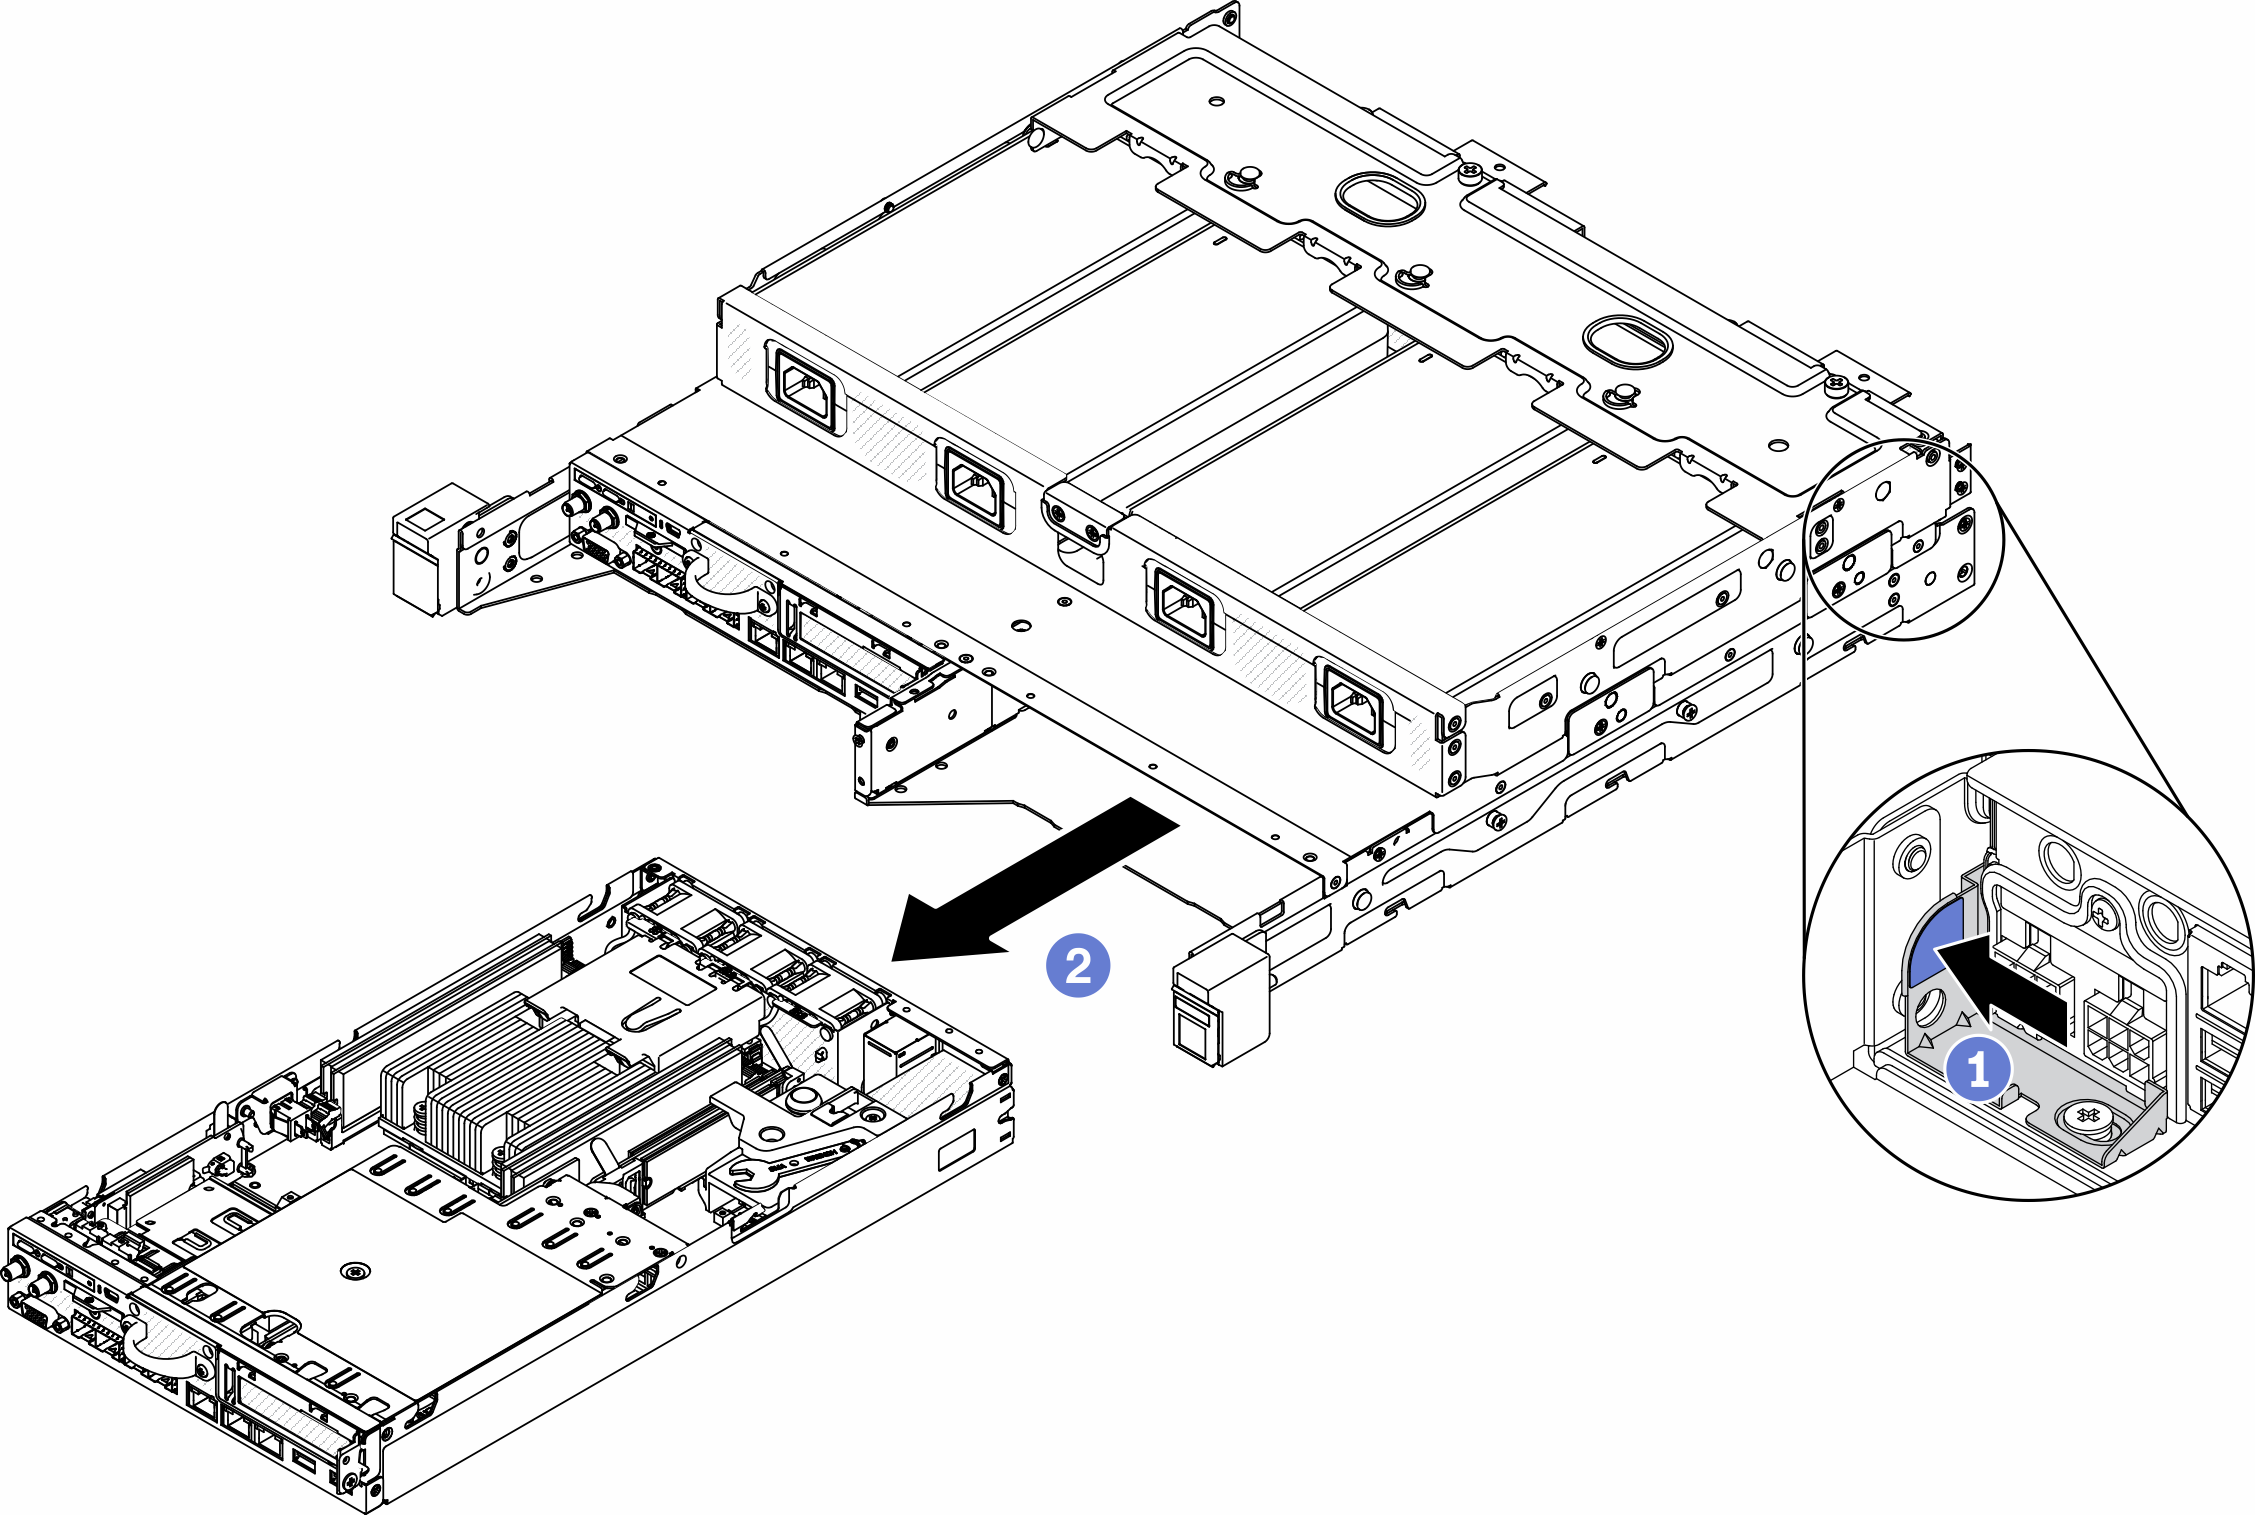
  5. (Optional) To reduce the weight of the enclosure, disconnect the power adapter cables from the nodes and remove the nodes.
    Figure 4. Removing compute nodes

    • ① Press on the release button.
    • ② Slide the node out from the enclosure.
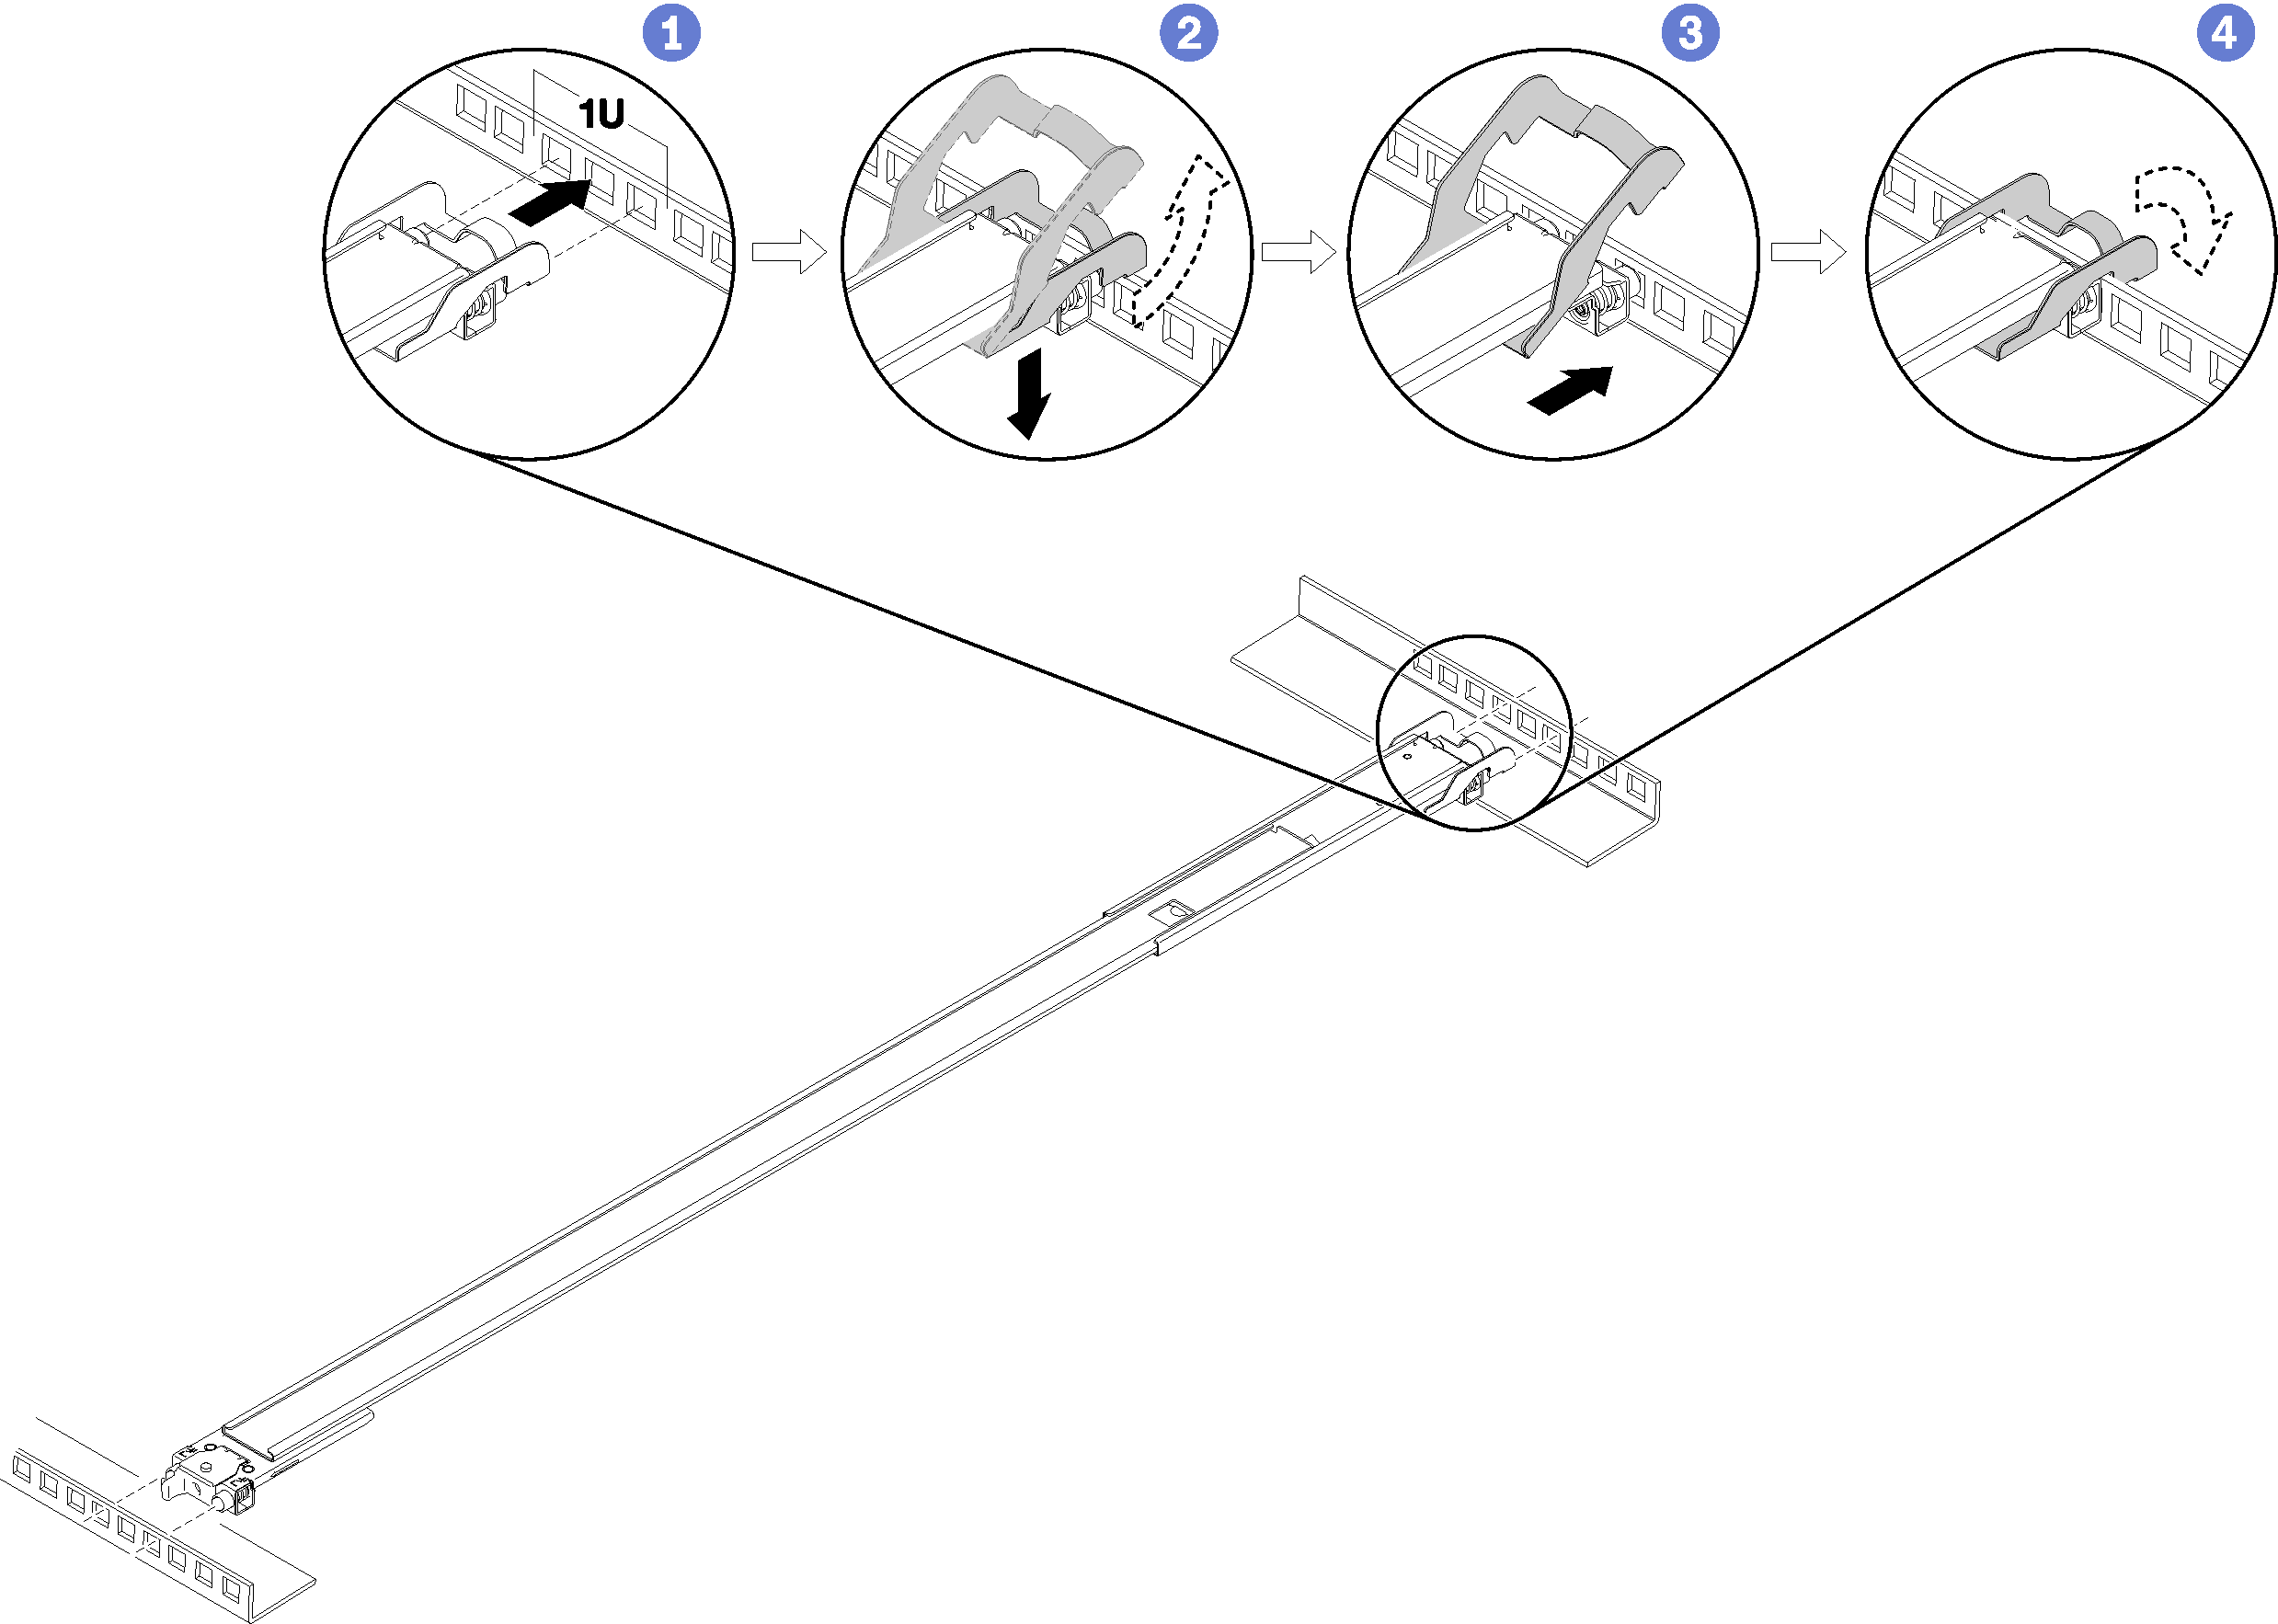
  6. Install the rear mounting bracket of the right outer rail to the lower EIA flange.
    Figure 5. Installing the rear mounting bracket to the EIA flange

    • ① Align the rear pins on the outer rails to the EIA flange.
    • ② Slightly push the end of the rail down to hook the rear mounting bracket latch to the rack.
    • ③ Push the rail into the EIA flange until the pins protrude through into the corresponding holes in the rack.
    • ④ The bracket will lock into place as illustrated.
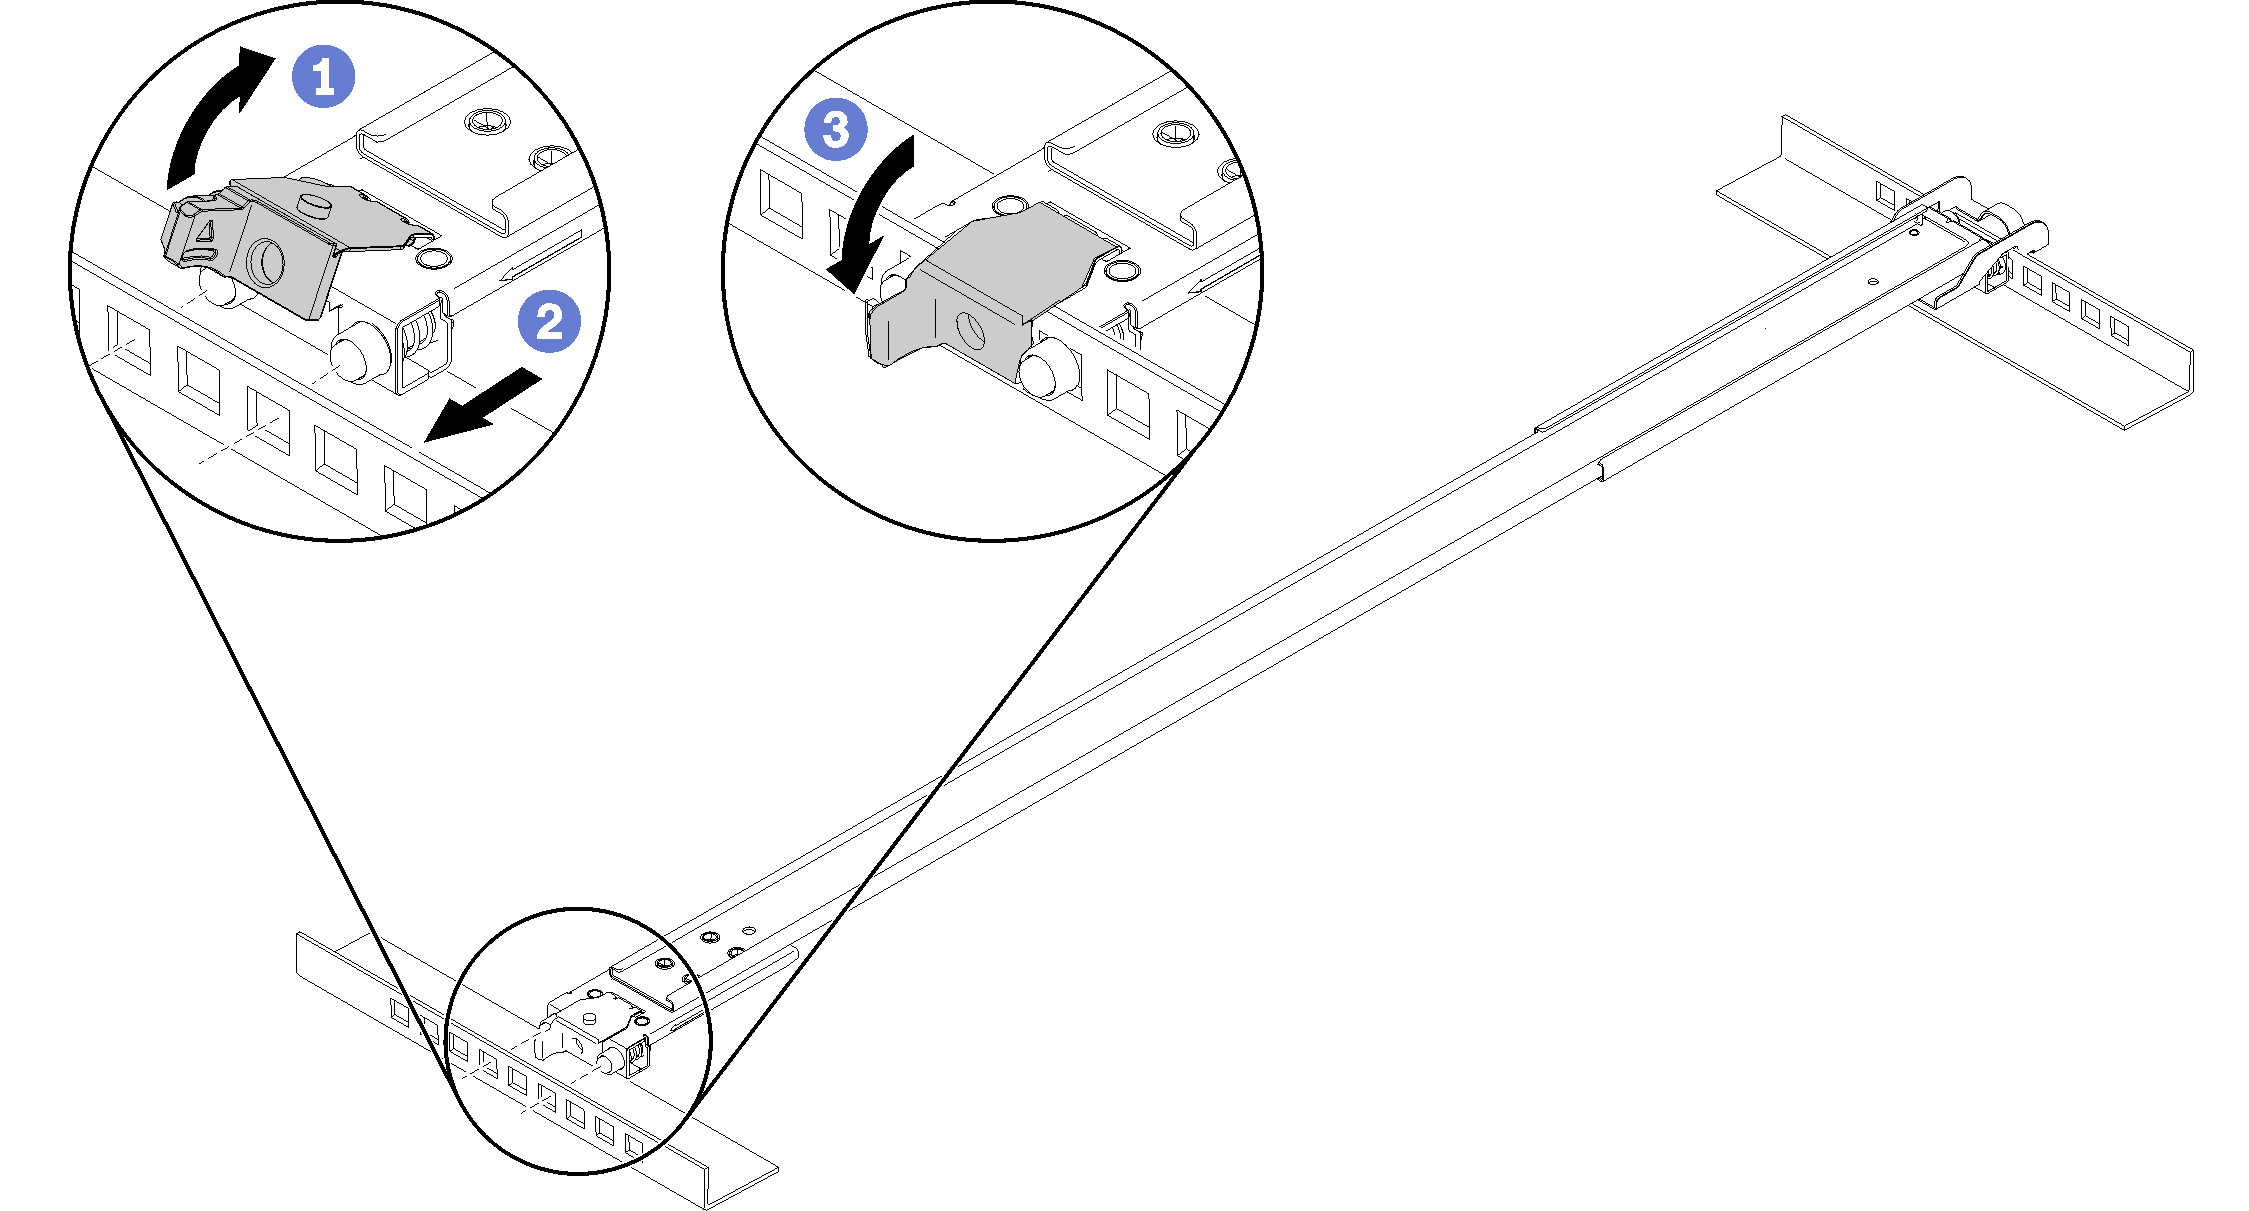
  7. Install the front mounting bracket of the right outer rail to the lower mounting flange.
    Figure 6. Installing the front mounting bracket to the EIA flange

    Note
    Make sure the rail stays horizontal.
    • ① Open the front bracket and align the front end of the outer rail to the EIA flange.
    • ② Pull the outer rail into the EIA flange until the pins are inserted into the corresponding holes.
    • ③ Close the front bracket to secure the rail.
  8. Repeat the previous two steps to install the left outer rail to the upper EIA flange.
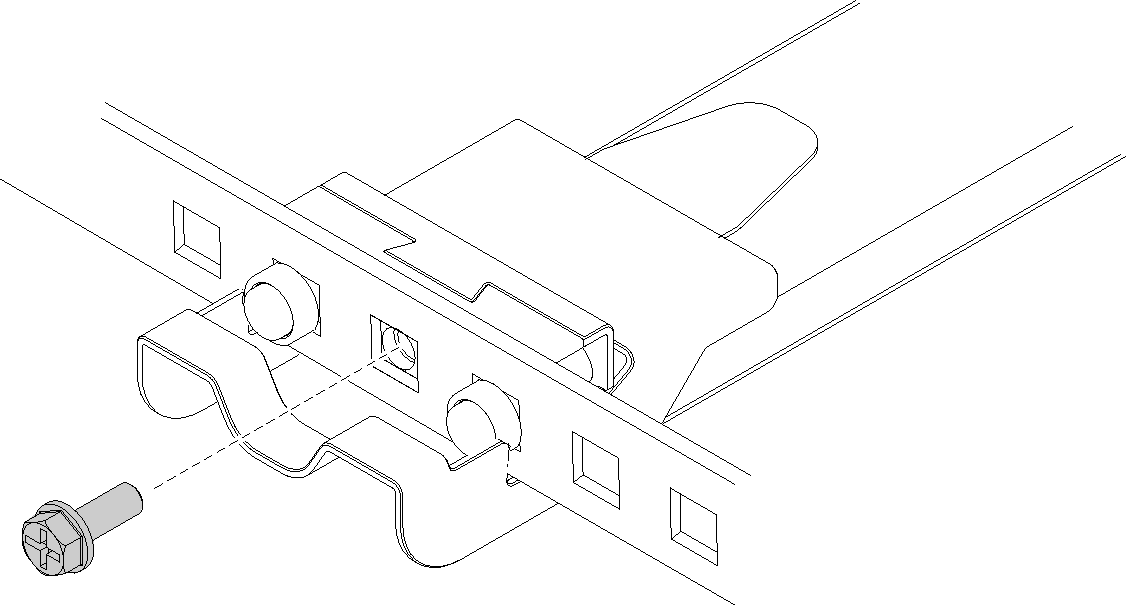
  9. (Optional) If you need to ship the rack cabinet with the enclosures installed or place the rack cabinet in a vibration-prone area, install two M6 screws into the mounting flanges between the two rear pins on both sides.
    Figure 7. Installing the rear screws

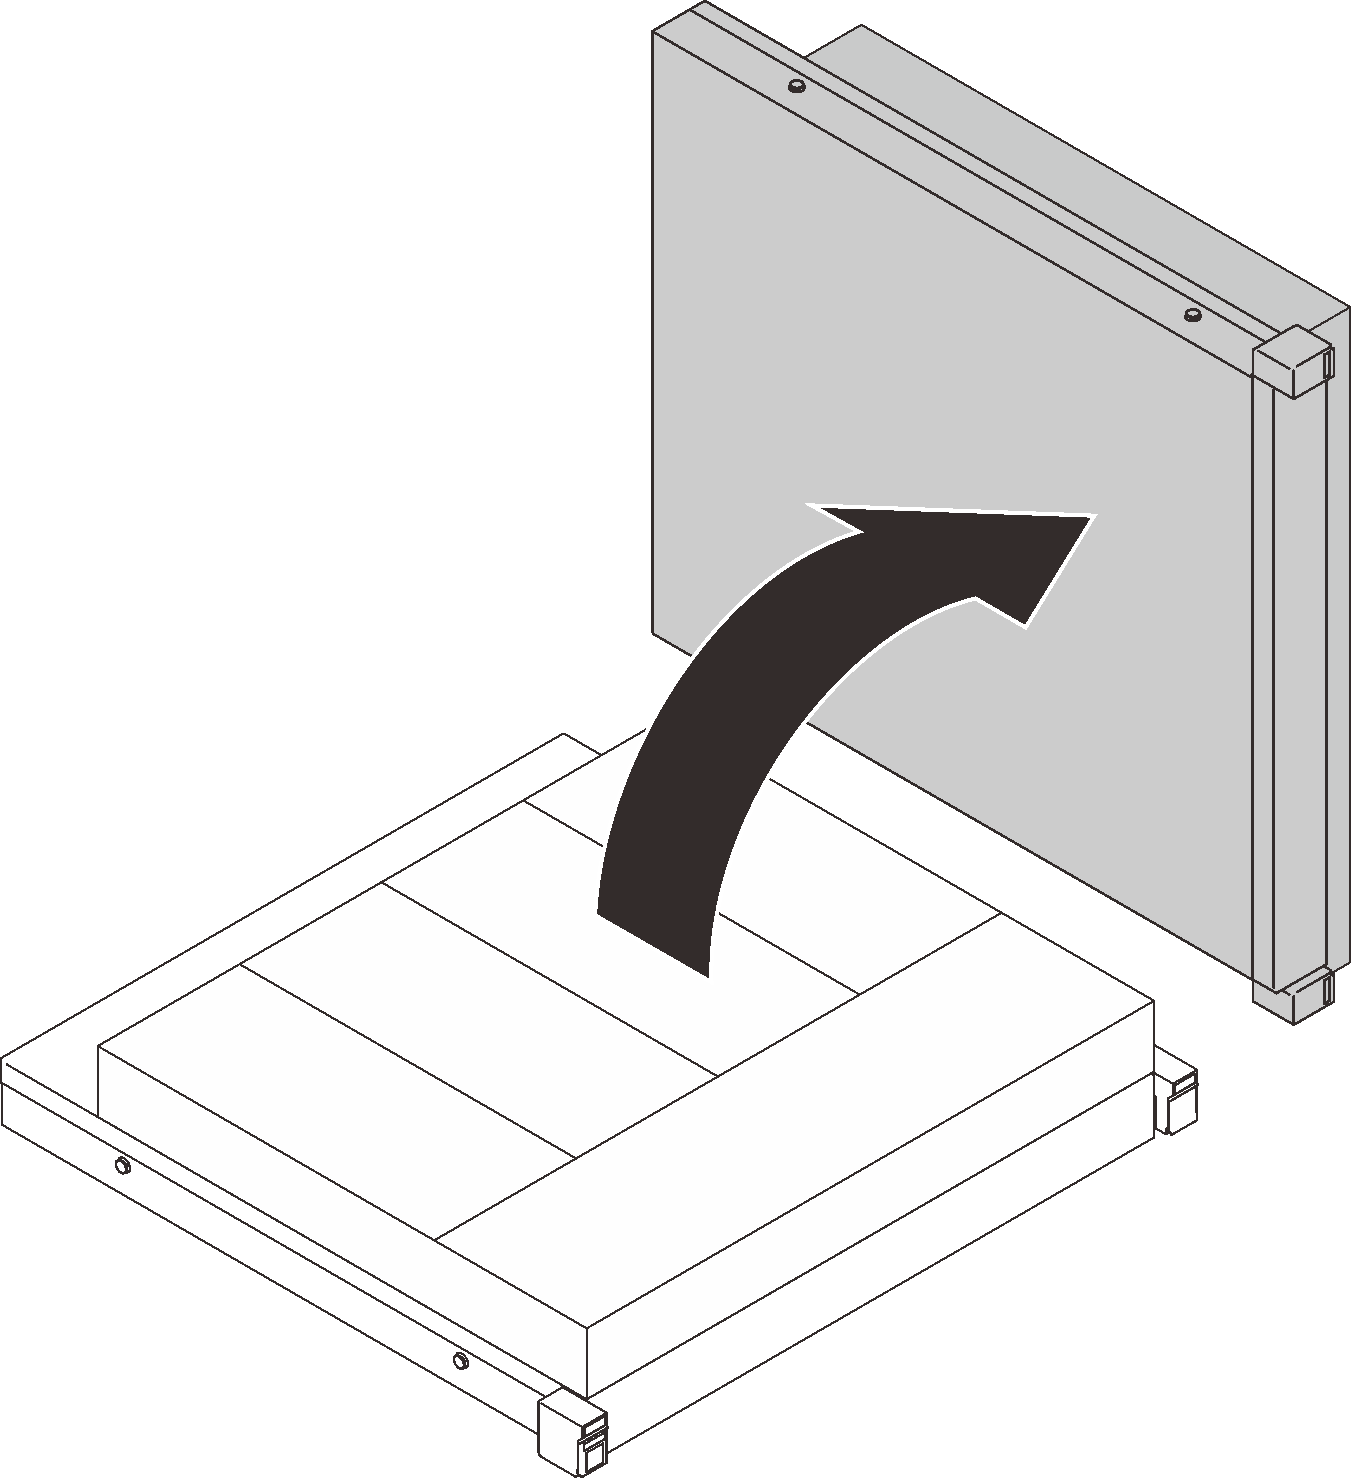
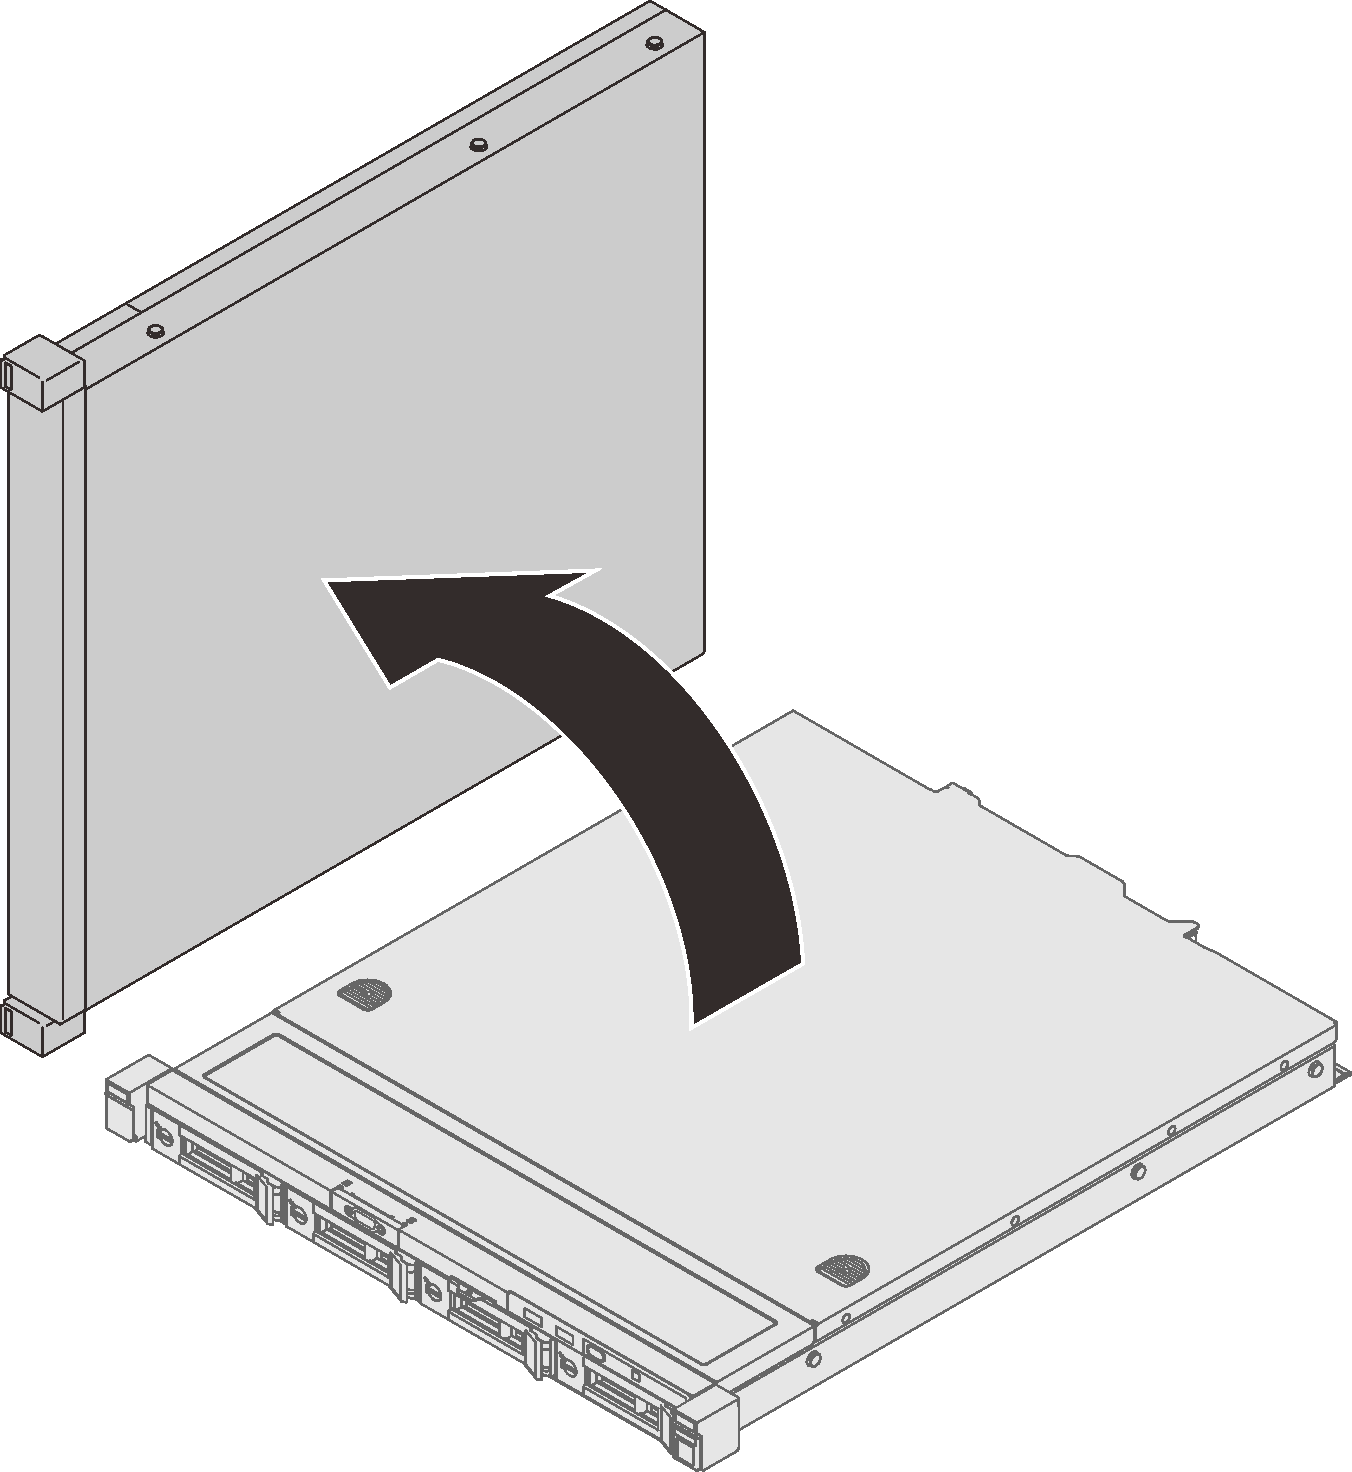
  10. Rotate the E2 enclosure clockwise so that the right side is facing down.
    Figure 8. Rotating SE350 E2 Enclosure

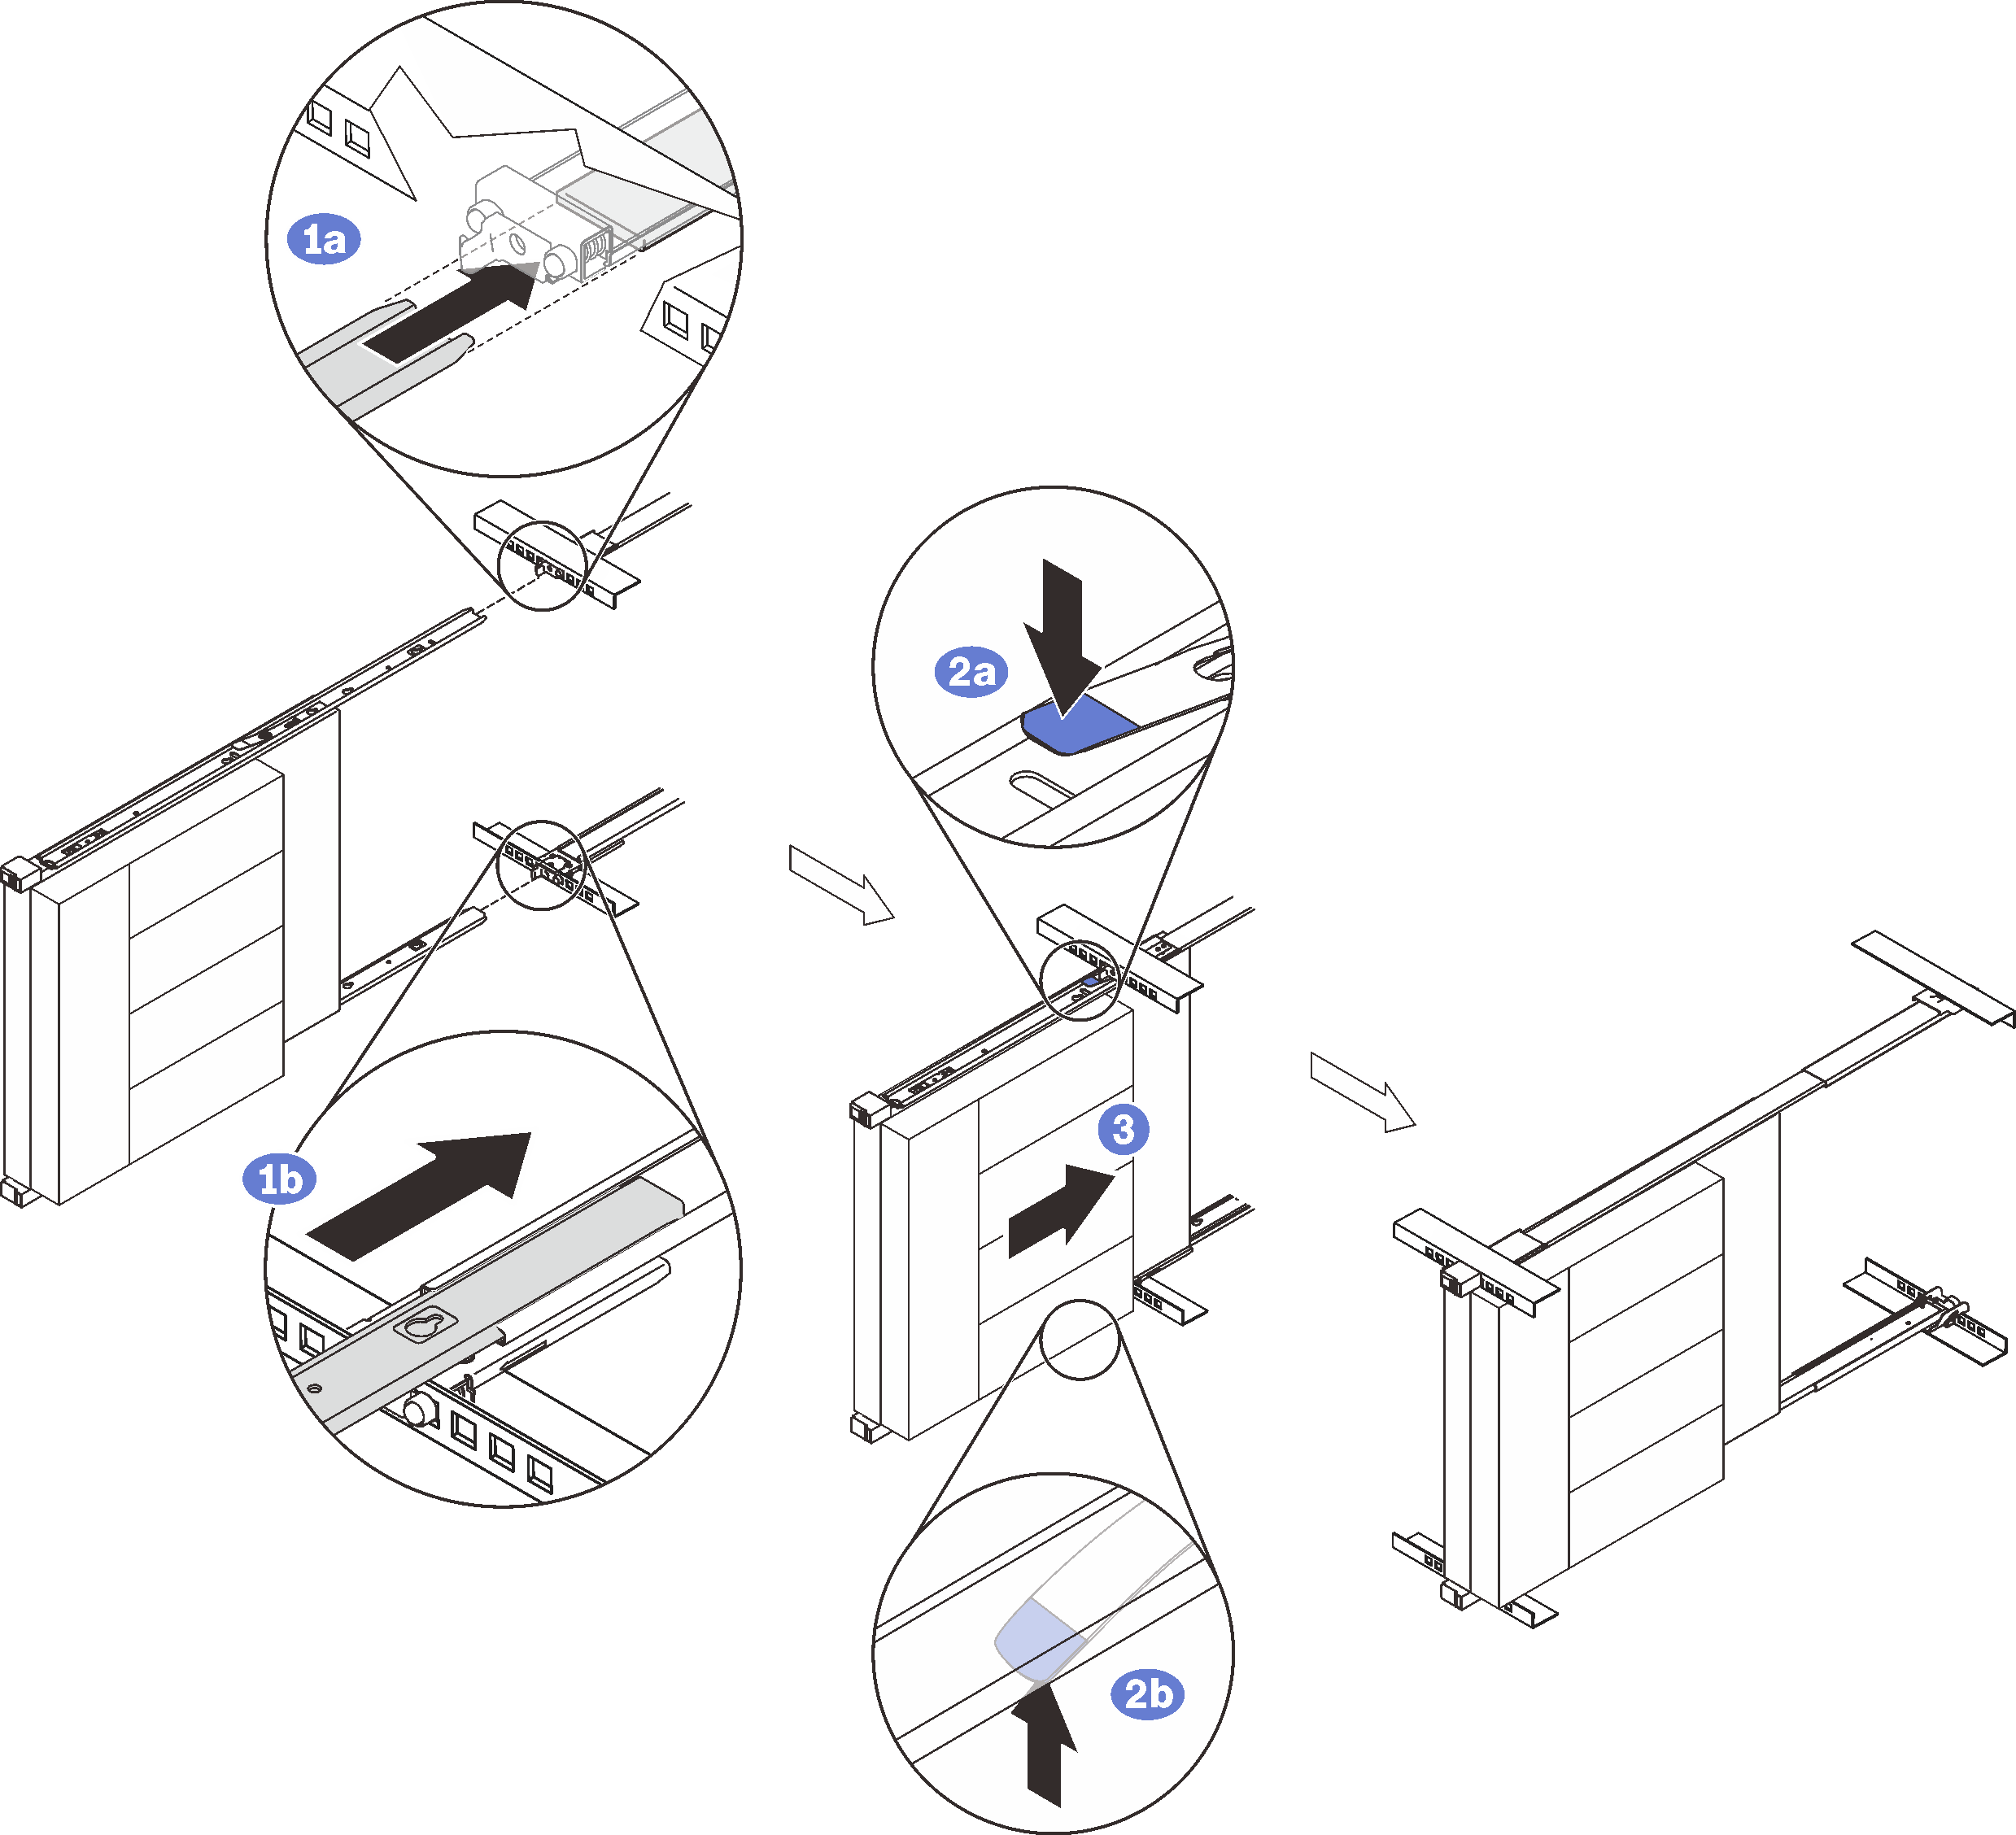
  11. Install the E2 Enclosure into the rack.
    Figure 9. Installing SE350 E2 Enclosure

    Note
    Make sure the top of the enclosure is facing right.
    • ① Lift and align the enclosure to the slide rails. Position the enclosure as shown, and slide it into the rack.
    • ② Press the release latches.
    • ③ Push the enclosure all the way into the rack until it clicks into locked position.
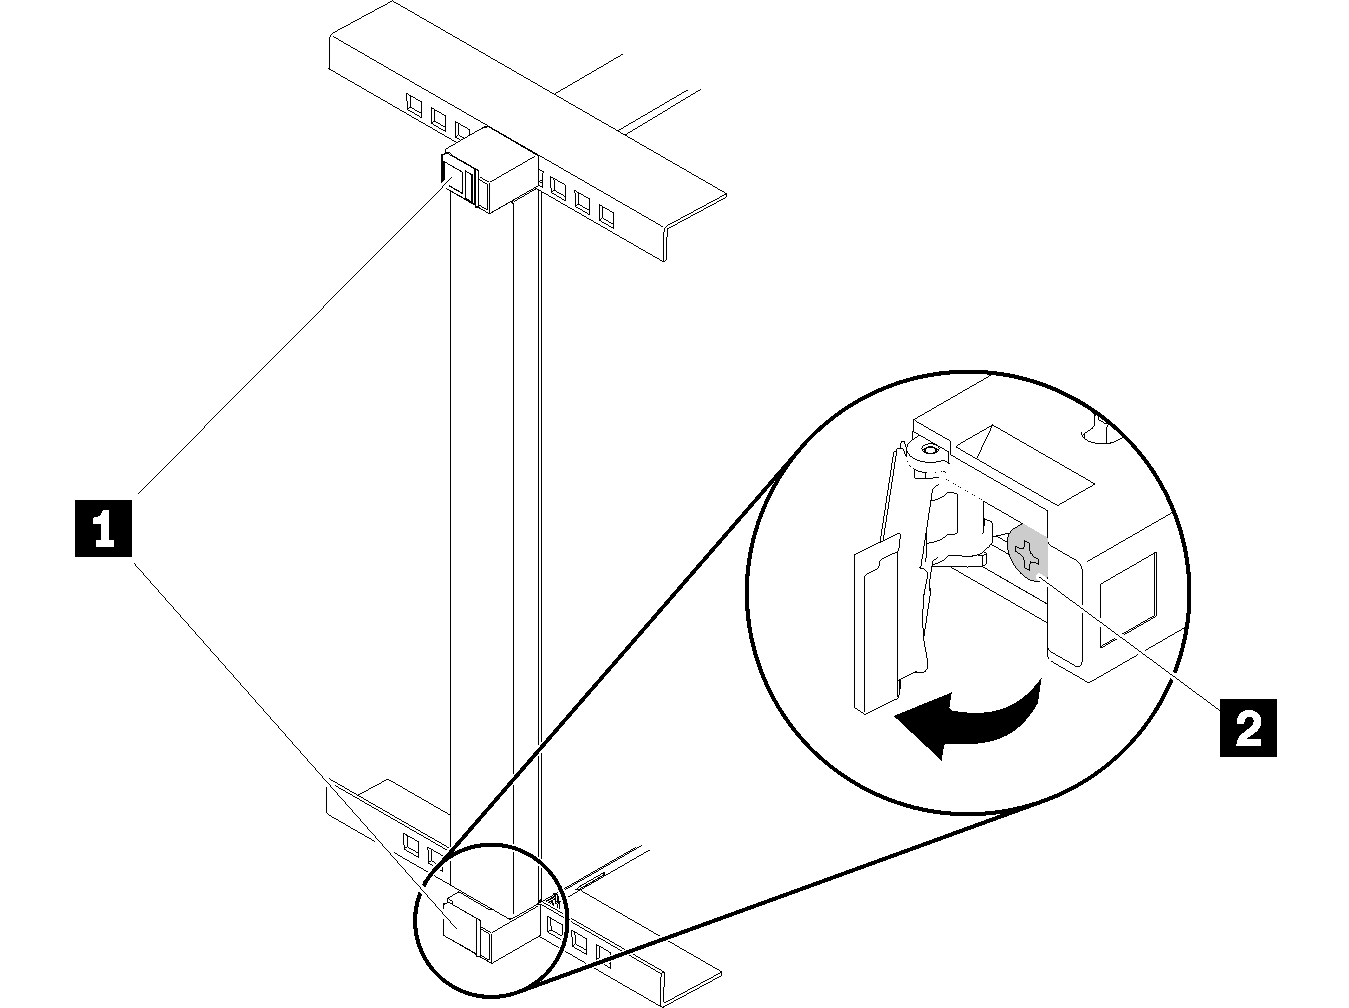
  12. (Optional) Open the rack release latches and tighten the screws to firmly secure the rail before moving or placing the rack cabinet in a vibration-prone area.
    Figure 10. Securing the enclosure

    1 Rack release latches2 Front screw
  13. Install the compute nodes back into the enclosure, and connect the power adapter cables to the nodes.

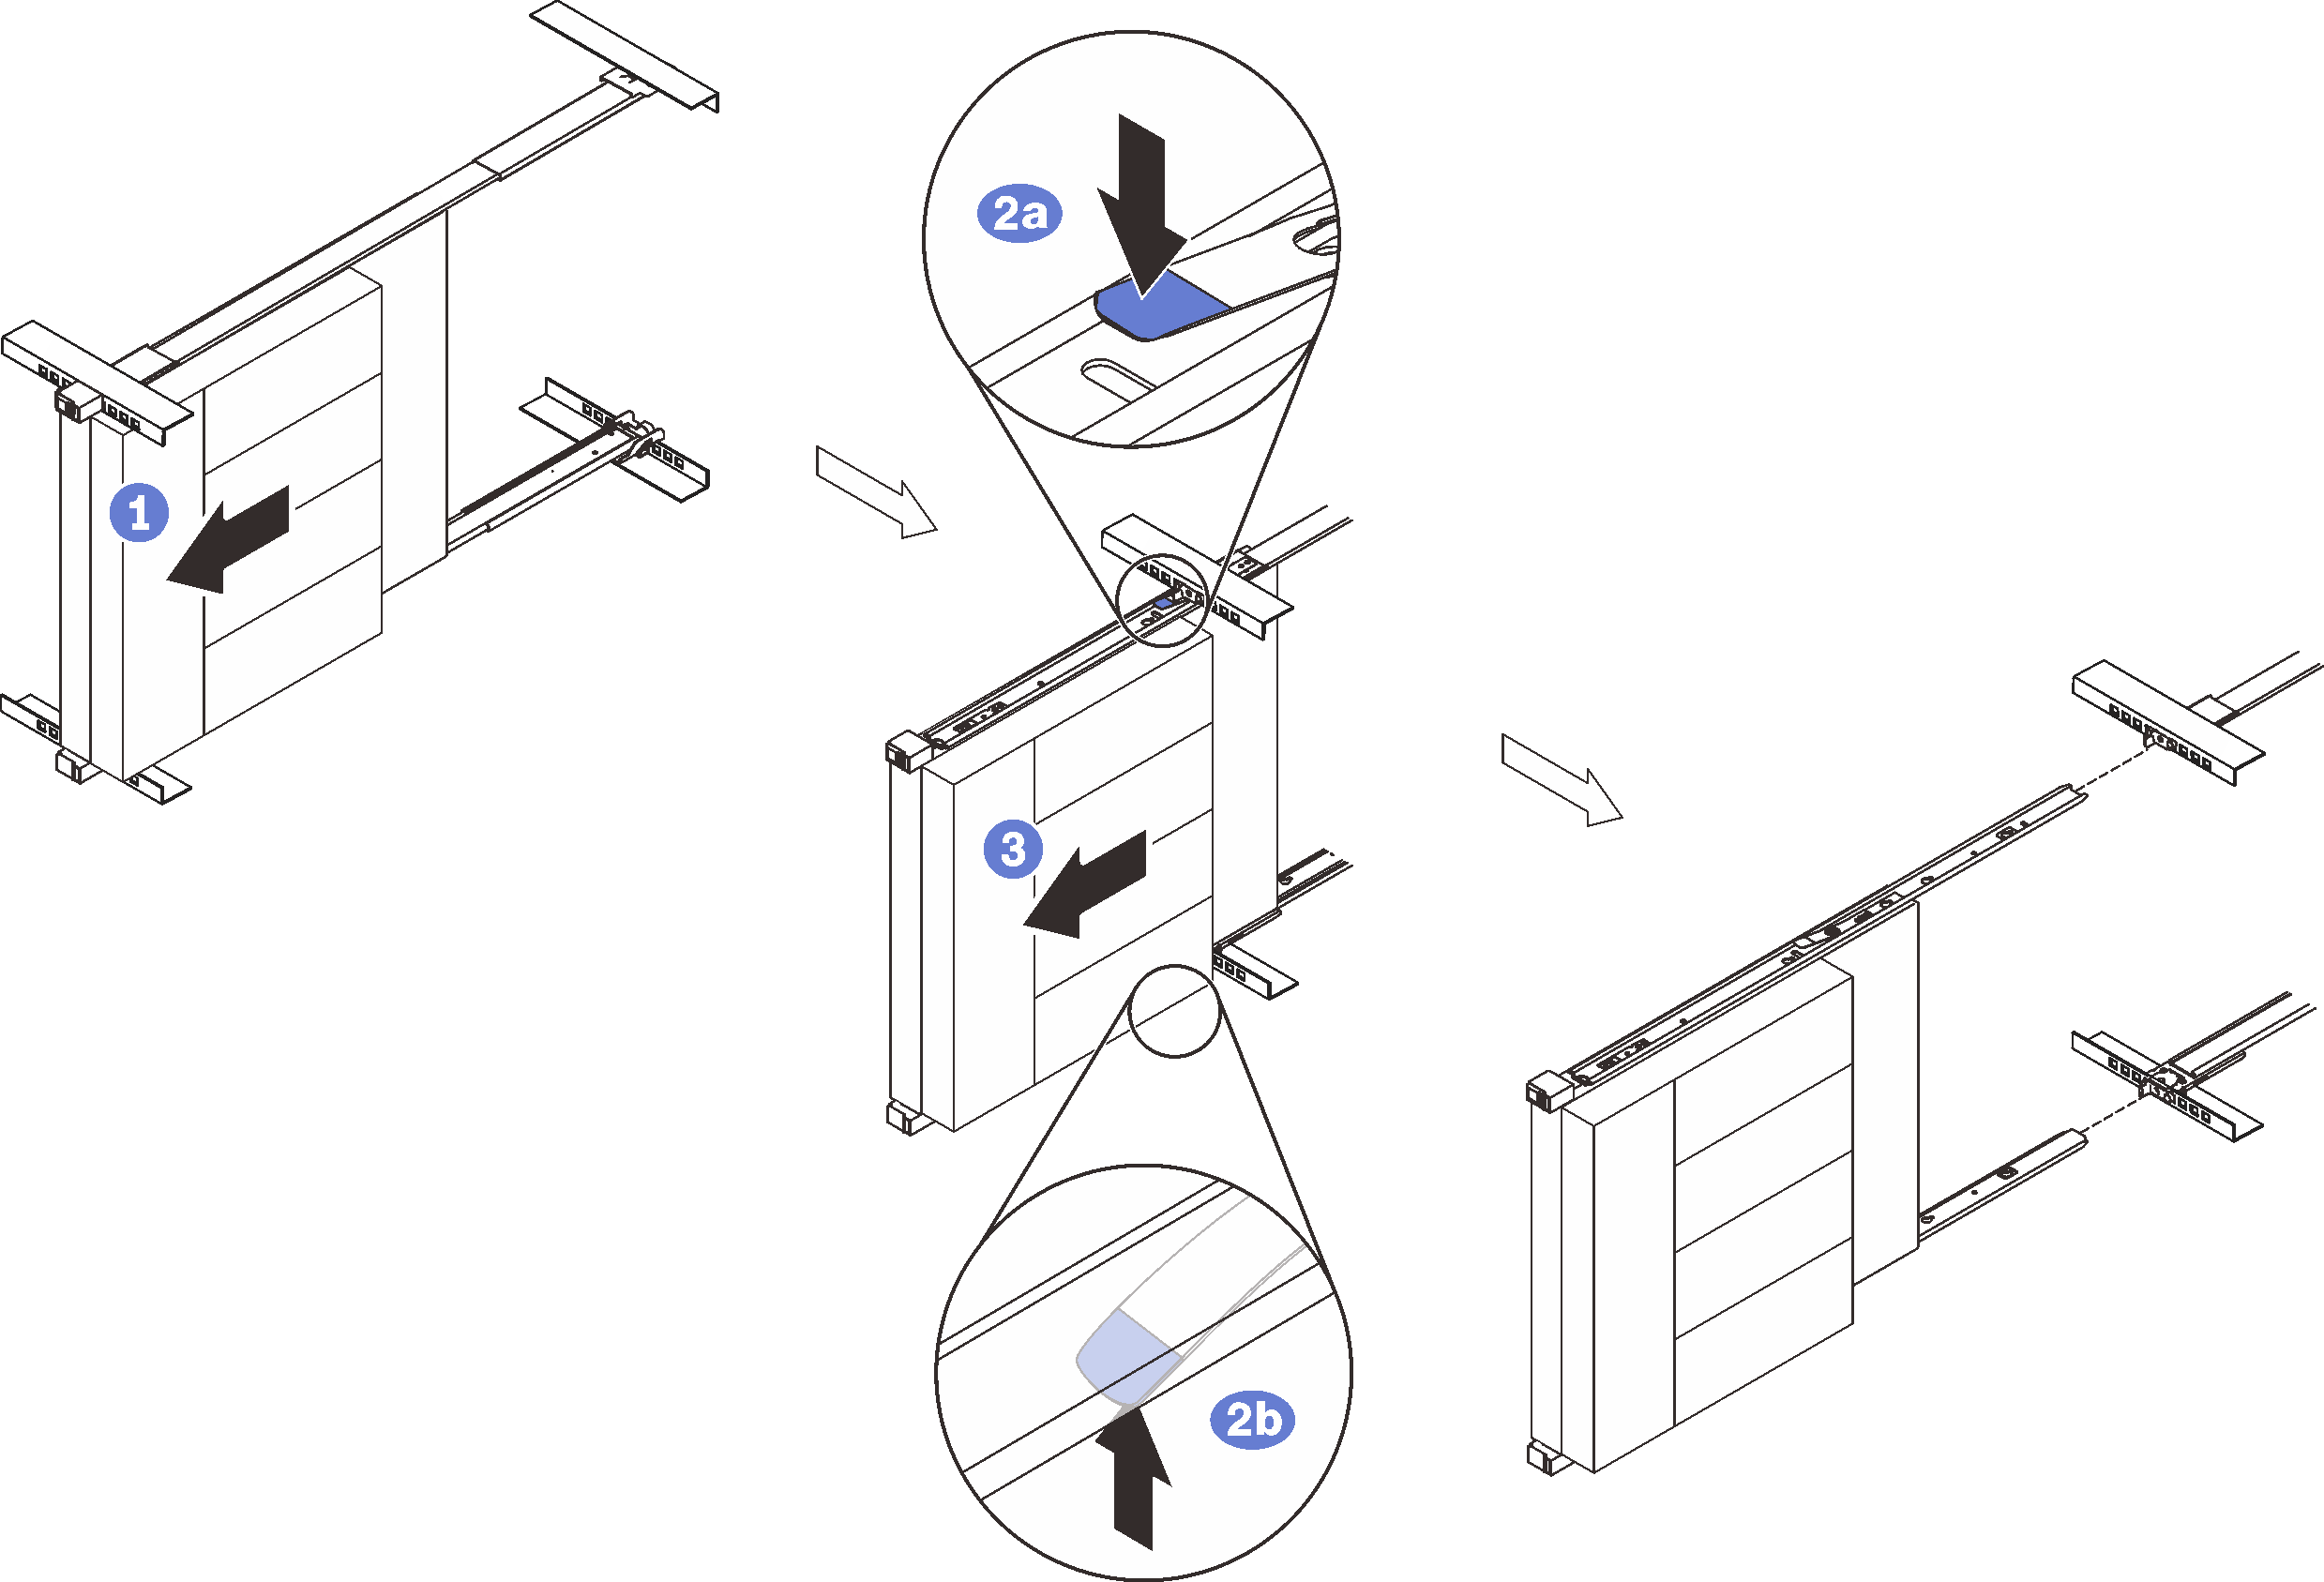
Remove the enclosure from the rack

Figure 11. Removing SE350 E2 Enclosure

  • (Optional) To reduce the weight of the enclosure, disconnect the power adapter cables from the nodes and remove the nodes.
  • Disconnect all the cables that are connected to the enclosure, and slide the enclosure out until it stops.
  • Press the release latches to disengage the inner rails.
  • ④ Remove the enclosure.

Install the rail kit and SR250

About this task

See the following table to identify the components that come with the rail kit.

1 Document4 Two M6 screws
2 Left rail5 Four black M3.5 x 5 mm flat head screws with pre-applied threadlocking adhesive
3 Right rail 
The cabinet supports up to four units of SR250 and corresponding rail kit. For optimal use of space, it is advised to determine the location to install the rail kits based on the number of units that are installed.
  • One unit: 3U

  • Two units: 3U and 4U

  • Three units: 3U, 4U, and 5U

  • Four units: 3U, 4U, 5U, and 6U

Note
When installed vertically into this cabinet, the server can be installed with server top facing either right or left. In this section, however, it is illustrated with the top of server facing left as an example.

Procedure

  1. Remove the inner rails.
    Figure 12. Removing the inner rails

    • ① Pull the inner rail outward until the release latch becomes visible.
    • ② Press on the release latch.
    • ③ Remove the inner rail from the outer rail.
  2. Install the inner rails to the server.
    Figure 13. Installing the inner rails to the enclosure

    • ① Align the mounting holes in the inner rail with the corresponding rail mounting pins on the side of the server.
    • ② Push the inner rail as shown until the mounting pins on the server lock into place with the inner rail.
    Note
    Make sure the stamp “Front” always faces toward the front when assembling the inner rail to the server.
  3. Rotate the server counter-clockwise so that the left side is facing down.
    Figure 14. Rotating SR250

  4. Install the rear mounting bracket of the right outer rail to the lower EIA flange.
    Figure 15. Installing the rear mounting bracket to the EIA flange

    • ① Align the rear pins on the outer rails to the EIA flange.
    • ② Slightly push the end of the rail down to hook the rear mounting bracket latch to the rack.
    • ③ Push the rail into the EIA flange until the pins protrude through into the corresponding holes in the rack.
    • ④ The bracket will lock into place as illustrated.
  5. Install the front mounting bracket of the right outer rail to the lower mounting flange.
    Figure 16. Installing the front mounting bracket to the EIA flange

    Note
    Make sure the rail stays horizontal.
    • ① Open the front bracket and align the front end of the outer rail to the EIA flange.
    • ② Pull the outer rail into the EIA flange until the pins are inserted into the corresponding holes.
    • ③ Close the front bracket to secure the rail.
  6. Repeat the previous two steps to install the left outer rail to the upper EIA flange.
  7. (Optional) If you need to ship the rack cabinet with servers installed or place the rack cabinet in a vibration-prone area, install two M6 screws into the mounting flanges between the two rear pins on both sides.
    Figure 17. Installing the rear screws

  8. Slide the SR250 into the rack:
    Figure 18. Slide the SR250 into the rack.

    Note
    Make sure the top of the enclosure is facing right.
    • ① Lift and align the server to the slide rails. Position the enclosure as shown, and slide it into the rack.
    • ② Press the release latches.
    • ③ Push the enclosure all the way into the rack until it clicks into locked position.
  9. (Optional) Open the rack release latches and tighten the screws to firmly secure the rail before moving or placing the rack cabinet in a vibration-prone area.
    Figure 19. Securing the server

    1 Rack release latches2 Front screw

Remove the server from the rack

Figure 20. Removing SR250
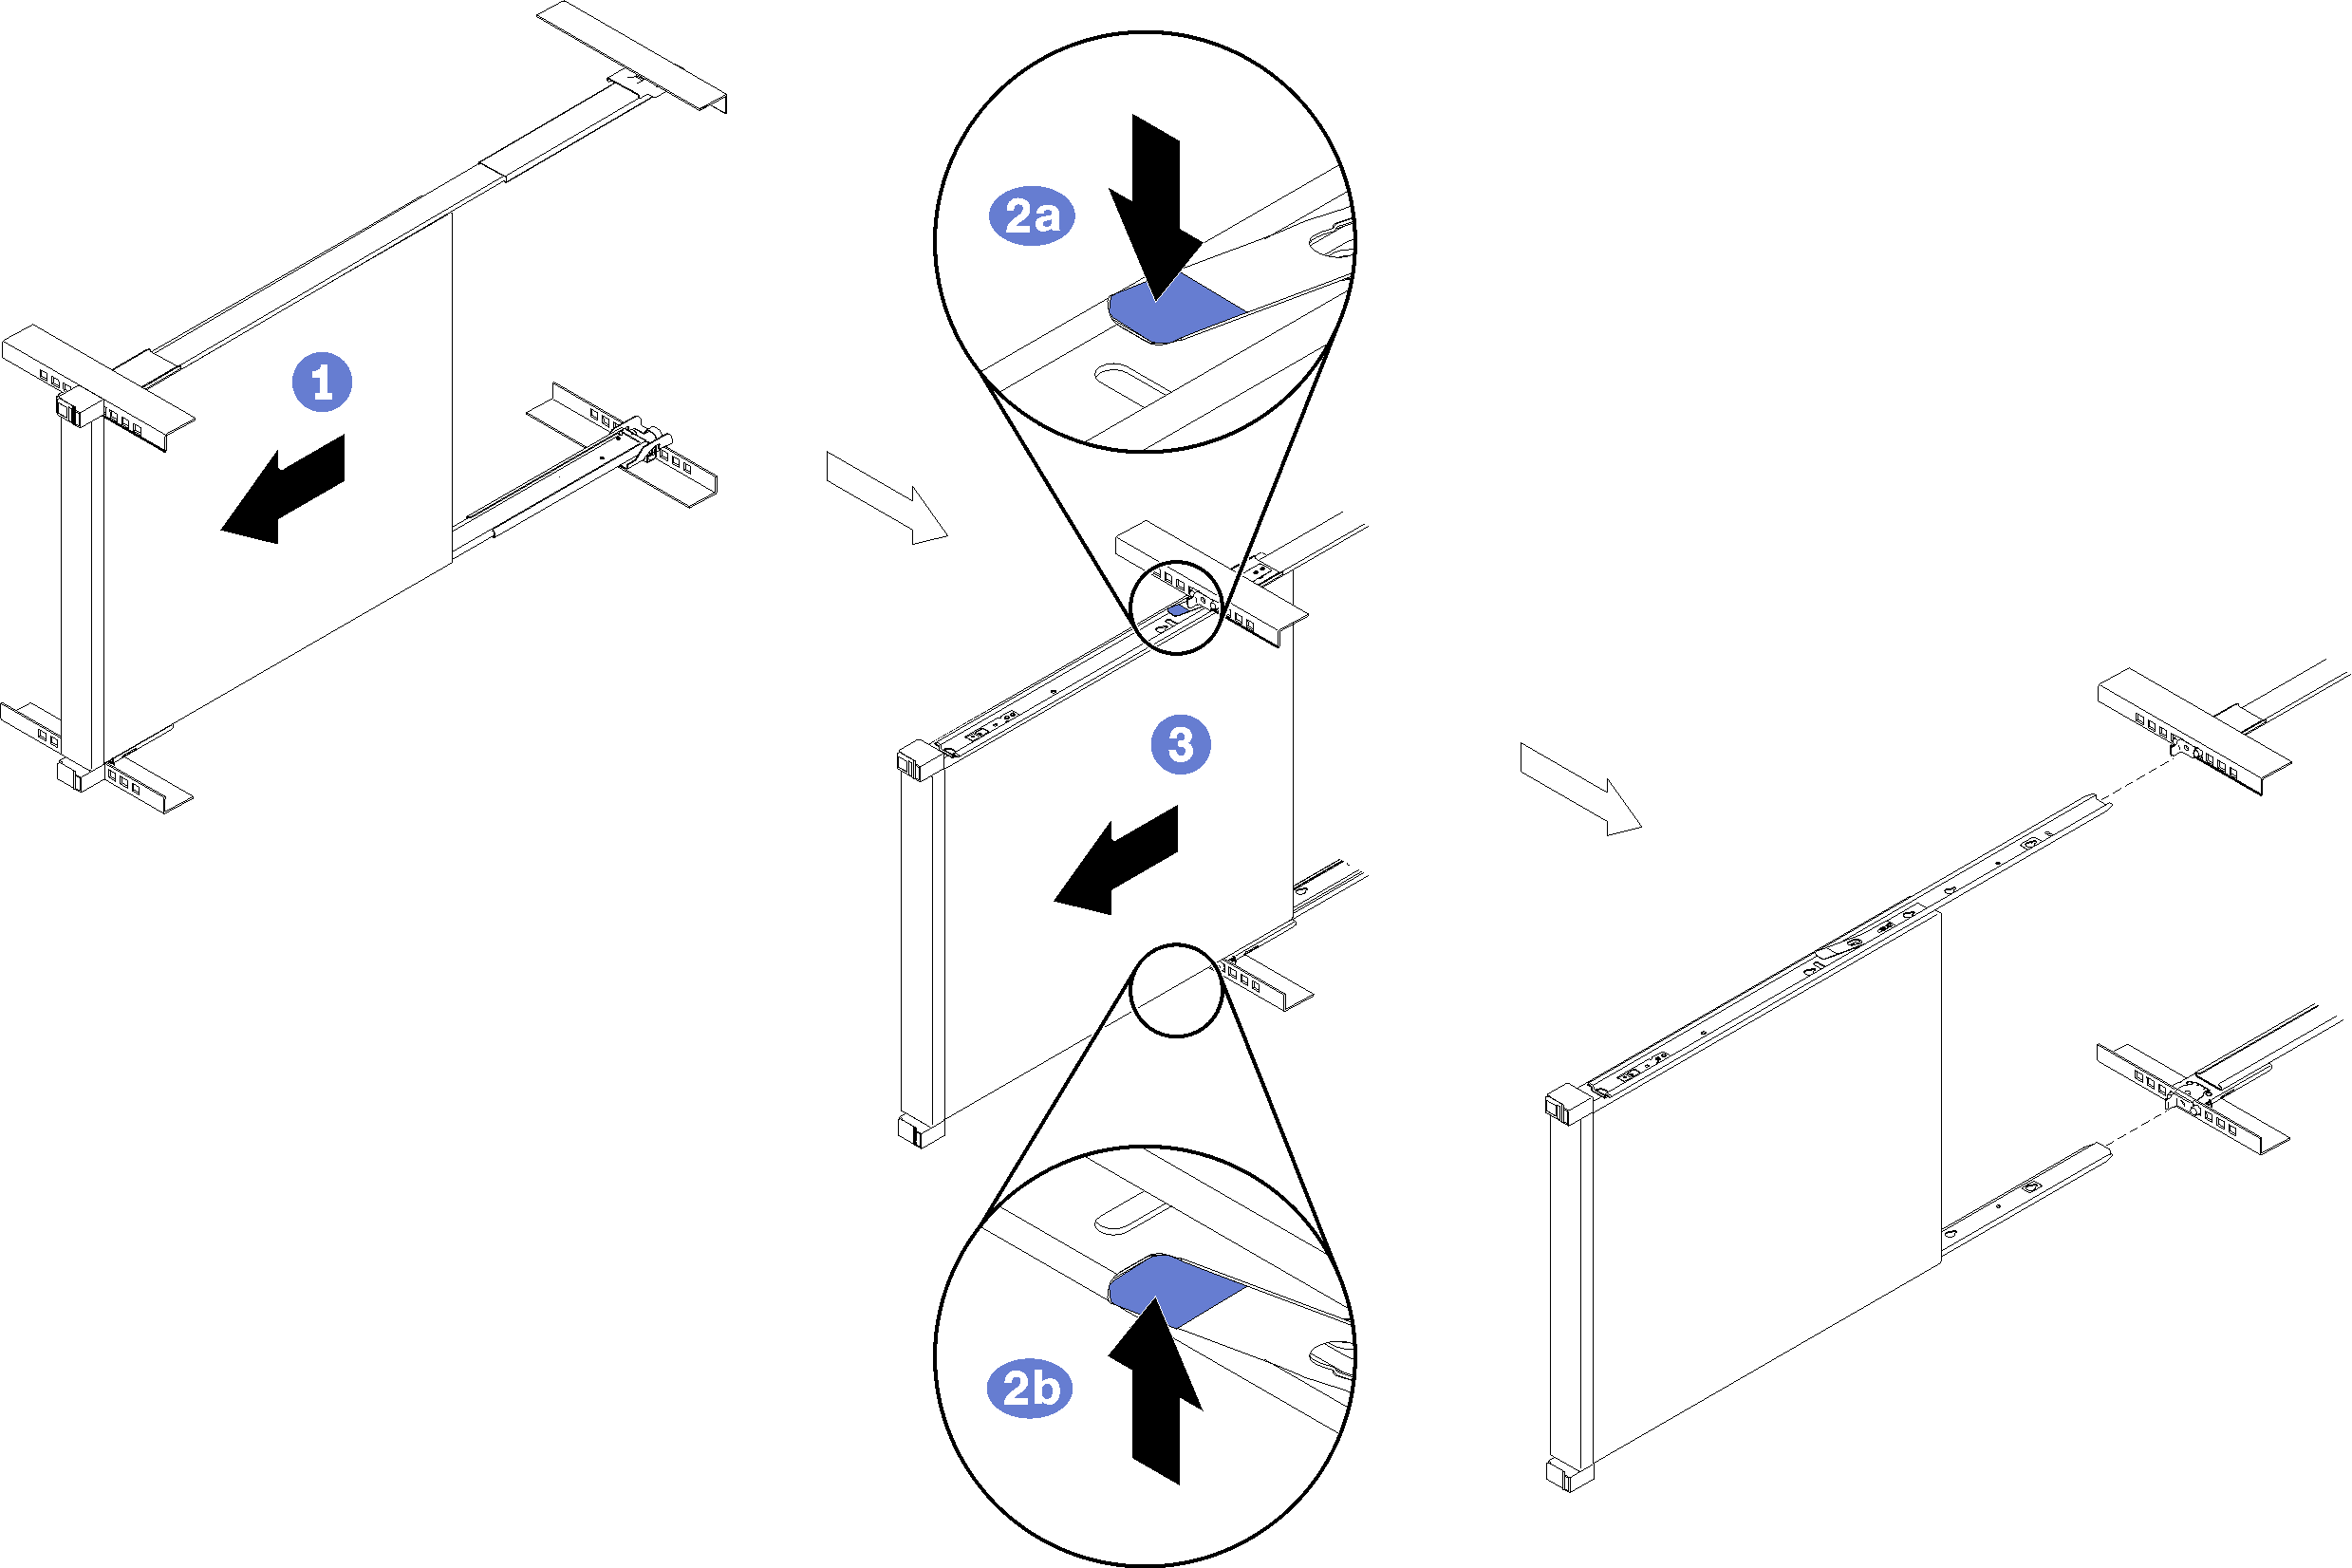
  • ① Disconnect all the cables that are connected to the server, and slide the server out until it stops.
  • Press the release latches to disengage the inner rails.
  • ③ Remove the server.