ถอดส่วนประกอบไดรฟ์ M.2 แบบ Hot-swap
ทำตามคำแนะนำในส่วนนี้เพื่อถอดชิ้นสส่วนประกอบไดรฟ์ M.2 แบบ Hot-swap
เกี่ยวกับงานนี้
อ่าน คู่มือการติดตั้ง และ รายการตรวจสอบความปลอดภัย เพื่อให้แน่ใจว่าคุณจะทำงานได้อย่างปลอดภัย
เพื่อให้แน่ใจว่ามีการระบายความร้อนของระบบอย่างเพียงพอ อย่าใช้งานเซิร์ฟเวอร์นานมากกว่าสองนาทีโดยไม่มีไดรฟ์หรือแผงครอบติดตั้งอยู่ในช่องใส่แต่ละช่อง
หากจะต้องถอดไดรฟ์โซลิดสเทต NVMe ออกอย่างน้อยหนึ่งตัว ขอแนะนำให้ปิดใช้งานผ่านระบบปฏิบัติการก่อน
ก่อนจะถอดหรือเปลี่ยนไดรฟ์ ตัวควบคุมไดรฟ์ (รวมถึงตัวควบคุมที่รวมอยู่บนแผงระบบ), แบ็คเพลนของไดรฟ์ หรือสายไดรฟ์ ให้สำรองข้อมูลที่สำคัญทั้งหมดที่เก็บอยู่บนไดรฟ์ก่อน
ก่อนที่จะถอดส่วนประกอบใดๆ ของอาร์เรย์ RAID (ไดรฟ์ การ์ด RAID ฯลฯ) ให้สำรองข้อมูลการกำหนดค่า RAID ทั้งหมด
ขั้นตอน
- ถอดส่วนประกอบไดรฟ์ M.2 แบบ Hot-swap
 เลื่อนสลักปลดล็อคเพื่อปลดล็อคที่จับ
 หมุนที่จับไปที่ตำแหน่งเปิด
 จับที่จับอย่างอย่างระมัดระวังและเลื่อนไดรฟ์ออกจากช่องใส่ไดรฟ์
รูปที่ 1. การถอดส่วนประกอบไดรฟ์ M.2 แบบ Hot-swap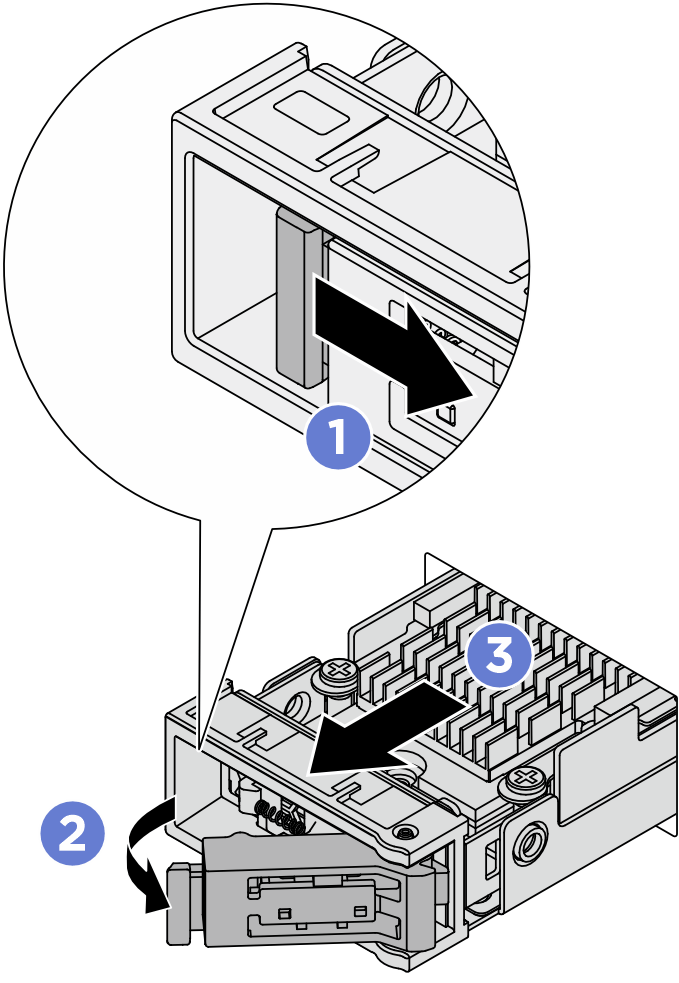
- ติดตั้งถาดไดรฟ์หรือส่วนประกอบไดรฟ์สำหรับเปลี่ยนทดแทนโดยเร็วที่สุด
- หากไม่มีการติดตั้งส่วนประกอบไดรฟ์ทดแทน ให้ติดตั้งถาดไดรฟ์ลงในช่องเสียบไดรฟ์ที่ว่างเพื่อให้ระบบระบายความร้อนอย่างเพียงพอ ในการแยกถาดไดรฟ์ออกจากส่วนประกอบไดรฟ์ M.2 แบบ Hot-swap โปรดดู ถอดส่วนประกอบไดรฟ์ M.2รูปที่ 2. การติดตั้งถาดไดรฟ์ M.2
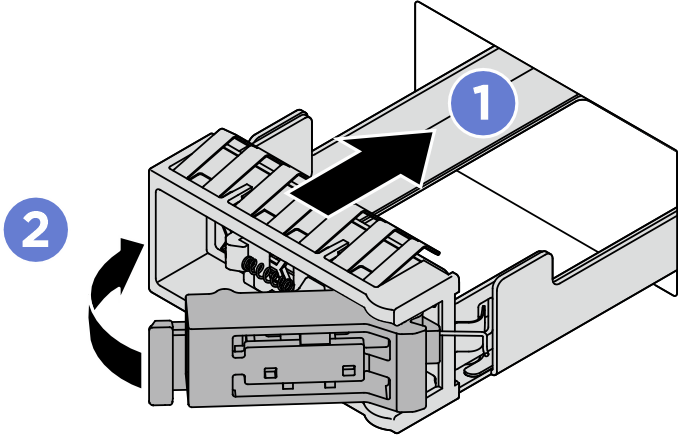
- ตรวจสอบให้แน่ใจว่าที่จับอยู่ในตำแหน่งเปิด จากนั้น ให้จัดแนวถาดให้ตรงกับรางนำทางในช่องใส่ แล้วค่อยๆ ดันถาดเข้าไปในช่องใส่จนสุด
- หมุนที่จับไปยังตำแหน่งปิดจนสุดจนกว่าสลักที่จับจะคลิกเข้าที่
- หากไม่มีการติดตั้งส่วนประกอบไดรฟ์ทดแทน ให้ติดตั้งถาดไดรฟ์ลงในช่องเสียบไดรฟ์ที่ว่างเพื่อให้ระบบระบายความร้อนอย่างเพียงพอ ในการแยกถาดไดรฟ์ออกจากส่วนประกอบไดรฟ์ M.2 แบบ Hot-swap โปรดดู ถอดส่วนประกอบไดรฟ์ M.2
หลังจากดำเนินการเสร็จ
หากคุณได้รับคำแนะนำให้ส่งคืนส่วนประกอบหรืออุปกรณ์เสริม ให้ปฏิบัติตามคำแนะนำที่มาพร้อมบรรจุภัณฑ์ทั้งหมด และให้ใช้บรรจุภัณฑ์ใดๆ ที่ส่งมอบให้กับคุณเพื่อการจัดส่ง
วิดีโอสาธิต