Hintere B200 GPU installieren
Führen Sie die Anweisungen in diesem Abschnitt aus, um eine hintere B200 GPU zu installieren. Der Vorgang muss von einem qualifizierten Kundendiensttechniker ausgeführt werden.
Zu dieser Aufgabe
Achtung
- Lesen Sie Installationsrichtlinien und Sicherheitsprüfungscheckliste, um sicherzustellen, dass Sie sicher arbeiten.
- Berühren Sie mit der antistatischen Schutzhülle, in der sich die Komponente befindet, eine unlackierte Metalloberfläche am Server. Entnehmen Sie die Komponente anschließend aus der Schutzhülle und legen Sie sie auf eine antistatische Oberfläche.
- Falls Sie keinen Drehmomentschraubendreher besitzen, wird auf Anfrage einer zur Verfügung gestellt.
Anmerkung
Stellen Sie sicher, dass Sie die unten aufgeführten Werkzeuge bereithalten, um die Komponente ordnungsgemäß auszutauschen:
- T15-Torx-Schraubendreher
- 2x T15-Torx-Verlängerungsbit, 200mm
- PH1-Kreuzschlitzschraubendreher
- PH2-Kreuzschlitzschraubendreher
- Alkoholhaltiges Reinigungstuch
- B200 PCM
- B200 SXM6 PAD-1
- B200 SXM6 PAD-2
- B200 GPU-Service-Satz
Wichtig
Richtlinien zum Austauschen von Putty-Pads/Phasenwechselmaterialien (PCM)
- Reinigen Sie vor dem Austausch des Putty-Pads/PCM die Hardwareoberfläche vorsichtig mit einem alkoholhaltigen Reinigungstuch.
- Halten Sie das Putty-Pad/PCM vorsichtig fest, um eine Verformung zu vermeiden. Stellen Sie sicher, dass keine Schraubenlöcher oder Öffnungen durch das Putty-Pad/PCM verdeckt werden.
- Verwenden Sie kein abgelaufenes Putty-Pad/PCM. Überprüfen Sie das Verfallsdatum auf der Verpackung des Putty-Pads/PCM. Wenn die Putty-Pads/PCM abgelaufen sind, kaufen Sie neue, um sie ordnungsgemäß zu ersetzen.
In der folgenden Abbildung sind die B200 GPU-Nummerierung und die entsprechende Steckplatznummerierung in XCC dargestellt.
Abbildung 1. B200 GPU-Nummerierung
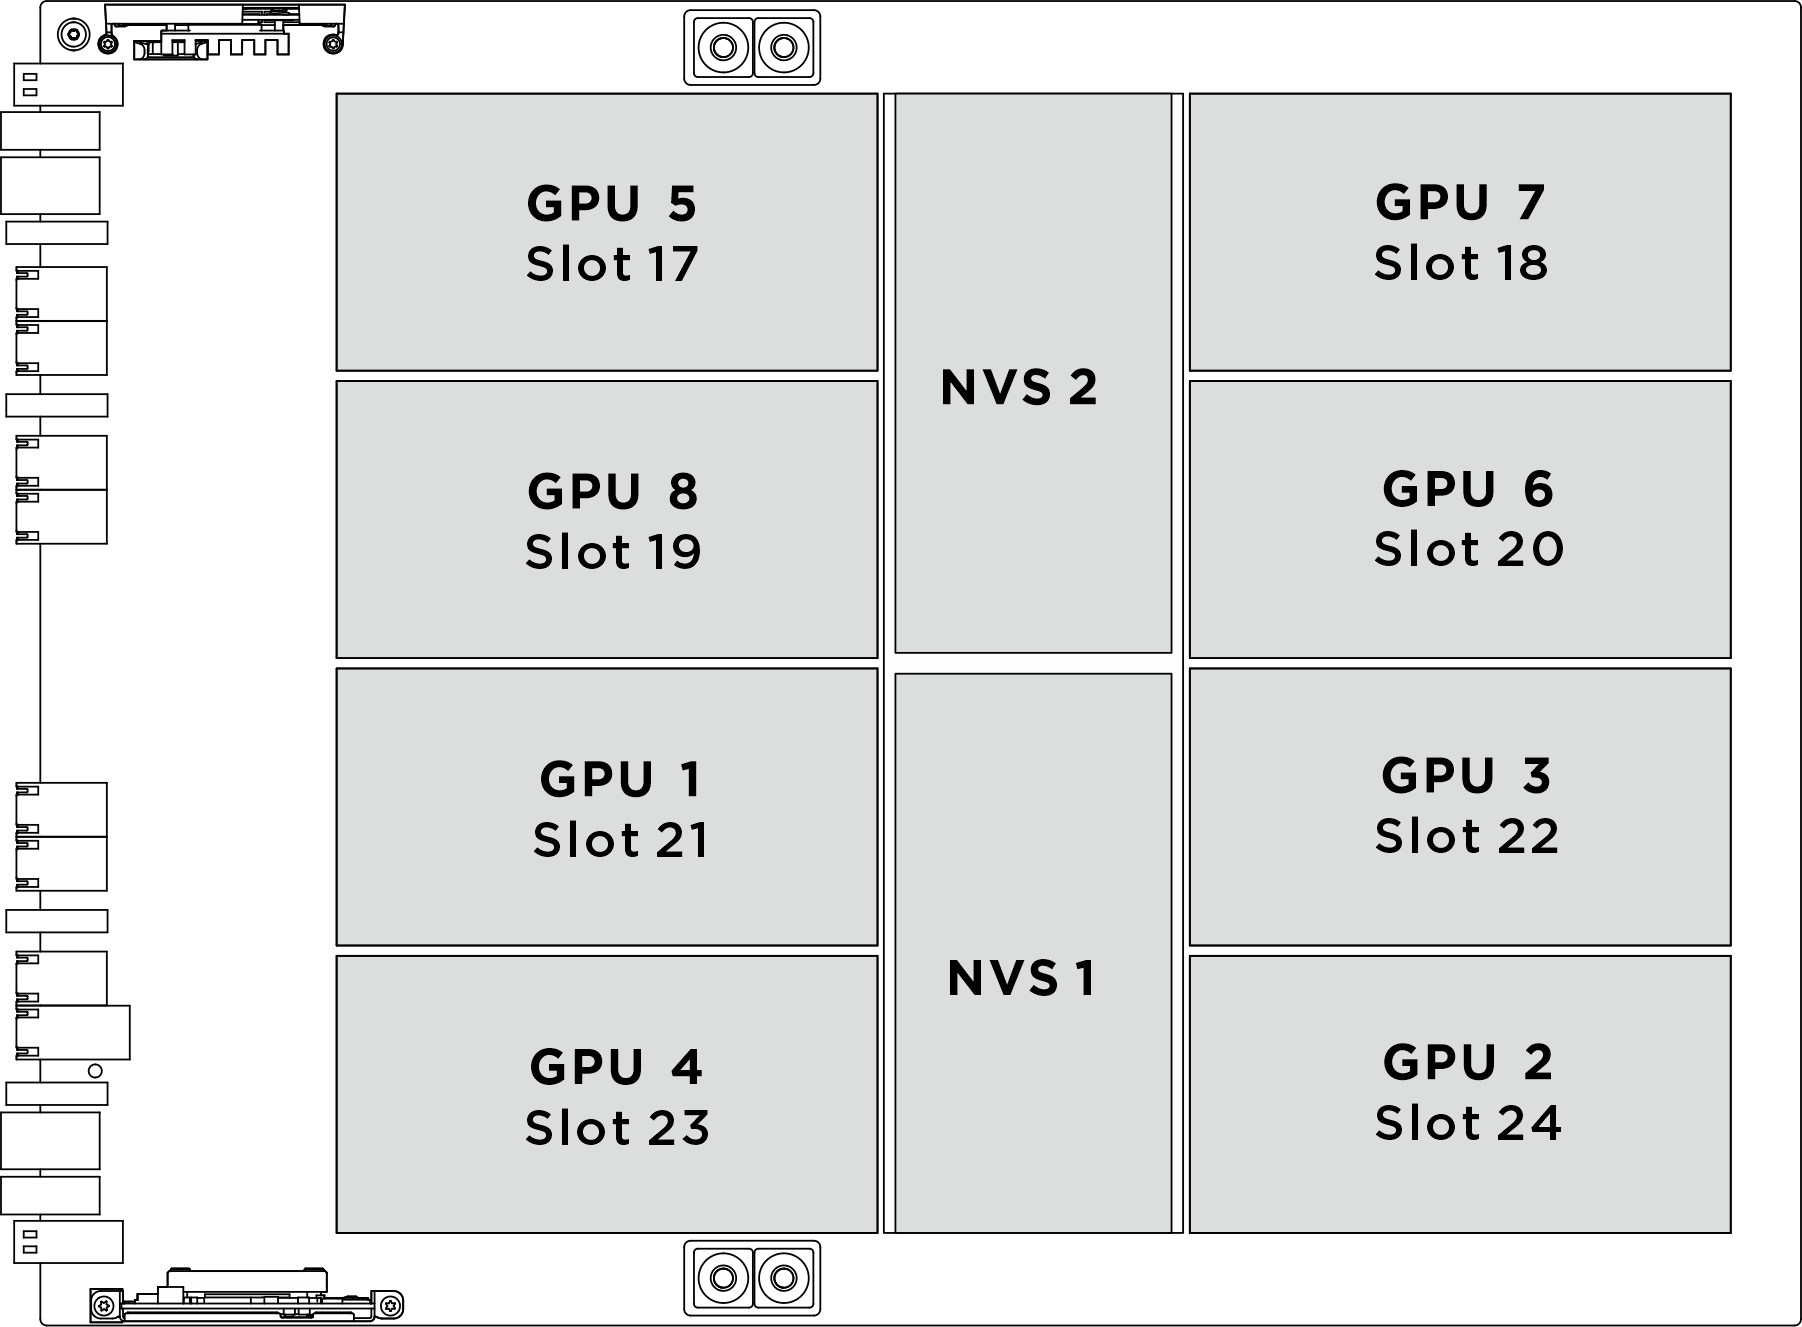
| Physischer GPU-Sockel | Steckplatznummerierung in XCC | Logische Nummer in nvidia-smi |
|---|---|---|
GPU 1 | Steckplatz 21 | 4 |
GPU 2 | Steckplatz 24 | 7 |
GPU 3 | Steckplatz 22 | 5 |
GPU 4 | Steckplatz 23 | 6 |
GPU 5 | Steckplatz 17 | 0 |
GPU 6 | Steckplatz 20 | 3 |
GPU 7 | Steckplatz 18 | 1 |
GPU 8 | Steckplatz 19 | 2 |
Vorgehensweise
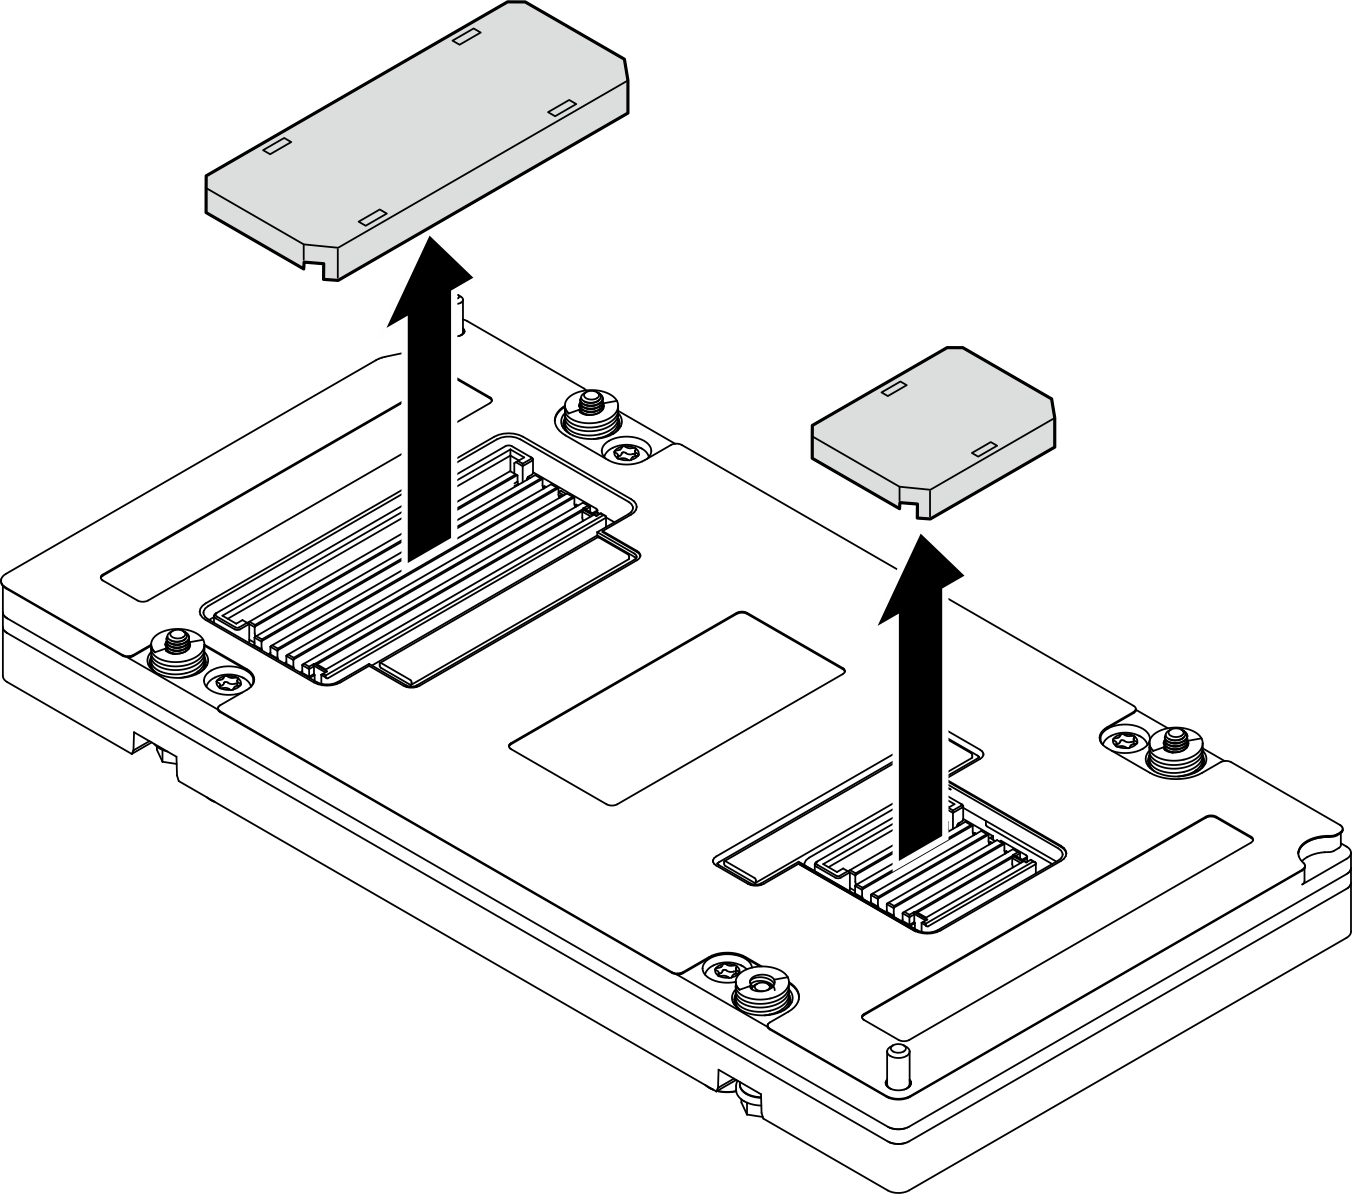
- (Optional) Entfernen Sie bei einer neuen GPU die Anschlussabdeckungen an der Unterseite.Abbildung 2. Entfernen der Anschlussabdeckungen
- Installieren Sie die GPU.
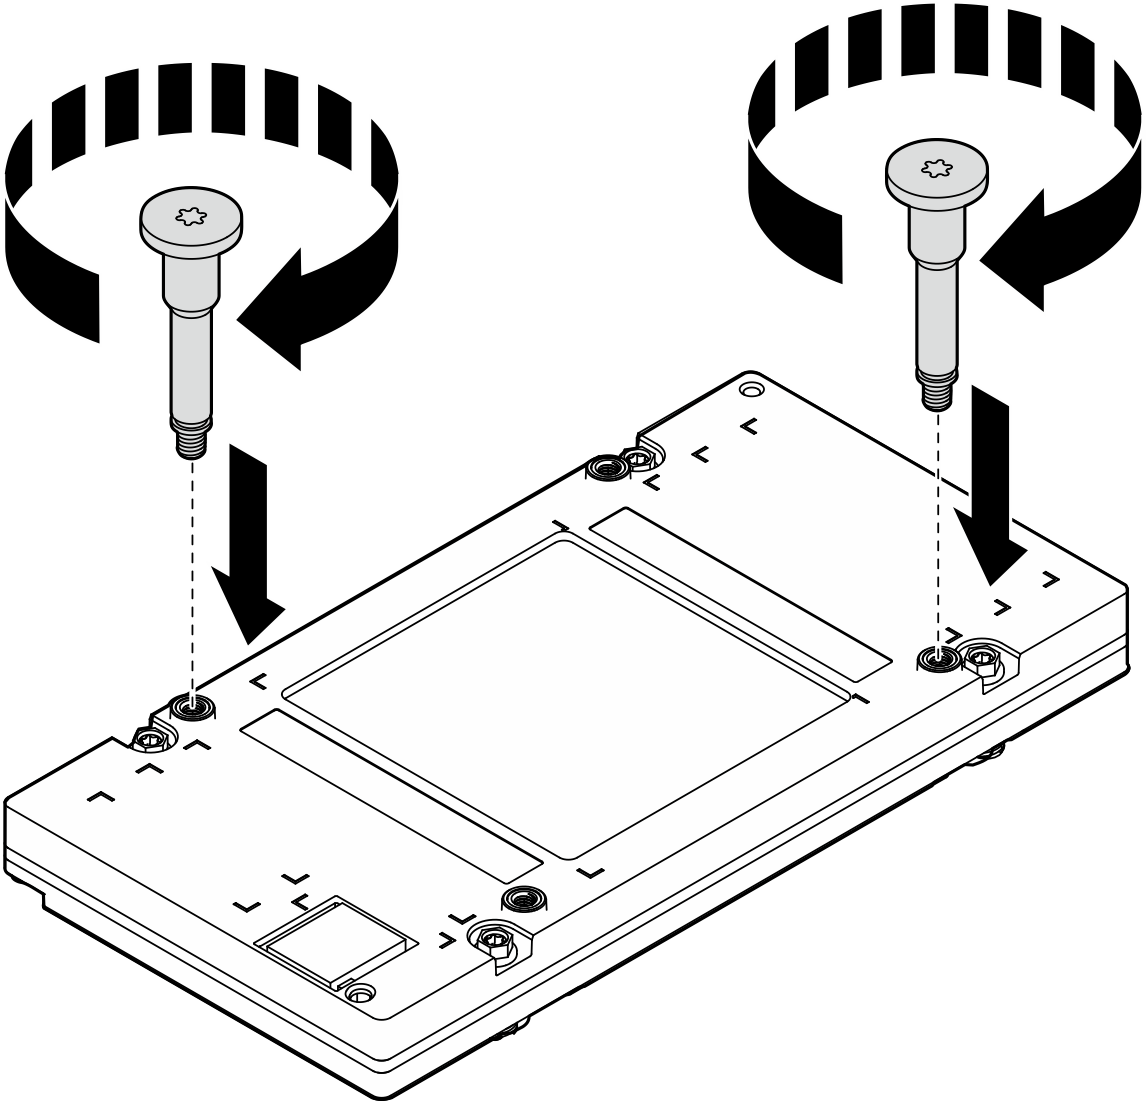
- Bringen Sie die beiden GPU-Schraubengriffe diagonal an. Richten Sie die Schraubengriffe an den Schraubenlöchern der Kühlplatte aus. Befestigen Sie dann die Schraubengriffe von Hand.Abbildung 3. Installieren der GPU-Schraubengriffe
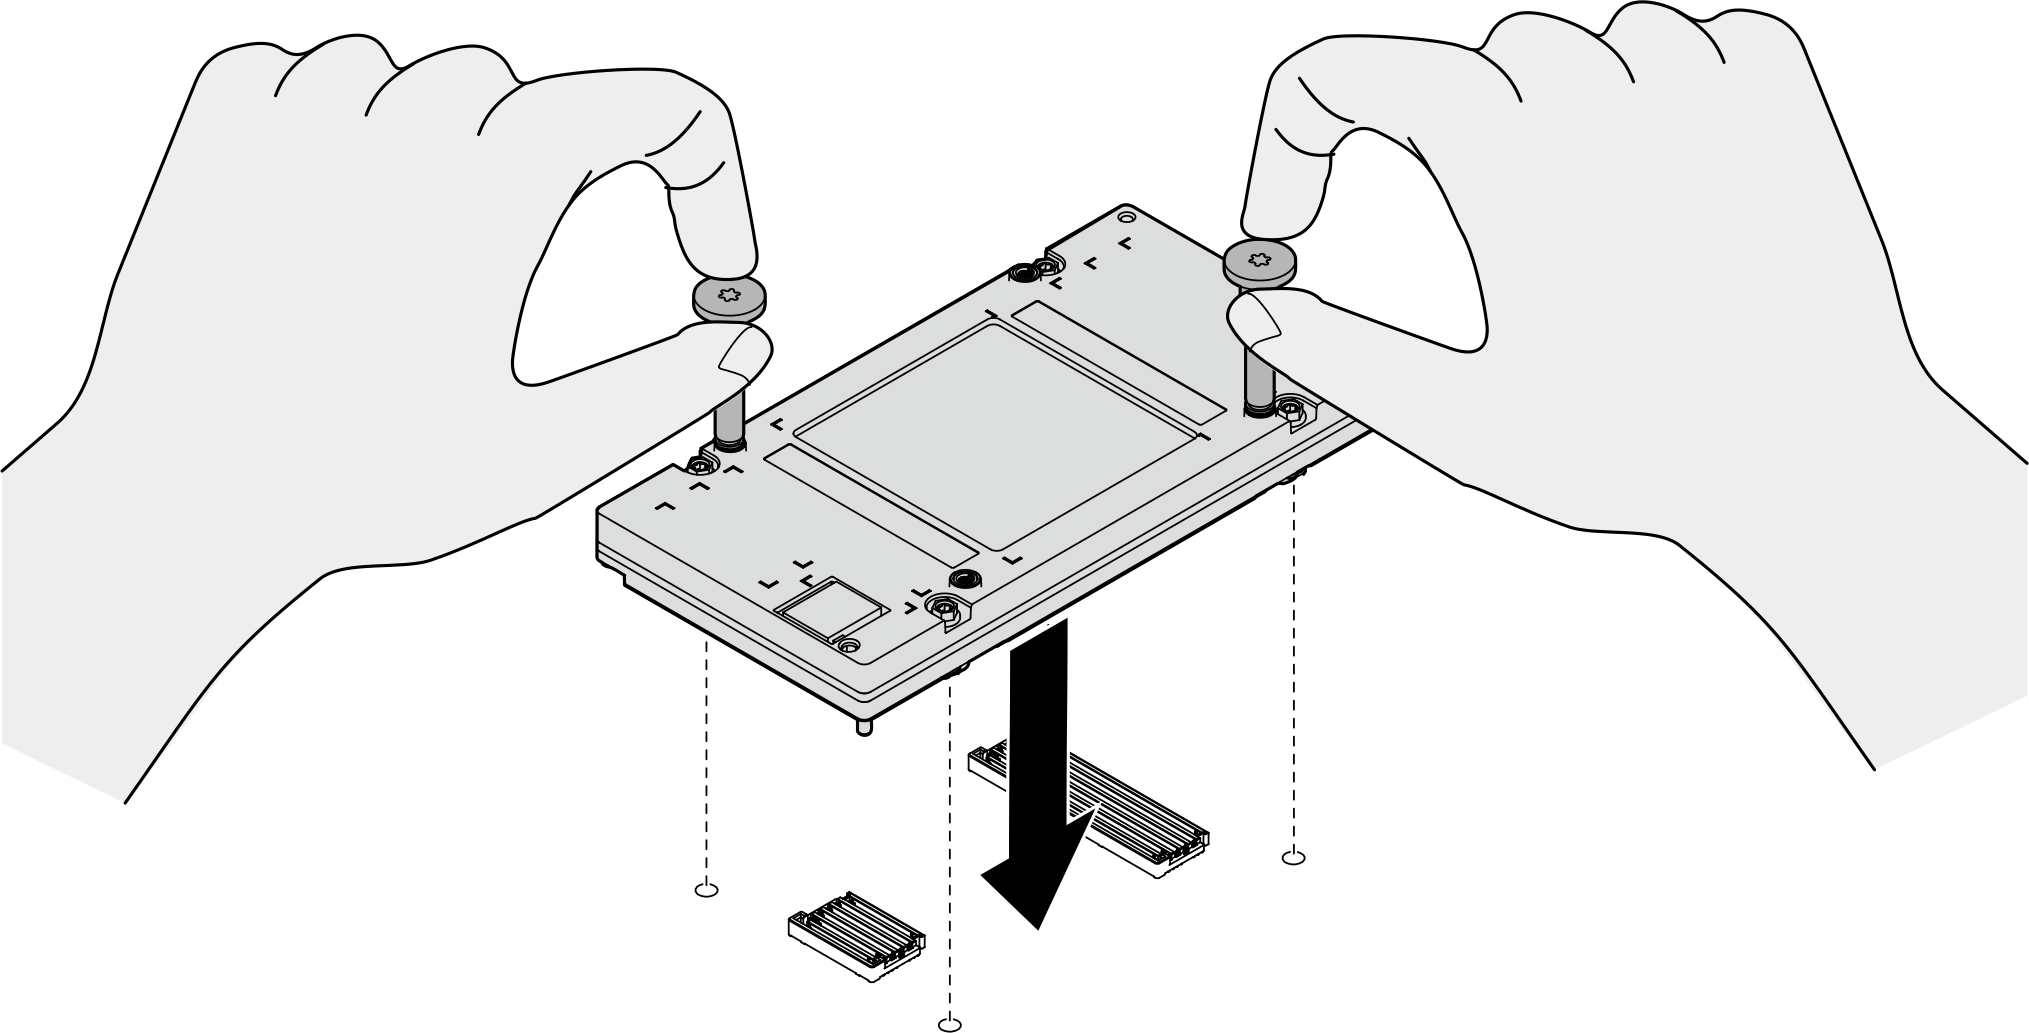
- Halten Sie die GPU-Schraubengriffe fest, um die GPU vorsichtig auf dem GPU-Baseboard zu platzieren.Abbildung 4. Installieren der GPU
- Entfernen Sie die beiden Schraubengriffe, indem Sie sie von Hand lösen.Abbildung 5. Entfernen der GPU-Schraubengriffe
- Stellen Sie zunächst den Drehmomentschraubendreher auf 0,11 ± 0,011 Newtonmeter bzw. 0,97 ± 0,097 Poundforce Inch ein, um gleichzeitig die beiden Diagonalschrauben
 anzuziehen. Ziehen Sie dann gleichzeitig die beiden Diagonalschrauben
  an.
an. - Stellen Sie dann den Drehmomentschraubendreher auf 0,6 ± 0,024 Newtonmeter bzw. 5,3 ± 0,212 Poundforce Inch ein, um die beiden Diagonalschrauben gleichzeitig anzuziehen. Ziehen Sie dann gleichzeitig die beiden Diagonalschrauben an.Abbildung 6. Installieren der GPU

- Bringen Sie die beiden GPU-Schraubengriffe diagonal an. Richten Sie die Schraubengriffe an den Schraubenlöchern der Kühlplatte aus. Befestigen Sie dann die Schraubengriffe von Hand.
- Tauschen Sie das Phasenwechselmaterial (PCM) auf der GPU-Kühlplatte aus.
- Bringen Sie die PCM-Vorrichtung an der GPU-Kühlplatte an.
- Entfernen Sie die Folie von einer Seite des Pads. Richten Sie das PCM an der Vorrichtung aus und legen Sie es auf die Kühlplatte. Entfernen Sie die Vorrichtung. Drücken Sie dann mit dem Finger auf die gesamte Oberfläche des PCM, um eingeschlossene Luft herauszulassen. Halten Sie diese Position 1 bis 2 Minuten, bis das PCM fest sitzt. Entfernen Sie vorsichtig die restliche obere Folie.Achtung
Das PCM kann nicht wiederverwendet werden. Jedes Mal, wenn der Wasserkreislauf entfernt wird, muss das PCM durch ein neues ersetzt werden.
Abbildung 7. Anbringen des PCM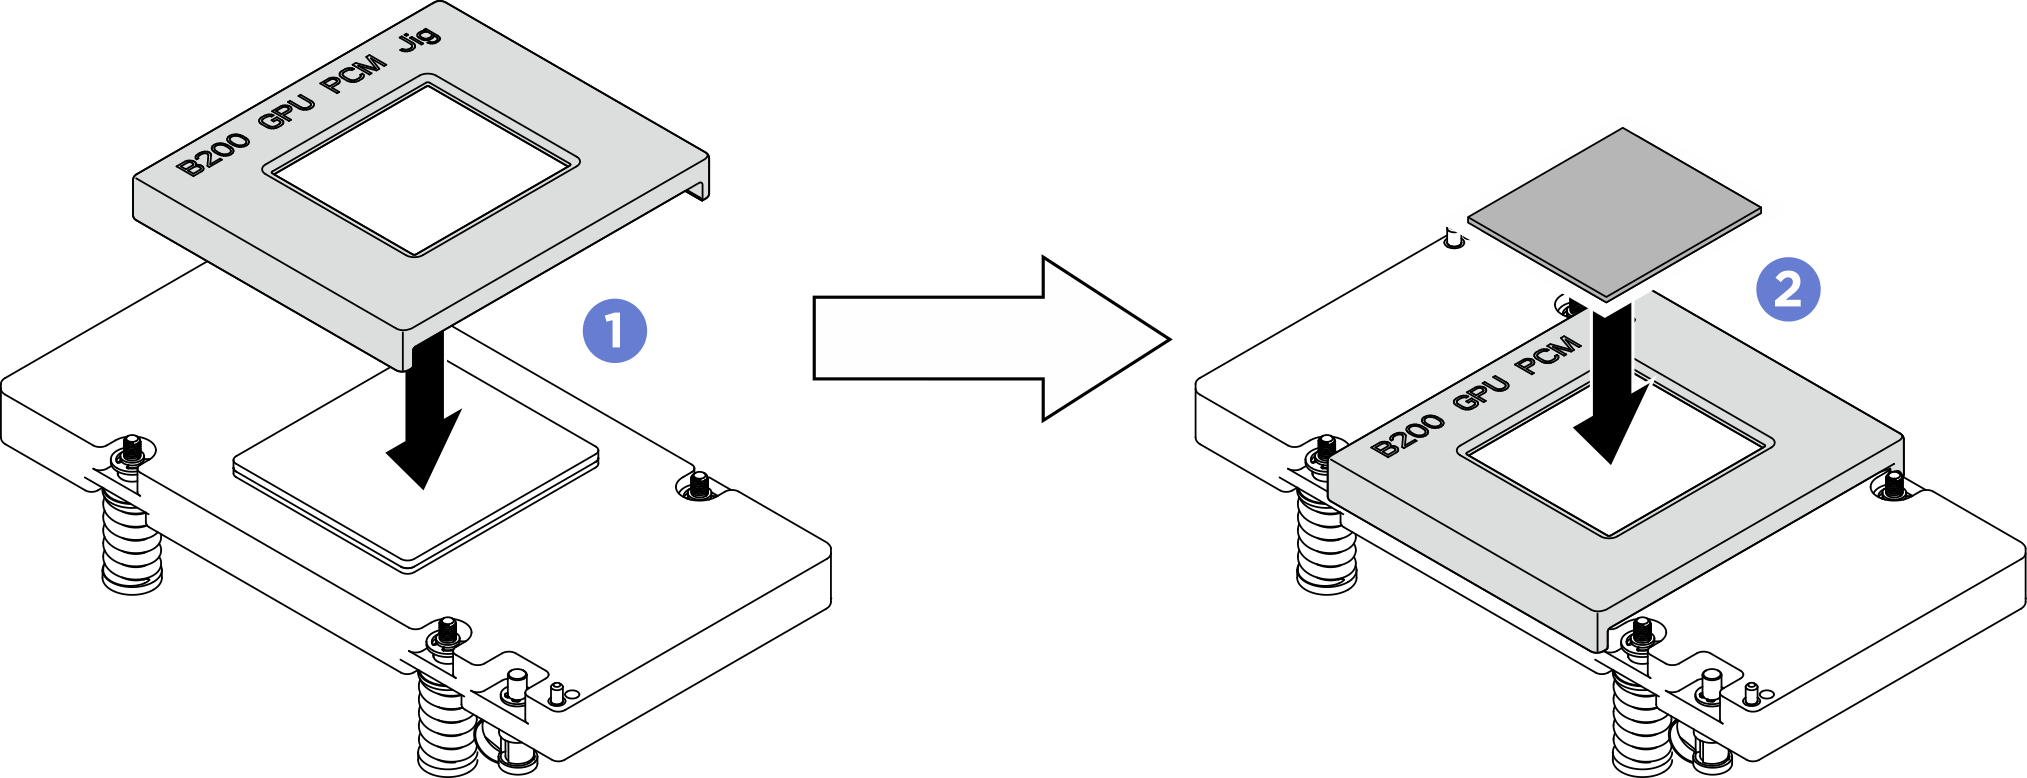
- Ersetzen Sie die Putty-Pads (x10) auf der GPU.
- Befolgen Sie die Anwendungshinweise für die B200 GPU, um die Putty-Pads anzubringen.Anmerkung
- Bringen Sie die Putty-Pads von B200 SXM6 PAD-1 an den sechs Positionen an, die mit der Nummer 1 gekennzeichnet sind.
- Bringen Sie die Putty-Pads von B200 SXM6 PAD-1 an den beiden Positionen an, die mit der Nummer 2 gekennzeichnet sind.
- Bringen Sie die Putty-Pads von B200 SXM6 PAD-2 an den beiden Positionen an der GPU VR an, die mit den Nummern 3 und 4 (graue Farbe) gekennzeichnet sind.
Abbildung 8. Anleitung für GPU-Putty-Pads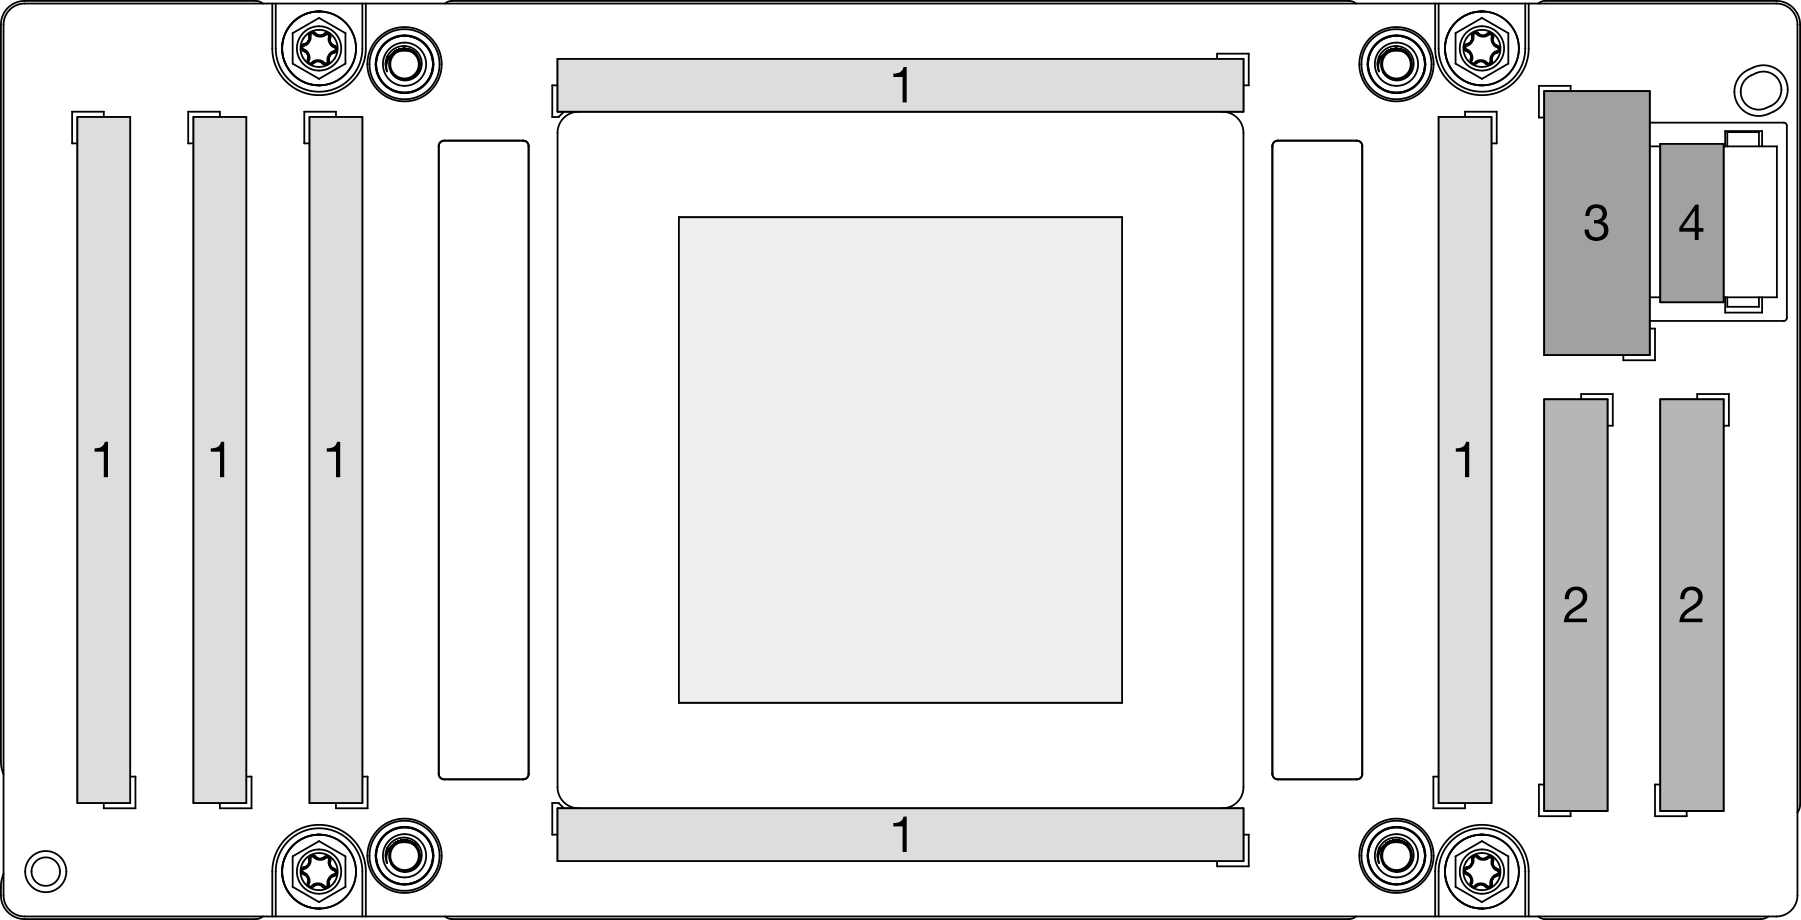
- Entfernen Sie die Folie von einer Seite des Pads.
 Stellen Sie sicher, dass die beiden grauen Putty-Pads an der GPU VR (1) und den Markierungen ausgerichtet sind. Platzieren Sie die Pads dann auf der GPU VR und üben Sie mit dem Finger leichten Druck auf die gesamte Oberfläche der Pads aus, damit sie fest sitzen. Entfernen Sie vorsichtig die restliche obere Folie.
 Richten Sie die Putty-Pads an den Markierungen auf der GPU aus. Platzieren Sie die Pads dann auf der GPU und üben Sie mit dem Finger leichten Druck auf die gesamte Oberfläche der Pads aus, damit sie fest sitzen. Entfernen Sie vorsichtig die restliche obere Folie.Achtung
- Putty-Pads können nicht wiederverwendet werden. Jedes Mal, wenn der Wasserkreislauf entfernt wird, müssen die Putty-Pads durch neue ersetzt werden.
Abbildung 9. Austausch der Putty-Pads an der GPU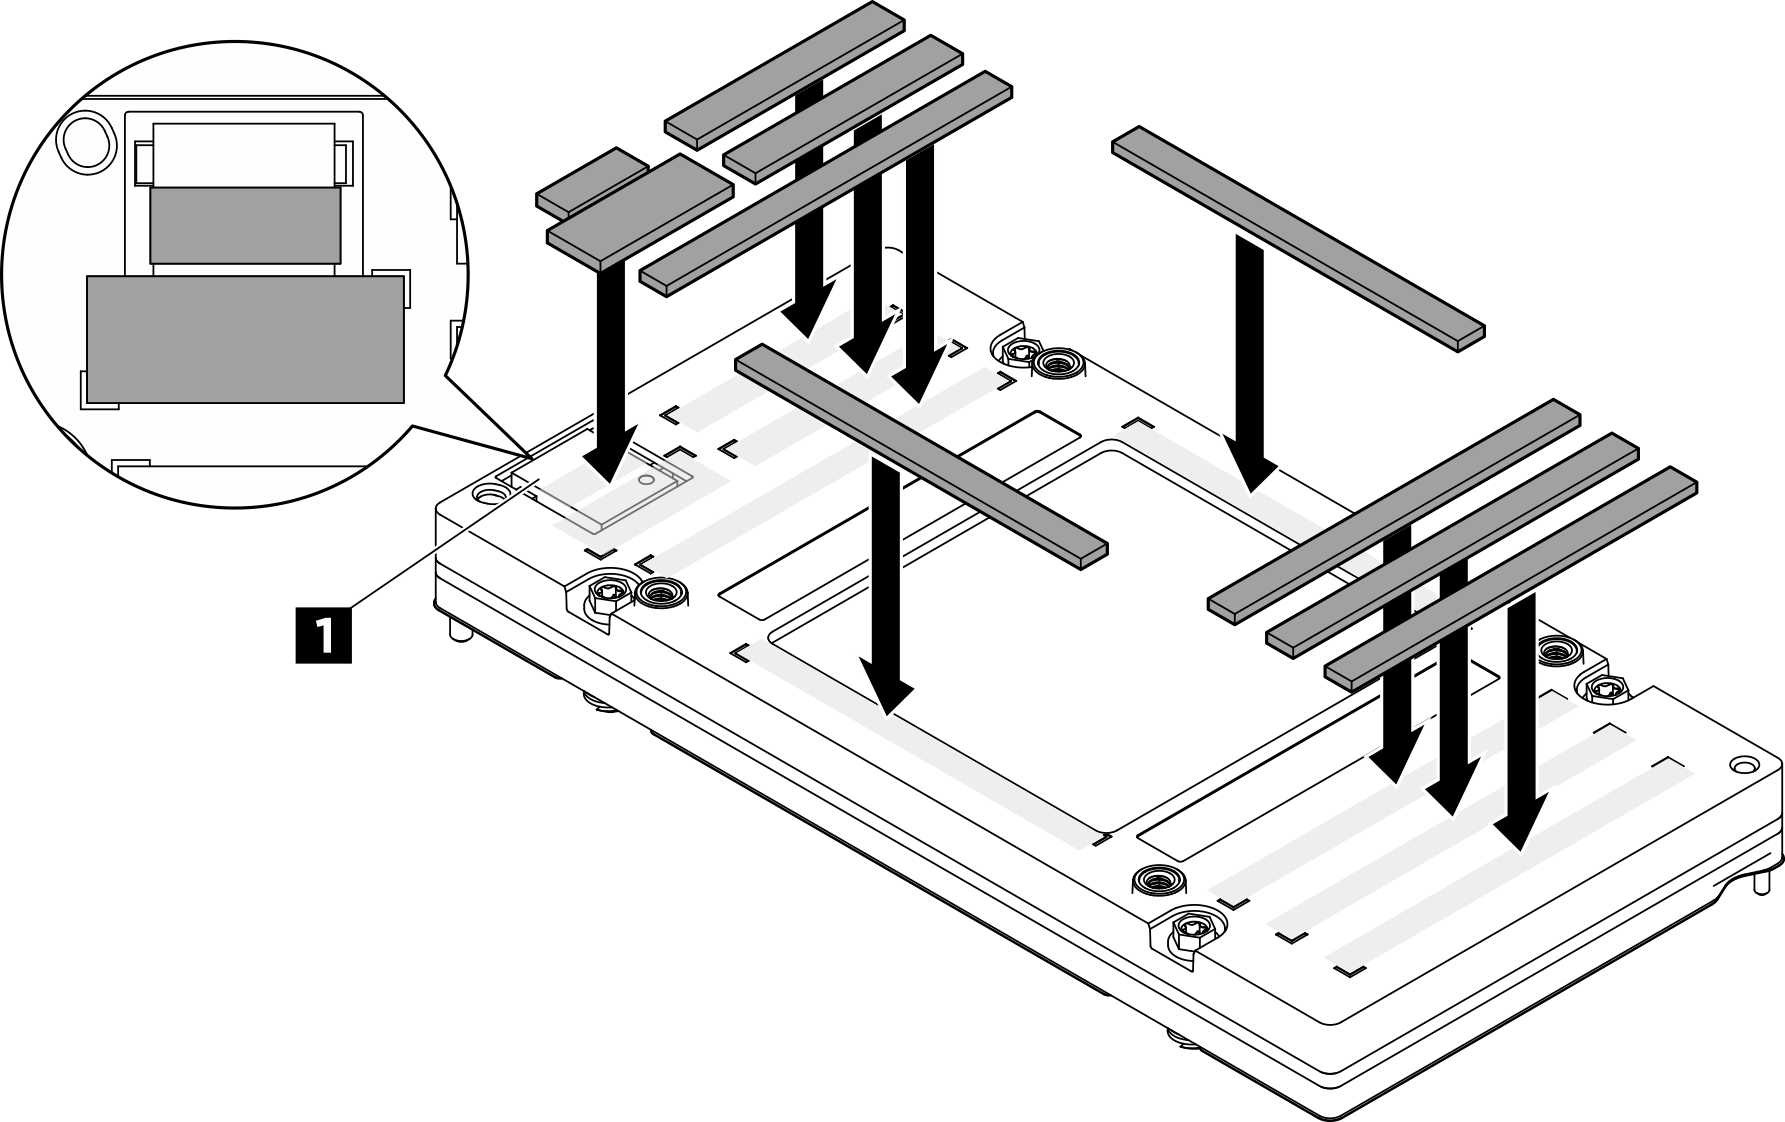
1 GPU VR (Decken Sie die GPU VR mit Putty-Pad ab.)
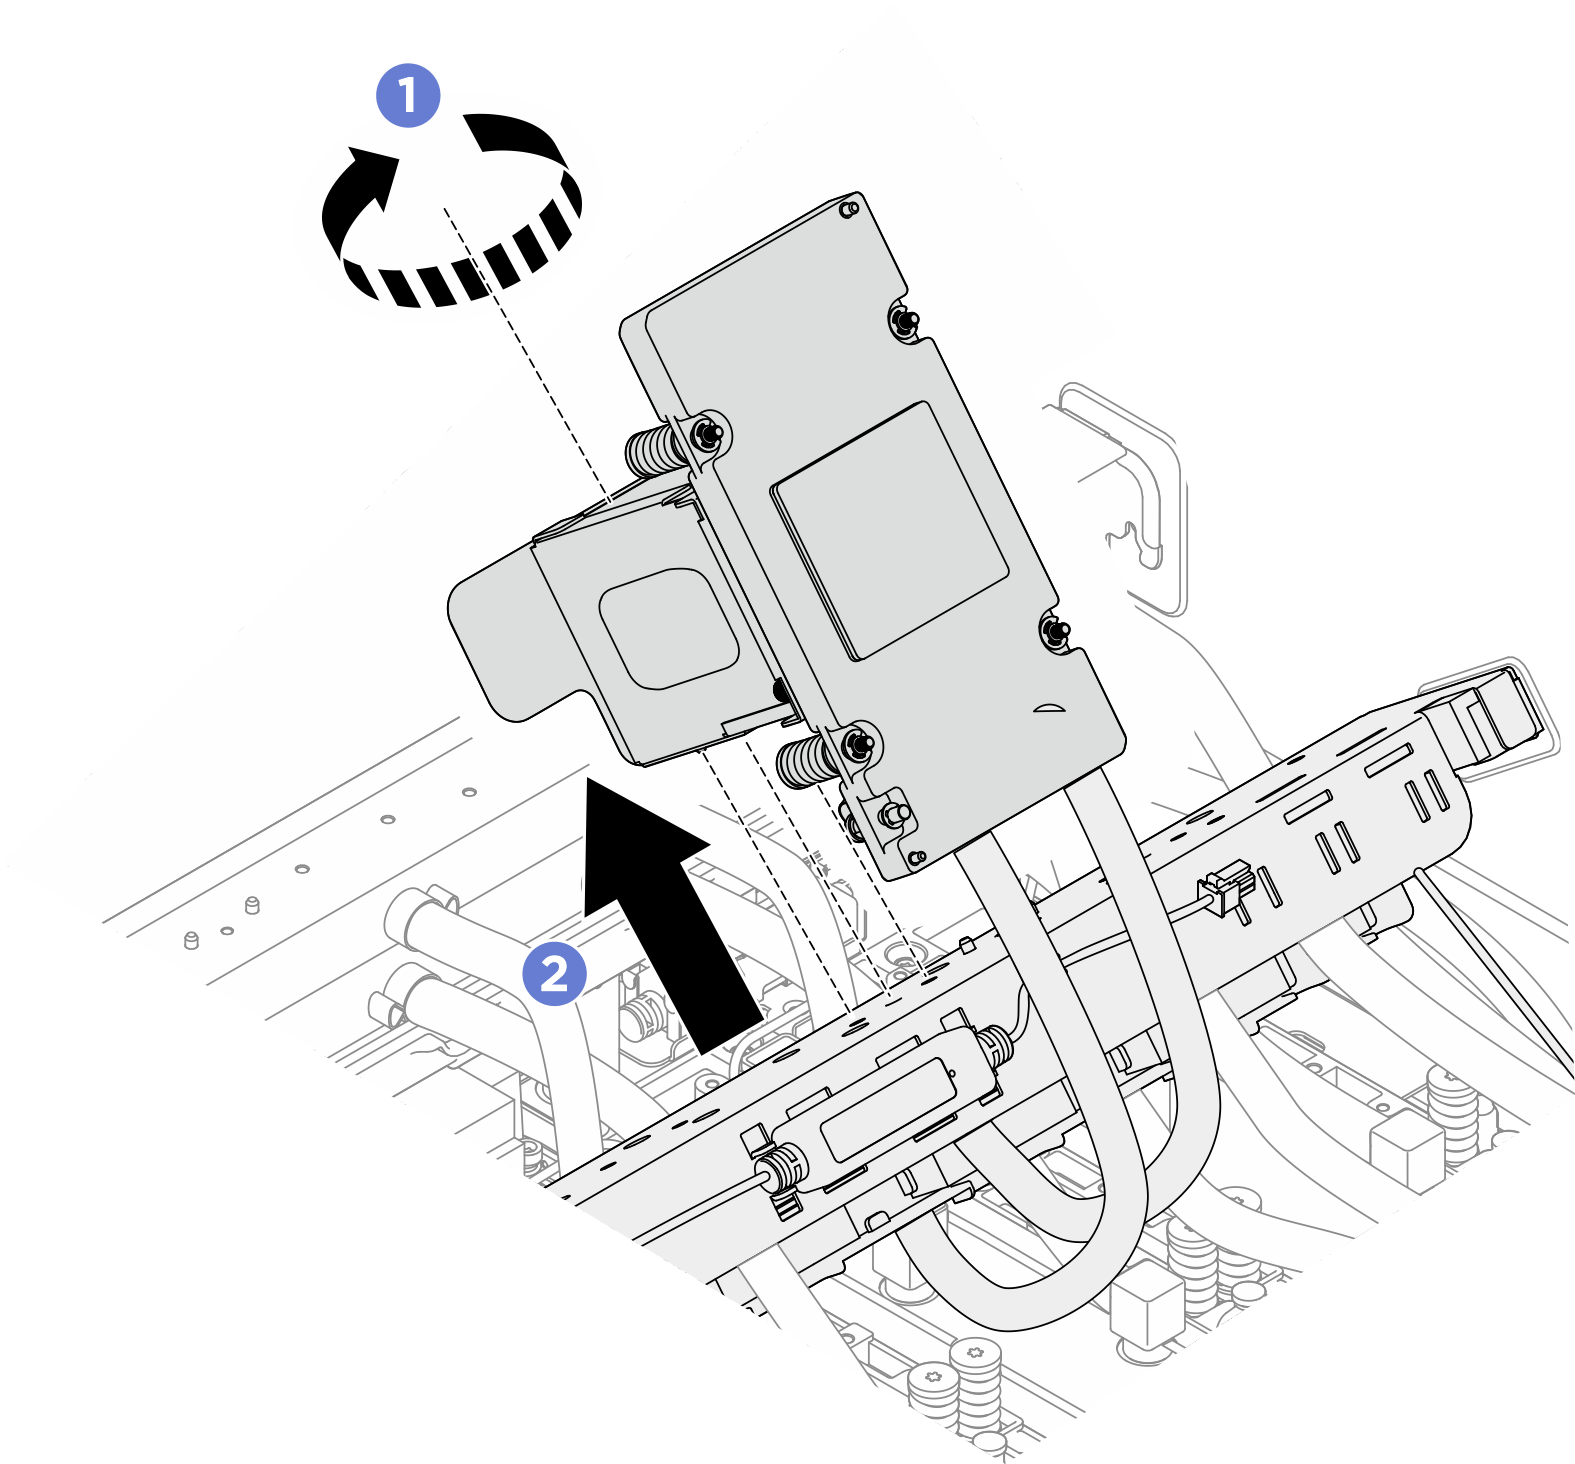
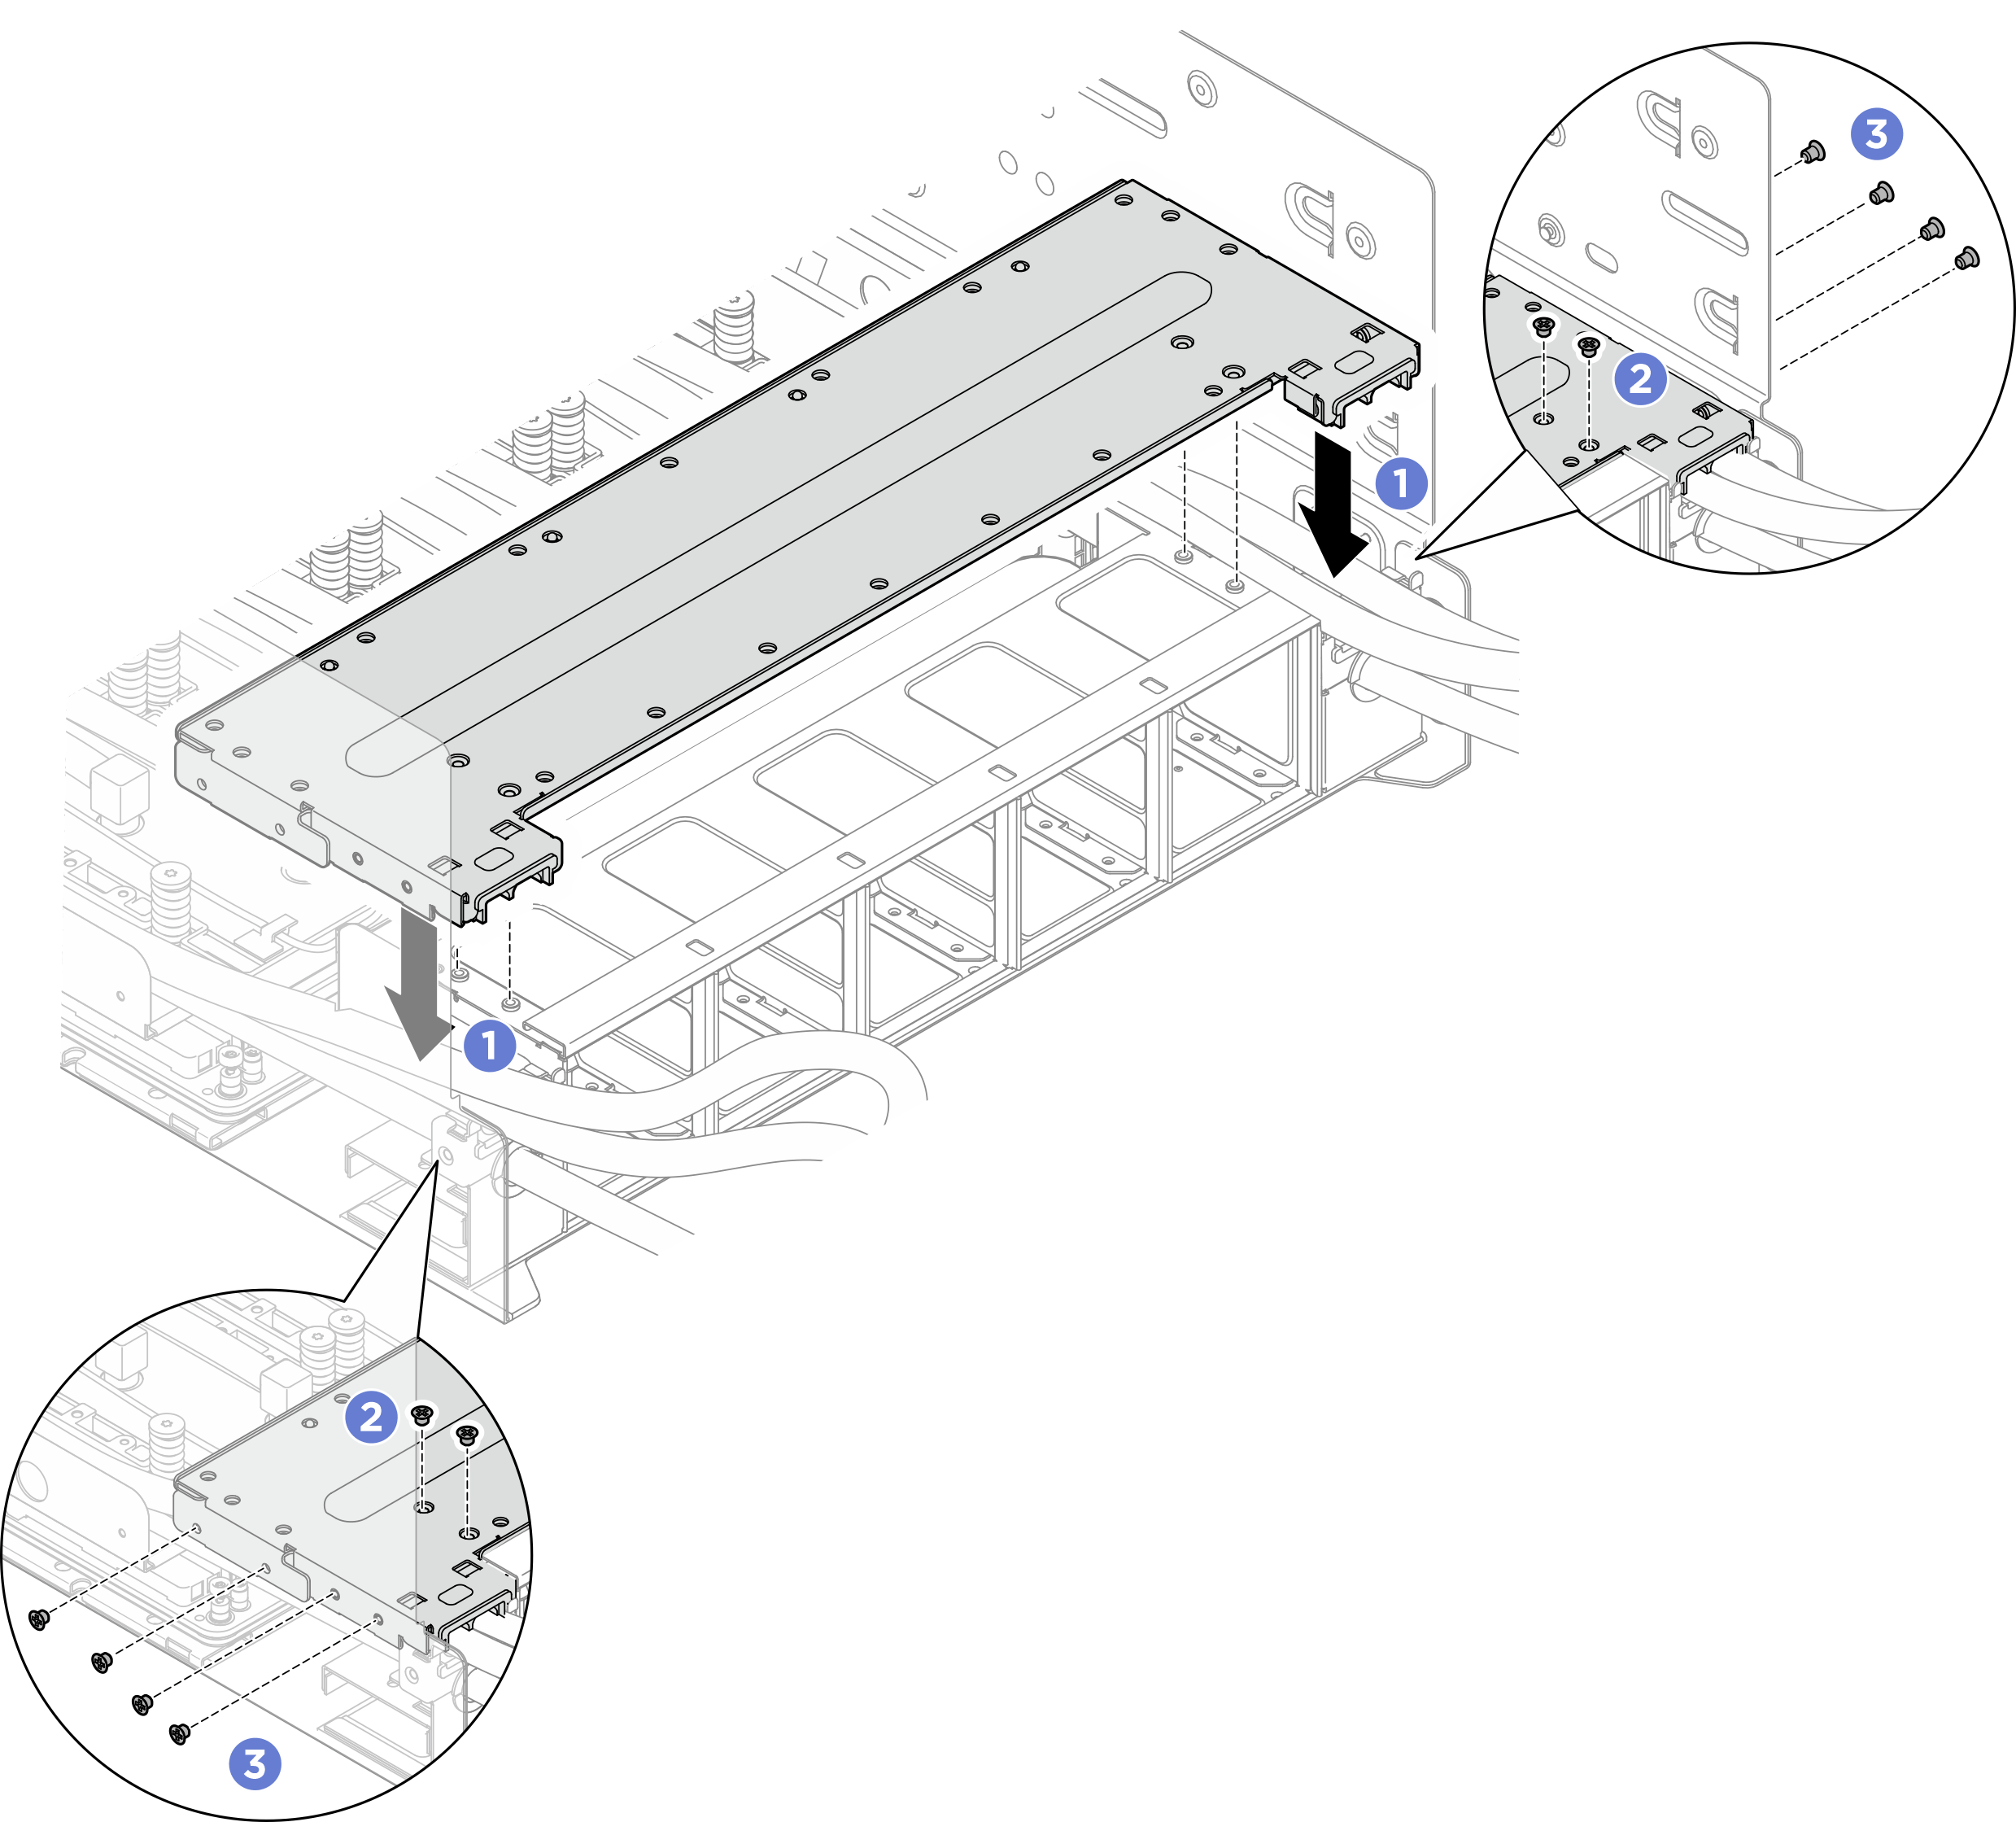
- Entfernen Sie die Servicehalterung und die GPU-Kühlplattenbaugruppe von der Leitung.
- Lösen Sie die unverlierbare Schraube, mit der die Servicehalterung an der Leitung befestigt ist.
- Heben Sie die Servicehalterung und die GPU-Kühlplattenbaugruppe von der Leitung weg, um sie zu entfernen.Abbildung 10. Entfernen der Servicehalterung und der GPU-Kühlplattenbaugruppe
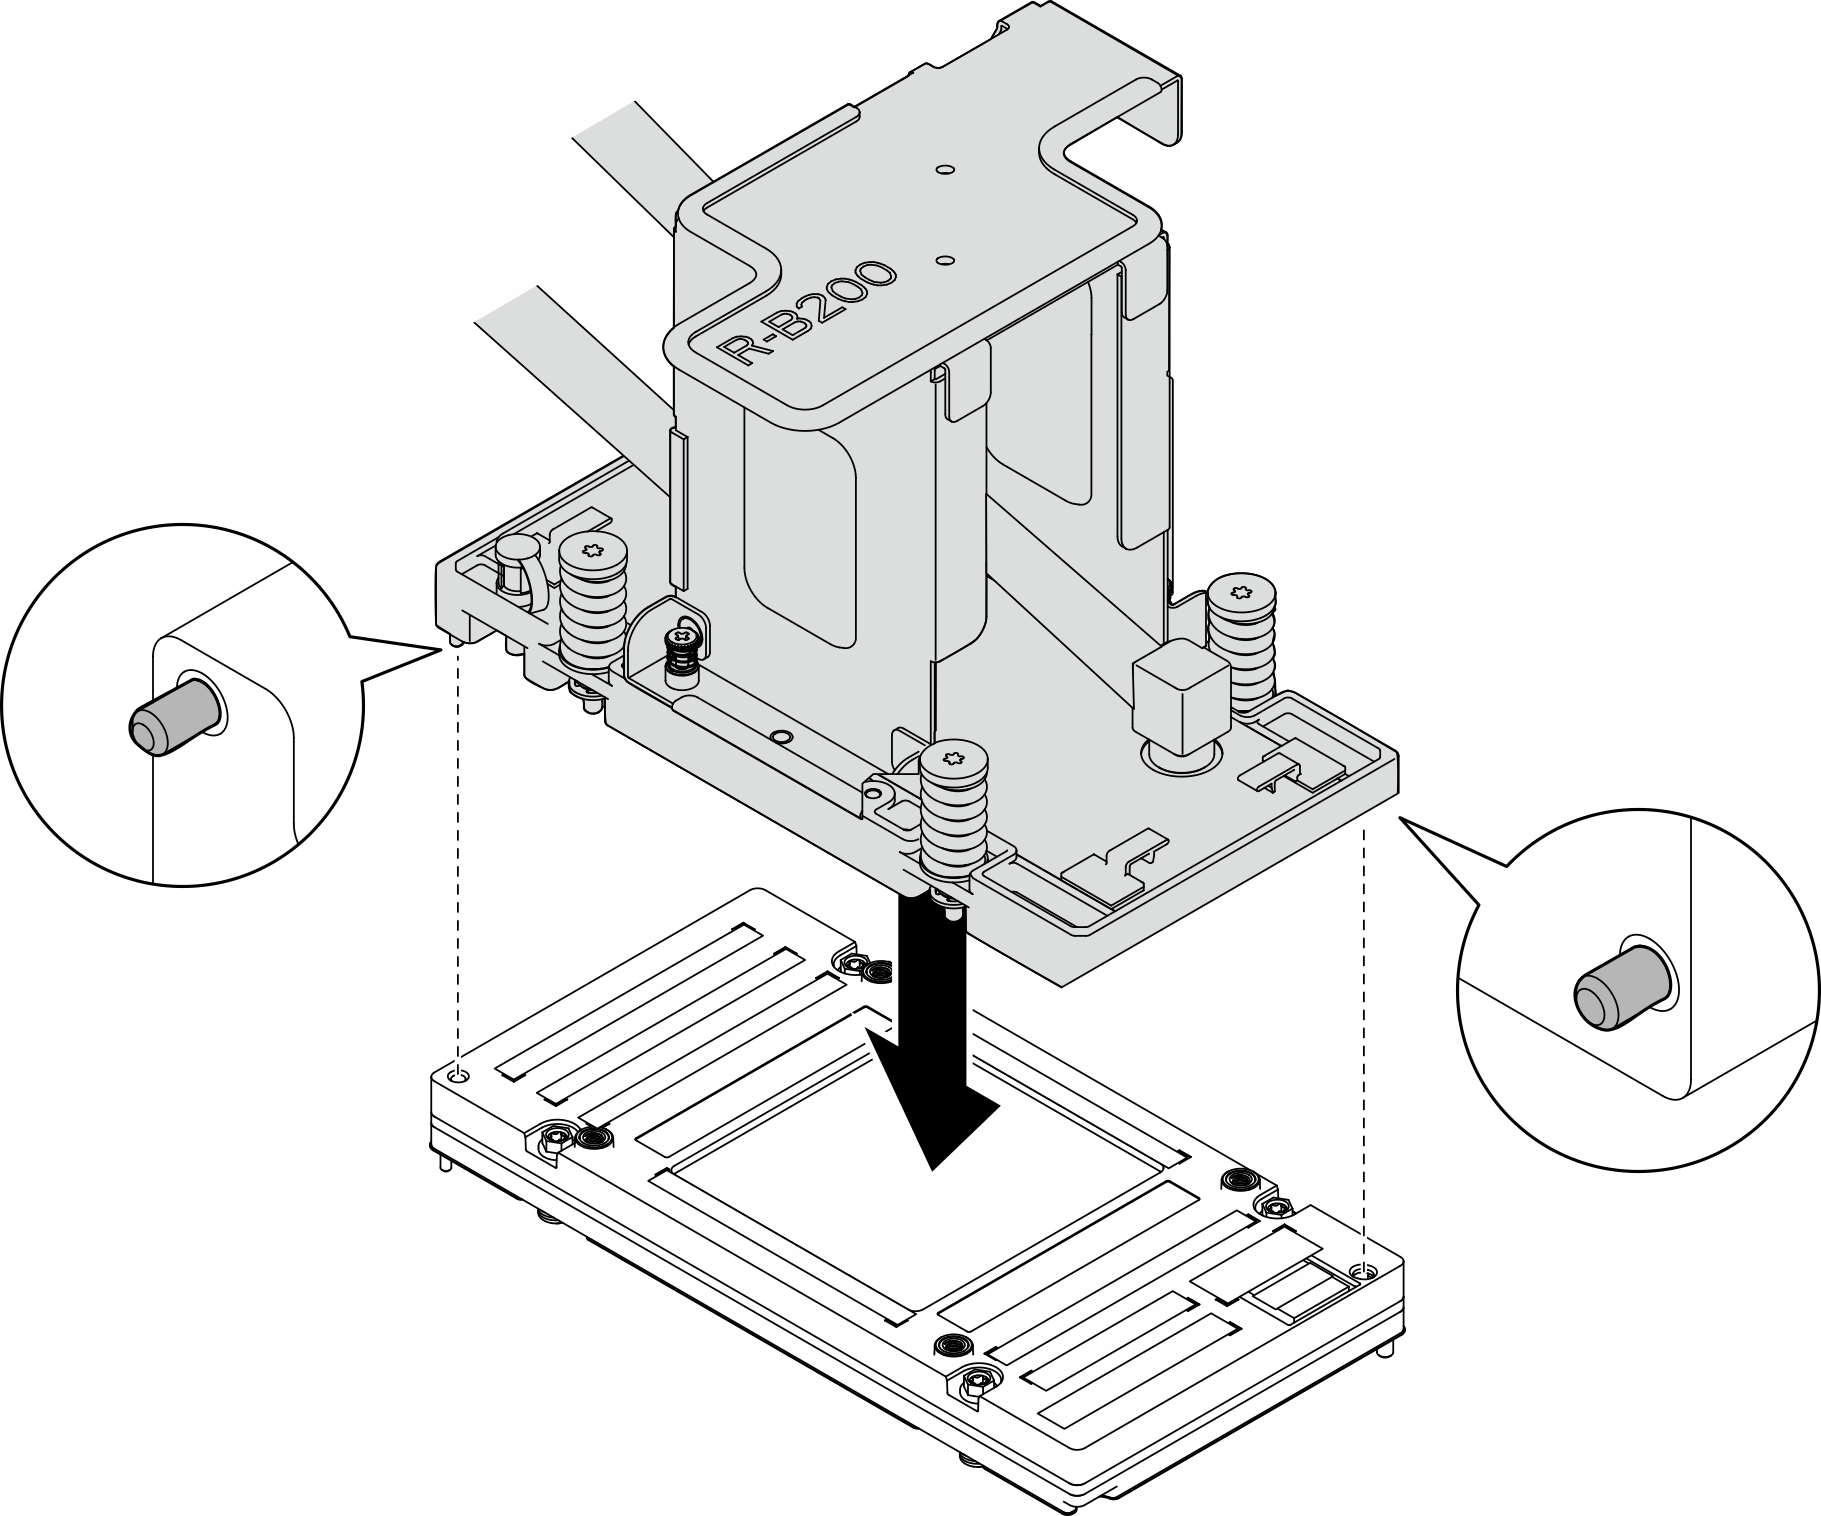
- Platzieren Sie die GPU-Kühlplatte auf der GPU.
- Drehen Sie die Servicehalterung und die GPU-Kühlplattenbaugruppe um. Setzen Sie dann die Kühlplatte vorsichtig auf die GPU.
- Passen Sie die GPU-Kühlplatte an, bis die beiden Führungsstifte in den Führungslöchern der GPU sitzen.Abbildung 11. Platzieren der GPU-Kühlplatte
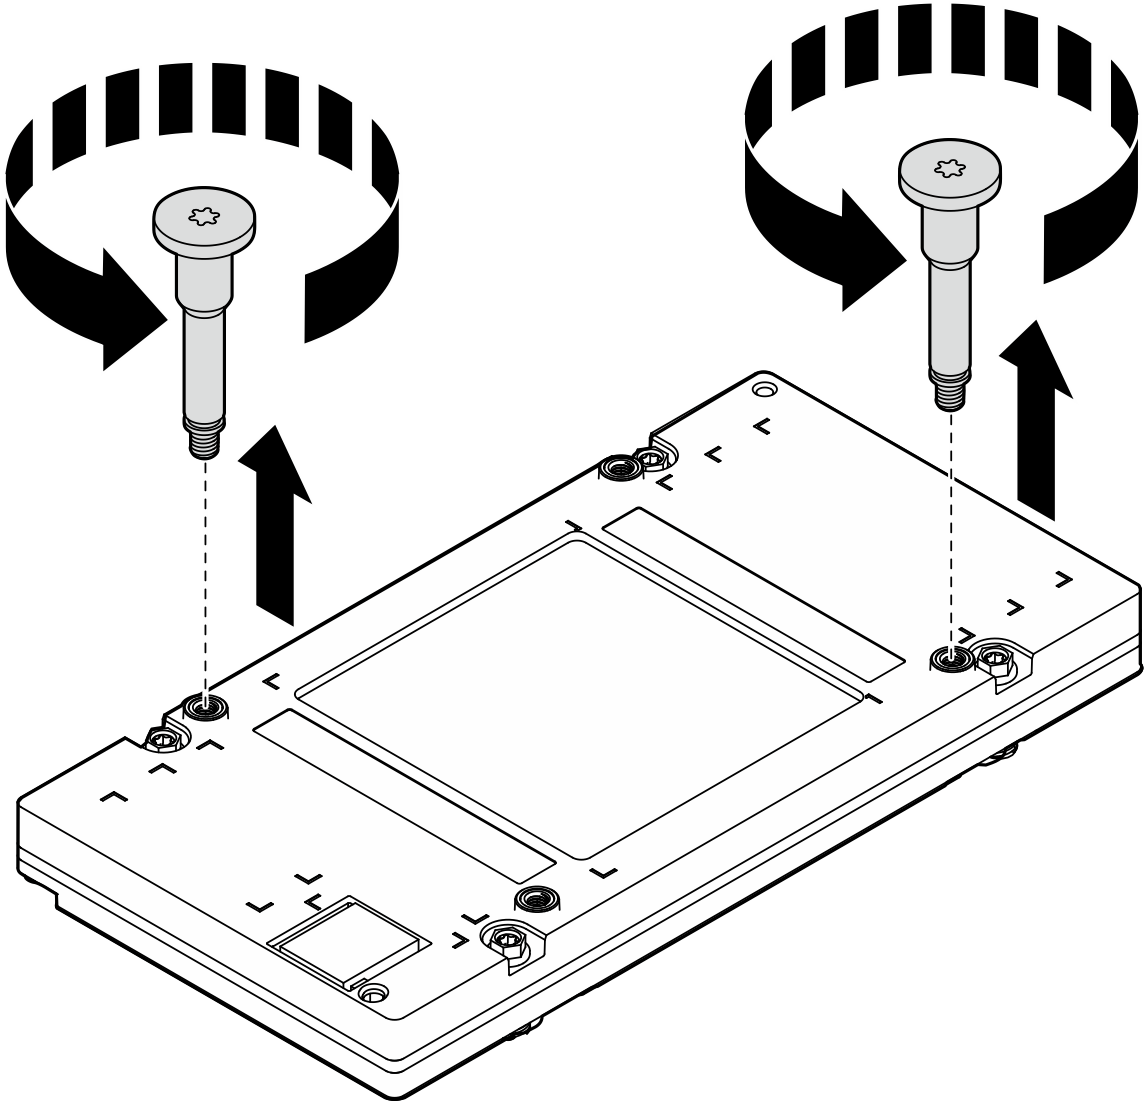
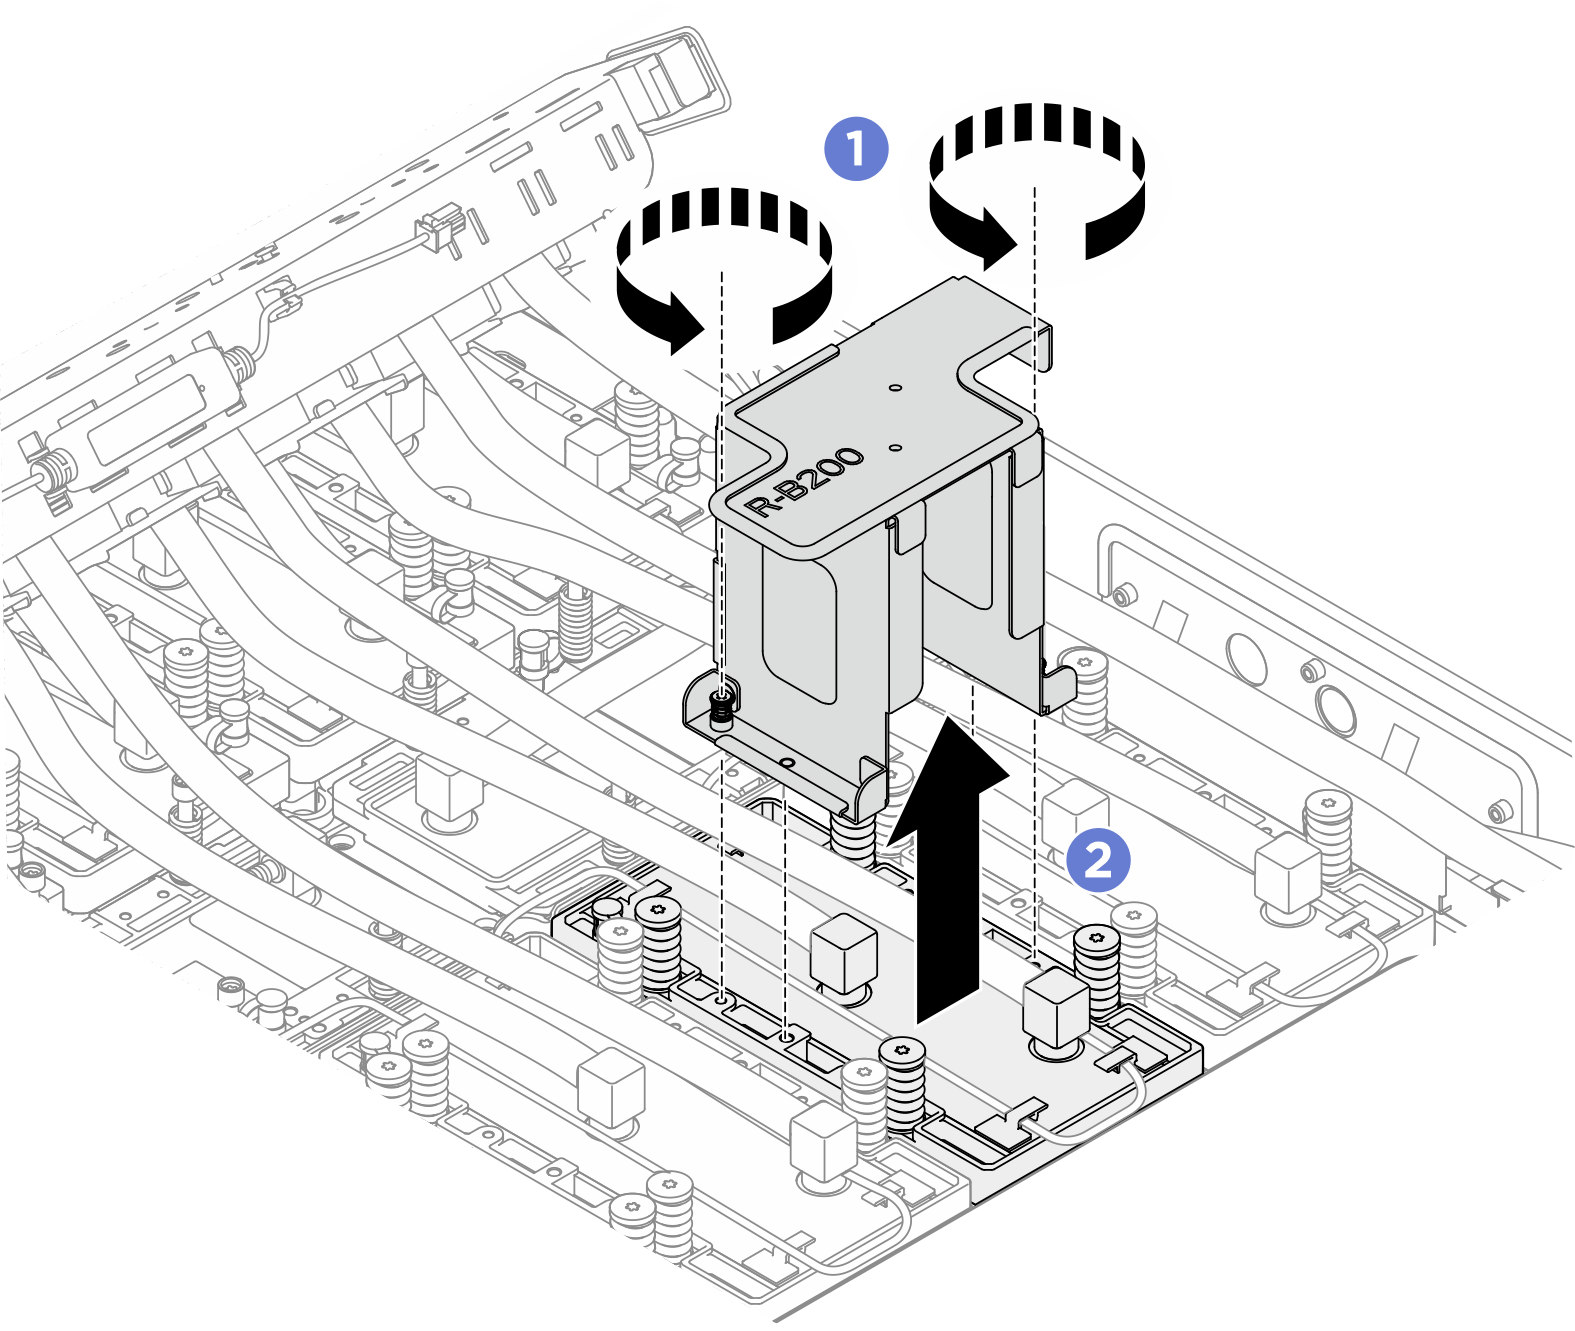
- Lösen Sie die zwei unverlierbaren Schrauben, um die Servicehalterung von der Kühlplatte zu entfernen.
- Lösen Sie die zwei unverlierbaren Schrauben, mit denen die Servicehalterung an der GPU-Kühlplatte befestigt ist.
- Heben Sie die Servicehalterung von der GPU-Kühlplatte ab, um sie zu entfernen.Abbildung 12. Entfernen der Servicehalterung
- Ziehen Sie die Schrauben um 360 Grad an und beachten Sie dabei die folgende Reihenfolge: → → → . Wiederholen Sie den Vorgang, um die vier T15-Torx-Schrauben mit einem Drehmomentschraubendreher und dem richtigen Drehmoment vollständig anzuziehen.Anmerkung
Stellen Sie sicher, dass die TIM-Trennschraube so weit gelöst ist, dass sie sich wieder in ihrer ursprünglichen Position befindet, bevor Sie die Schrauben der Kühlplatte anziehen. (Ausnahme: fabrikneues Kühlplattenmodul).
- Lösen Sie die TIM-Trennschraube, um sie wieder in ihre ursprüngliche Position zu bringen.
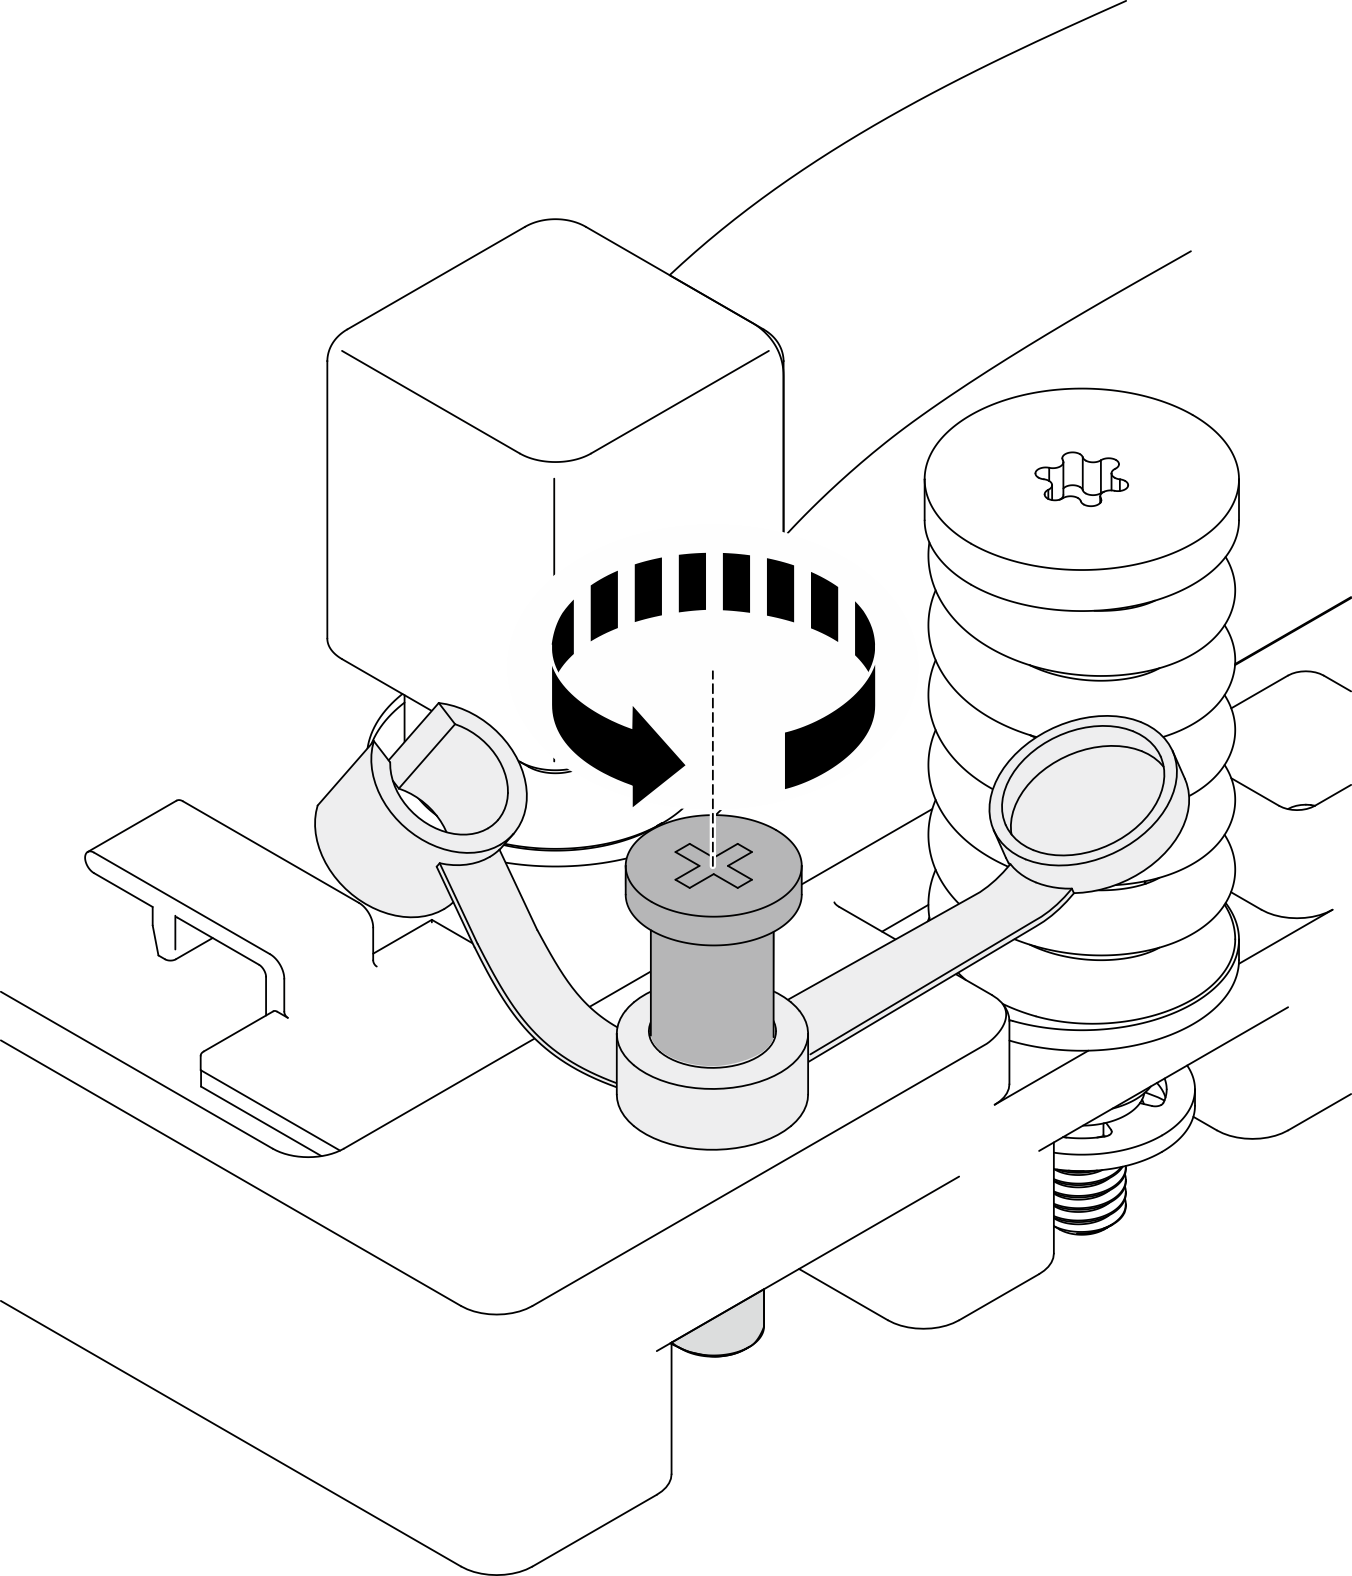
- Schließen Sie den Deckel. Wenn der Deckel nicht geschlossen werden kann, muss die TIM-Trennschraube weiter gelöst werden.
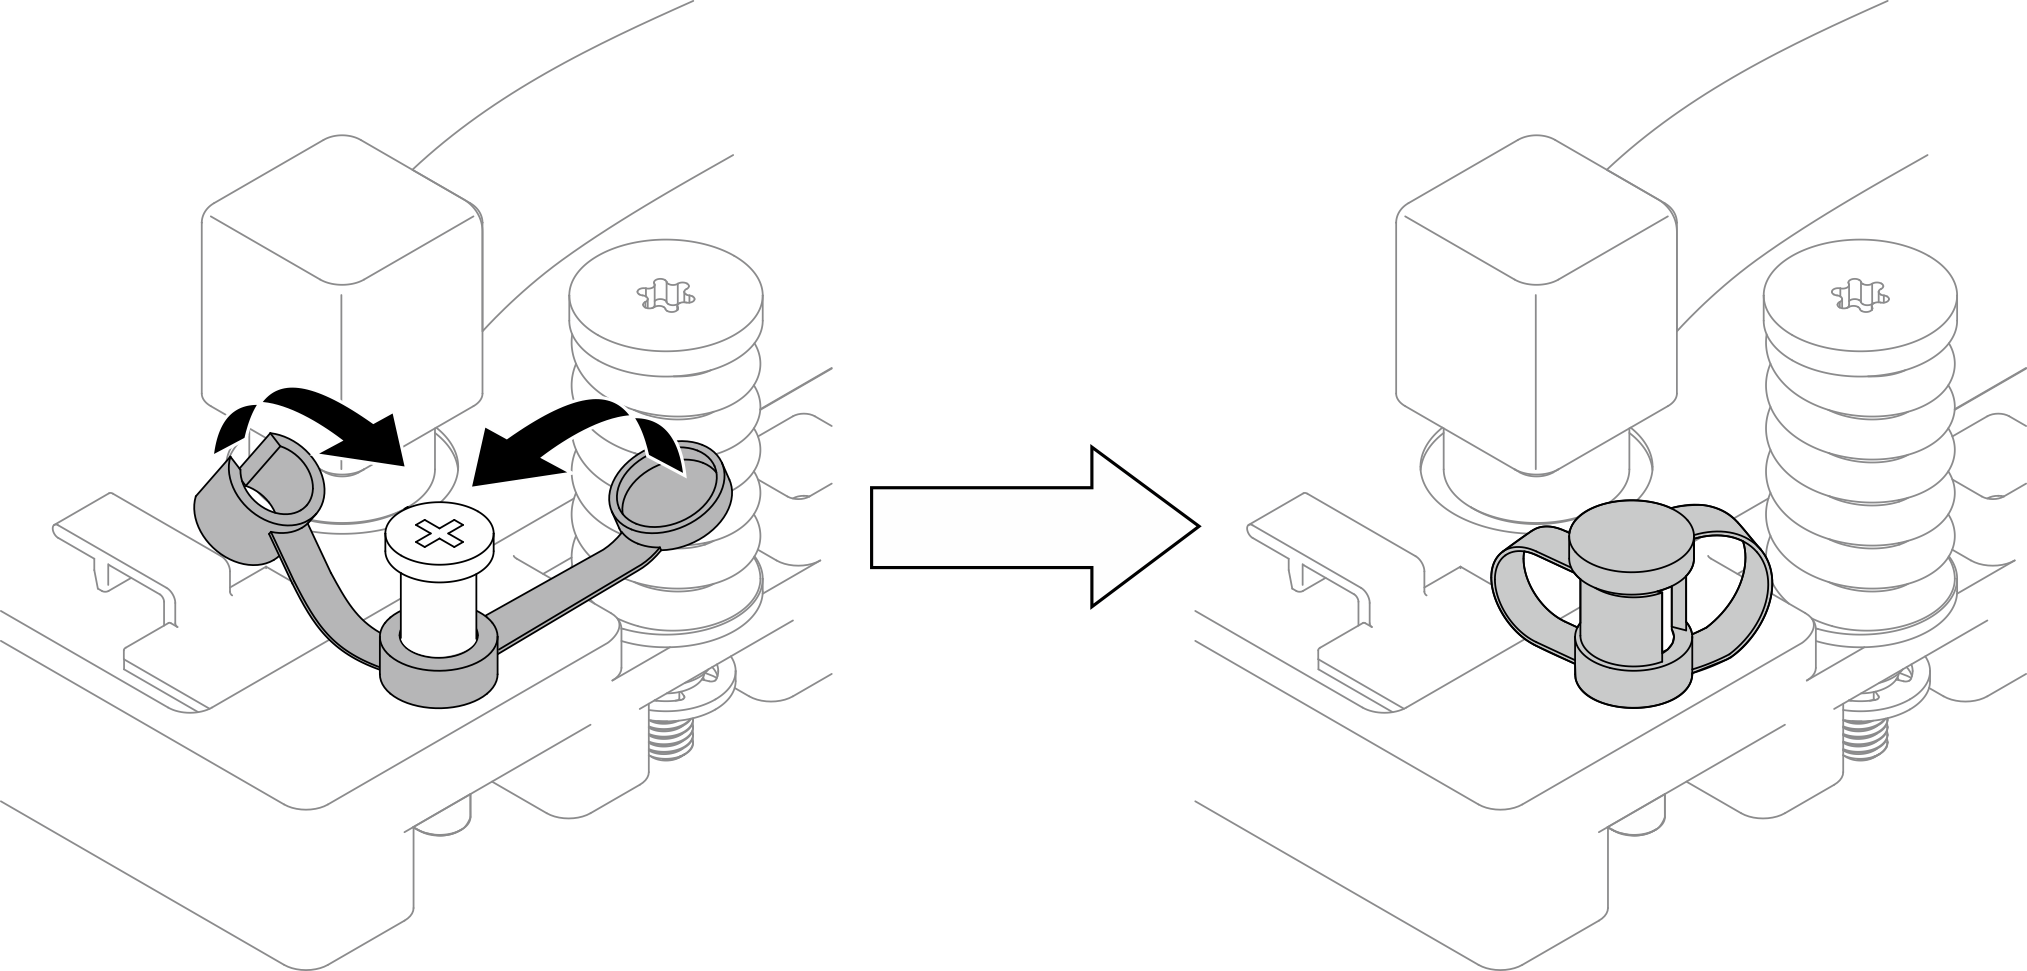
Abbildung 13. Reihenfolge beim Anziehen der Schrauben der GPU-Kühlplatte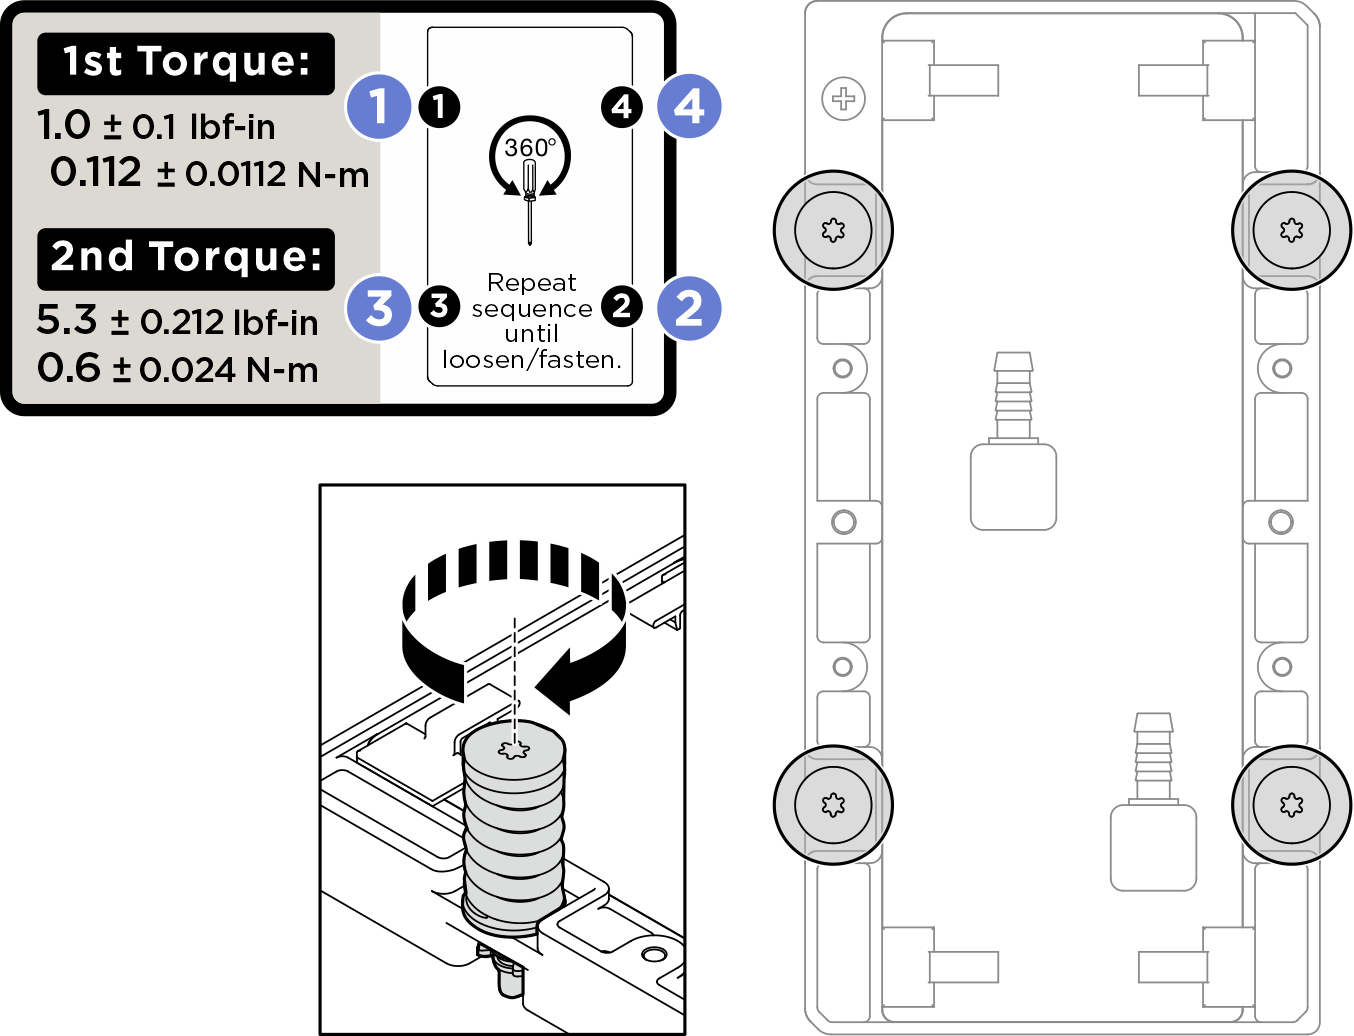
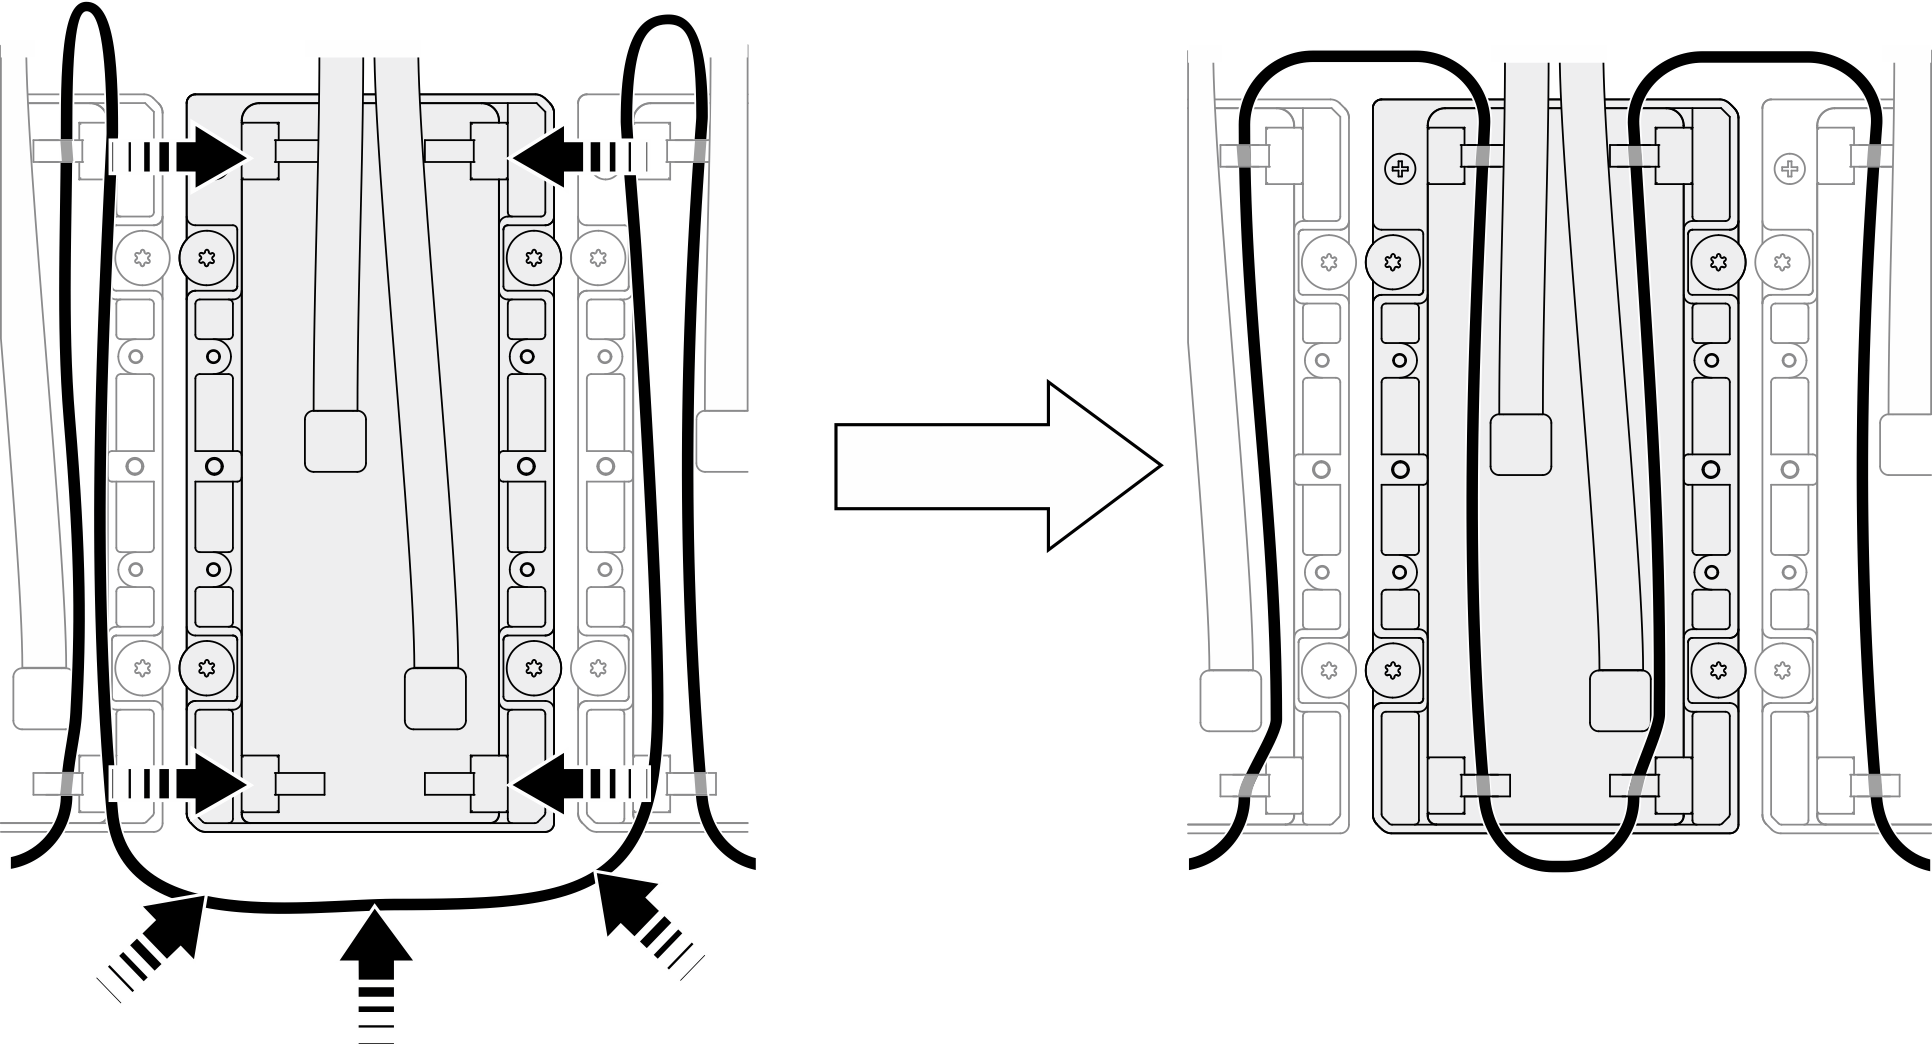
- Führen Sie das Kabel des Flüssigkeitserkennungssensormodul zurück auf die GPU-Kühlplatte und in die Kabelklemmen.Abbildung 14. Installieren des Kabels des Flüssigkeitserkennungssensormoduls
- Installieren Sie die Halterung für den hinteren Lüfterrahmen.
- Richten Sie die Halterung des hinteren Lüfterrahmens an den entsprechenden Schraubenlöchern aus. Installieren Sie dann die Halterung des hinteren Lüfterrahmens wie dargestellt auf der Schlauchhalterung B/C.
- Ziehen Sie die vier M3-Schrauben (PH2, 4 x M3, 0,5 Newtonmeter bzw. 4,3 Poundforce Inch) an, um die Halterung des hinteren Lüfterrahmens am Lüfterrahmen zu befestigen.
- Ziehen Sie die acht M3-Schrauben (PH2, 8 x M3, 0,5 Newtonmeter bzw. 4,3 Poundforce Inch) fest, um die Halterung des hinteren Lüfterrahmens am Gehäuse zu befestigen.Abbildung 15. Installieren der Halterung des hinteren Lüfterrahmens
Nach dieser Aufgabe
- Schließen Sie alle vorher abgezogenen Kabel wieder an. Siehe Interne Kabelführung.
- Installieren Sie den Stromversorgungskomplex erneut. Siehe Stromversorgungskomplex installieren.
- Installieren Sie den CPU-Komplex erneut. Siehe CPU-Komplex installieren.
- Bauen Sie den Lüfterrahmen wieder ein. Siehe Lüfterrahmen installieren (nur qualifizierte Techniker).
- Bringen Sie die hintere obere Abdeckung wieder an. Siehe Hintere obere Abdeckung installieren.
- Bringen Sie die vordere obere Abdeckung wieder an. Siehe Vordere obere Abdeckung installieren.
- Schließen Sie den Austausch der Komponenten ab. Informationen dazu finden Sie im Abschnitt Austausch von Komponenten abschließen.
Feedback geben