This section covers the procedure to physically install the set of eight drives to upgrade the storage capacity of the ThinkAgile CP solution.
Before installing the drive into the storage block, ensure that they are properly prepared according to Preparing the drives section.
Procedure performed by: customer or field service
The drive bays are numbered to indicate the installation order (starting from number “01”). Follow this installation order when you install a drive.
You cannot mix drives of different capacities in one system.
To install a hot-swap drive, complete the following steps:
- Check that the NVME namespace exists before installing the new drives:
# ls /dev/nvme*
Following is an example output:
/dev/nvme0 /dev/nvme1 /dev/nvme2 /dev/nvme3 /dev/nvme4 /dev/nvme5 /dev/nvme6 /dev/nvme7
- To open the drive tray handle, press the release tab.
Figure 1. Opening the drive tray handle 
- Slide the drive into the drive bay until it snaps into position.
Figure 2. Sliding the drive into the drive bay 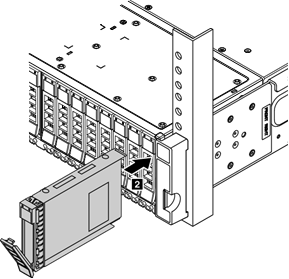
- Close the drive tray handle to lock the drive in place.
- Check the drive status LED to verify that the drive is operating correctly.
If the yellow drive status LED is lit continuously, that drive is faulty and must be replaced.
If the green drive activity LED is flashing, the drive is being accessed.
- Continue to install the other hot-swap drives in the set until the drive bay is full.
- Check that the new drives are detected by the storage block:
To check the storage drive configuration, use the following command:
# lsblk
Following is an example output:
NAME                                                              MAJ:MIN RM SIZE   RO TYPE  MOUNTPOINT

...

nvme7n1                                                           259:7   0  740.4G 0        disk
└─sed7                                                            253:7   0  740.4G 0        crypt
 └─md125                                                          9:125   0  4.3T   0        raid5
  └─md124                                                         9:124   0  4.3T   0        raid0
   └─vdo_data                                                     253:9   0  4.3T   0        dm
    └─vdo                                                         253:10  0  43.4T  0        vdo
     ├─CBS_POOL_data                                              253:8   0  43.3T  0        dm
     │└─CBS_POOL                                                  253:12  0  43.3T  0        dm
     │ ├─SPECIAL_METADATA_STORE_71c510a8973349de9183b18f0acc4b3d  253:13  0  1G     0        dm
     │ └─SPECIAL_TEMPLATE_STORE_ef7543aa482e44f493c13db90b5796e8  253:14  0  43.3T  0        dm
     └─CBS_POOL_meta                                              253:11  0  16G    0        dm
      └─CBS_POOL                                                  253:12  0  43.3T  0        dm
       ├─SPECIAL_METADATA_STORE_71c510a8973349de9183b18f0acc4b3d  253:13  0  1G     0        dm
       └─SPECIAL_TEMPLATE_STORE_ef7543aa482e44f493c13db90b5796e8  253:14  0  43.3T  0        dm
To check the drive firmware level, use the following command and check the values in the FW Rev column:
# nvme list
Following is an example output:
Node           SN                   Namespace Usage                   Format        FW Rev
-------------- ---------------- ... --------- ----------------------- ------------- --------
/dev/nvme0n1   S3HCNX0JC02194       1         795.00 GB / 795.00 GB   512 B + 0 B   GPNA9B3Q
/dev/nvme1n1   S3HCNX0JC02193       1         795.00 GB / 795.00 GB   512 B + 0 B   GPNA9B3Q
/dev/nvme2n1   S3HCNX0JC02233       1         795.00 GB / 795.00 GB   512 B + 0 B   GPNA9B3Q
/dev/nvme3n1   S3HCNX0JC02191       1         795.00 GB / 795.00 GB   512 B + 0 B   GPNA9B3Q
/dev/nvme4n1   S3HCNX0JC02189       1         795.00 GB / 795.00 GB   512 B + 0 B   GPNA9B3Q
/dev/nvme5n1   S3HCNX0JC02198       1         795.00 GB / 795.00 GB   512 B + 0 B   GPNA9B3Q
/dev/nvme6n1   S3HCNX0JC02188       1         795.00 GB / 795.00 GB   512 B + 0 B   GPNA9B3Q
/dev/nvme7n1   S3HCNX0JC02195       1         795.00 GB / 795.00 GB   512 B + 0 B   GPNA9B3Q
Check that the NVME namespace exists before installing the new drives:
# ls /dev/nvme*
Following is an example output:
/dev/nvme0 /dev/nvme1 /dev/nvme2 /dev/nvme3 /dev/nvme4 /dev/nvme5 /dev/nvme6 /dev/nvme7
/dev/nvme8 /dev/nvme9 /dev/nvme10 /dev/nvme11 /dev/nvme12 /dev/nvme13 /dev/nvme14 /dev/nvme15
The new drives are now added to the RAID array as spare devices.
The set of eight (8) drives is installed in the storage block.
The eight drives need to be added to the Cloud Controller. See Adding drives to the Cloud Controller.