Prepare to replace controller
You prepare to replace a controller canister by verifying that the replacement controller canister has the correct FRU part number, backing up the configuration, and collecting support data. If the controller is still online, you must take it offline.
This task describes how to prepare to replace a controller canister in a controller shelf with two controllers.
Perform this task only if your storage array has two controllers.
- Unpack the new controller canister, and set it on a flat, static-free surface. Save the packing materials to use when shipping the failed controller canister.
- Locate the MAC address and FRU part number labels on the back of the controller canister.
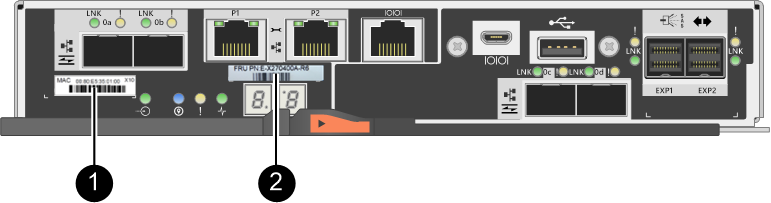
MAC address: The MAC address for management port 1 (“P1”). If you used DHCP to obtain the original controller's IP address, you will need this address to connect to the new controller.
FRU part number: This number must match the replacement part number for the currently installed controller.
- From ThinkSystem System Manager, locate the replacement part number for the controller canister you are replacing. When a controller has a fault and needs to be replaced, the replacement part number is displayed in the Details area of the Recovery Guru. If you need to find this number manually, follow these steps:
- Select Hardware.
- Locate the controller shelf, which is marked with the controller icon
.
- Click the controller icon.
- Select the controller, and click Next.
- On the Base tab, make a note of the Replacement Part Number for the controller.
- Confirm that the replacement part number for the failed controller is the same as the FRU part number for the replacement controller.AttentionPossible loss of data access – If the two part numbers are not the same, do not attempt this procedure. In addition, if the failed controller canister includes a host interface card (HIC), you must install that HIC into the new controller canister. The presence of mismatched controllers or HICs will cause the new controller to lock down when you bring it online.
- Back up the storage array's configuration database.
If a problem occurs when you remove a controller, you can use the saved file to restore your configuration.
- Download SMcli from ThinkSystem System Manager and setup SMcli command execution environment.
- Execute the following SMcli command.
save storageArray dbmDatabase sourceLocation=onboard contentType=all file="filename";
In this command, filename is the file path and file name to which you want to save the database. Enclose the file name in backslash following double quotation marks (\"). For example:file="C:\Program Files\CLI\logs\dbmdata.zip"
This command does not automatically append a file extension to the saved file. You must specify a file extension when entering the file name.
NoteUnder PowerShell, enclose the file name following two quotation marks(""), for example file=\""data.zip\"".NoteExecution environment requires setting JAVA_HOME environment variable, and JRE8 or later.
See Command Line Interface (CLI) Reference and follow the complete command syntax for this operation.
- Collect support data for your storage array using ThinkSystem System Manager.
- Select Support > Support Center > Diagnostics.
- Select Collect Support Data.
- Click Collect.
The file is saved in the Downloads folder for your browser with the name support-data.7z.
- If the controller is not already offline, take it offline now using either ThinkSystem System Manager or the SMcli tool.
To use ThinkSystem System Manager:
- Select Hardware.
- If the graphic shows the drives, select Show back of shelf to show the controllers.
- Select the controller that you want to place offline.
- From the context menu, select Place offline, and confirm that you want to perform the operation.
Note: If you are accessing ThinkSystem System Manager using the controller you are attempting to take offline, a ThinkSystem System Manager Unavailable message is displayed. Select Connect to an alternate network connection to automatically access ThinkSystem System Manager using the other controller.To use SMcli under system terminal:
- Download SMcli from ThinkSystem System Manager and setup SMcli command execution environment.
- Execute one of the following SMCli commands:
For controller A: set controller [a] availability=offline;
For controller B: set controller [b] availability=offline;
NoteExecution environment requires setting JAVA_HOME environment variable, and JRE8 or later.
See Command Line Interface (CLI) Reference and follow the complete command syntax for this operation.
The system attempts to take the controller offline.
- Wait for ThinkSystem System Manager to update the controller's status to offline. AttentionDo not begin any other operations until after the status has been updated.
- Select Recheck from the Recovery Guru, and confirm that the OK to remove field in the Details area displays Yes, indicating that it is safe to remove this component.
Go to Remove failed controller.