External authentication of certificates
Certificates are used to establish secure, trusted connections to the CMM and from the CMM to other servers.
For an application initiating a connection to trust the server that it is connecting to, it must have in its trust store a copy of either the server certificate or the certificate of the Certificate Authority (CA) that signed the server certificate. The CMM has a CA that signs certificates for the LDAP, HTTPS, and CIM servers of all systems management processors in a Flex System chassis. Some compute nodes, such as the x240 M5 compute node, can also create certificates that can be imported by the CMM. See the Integrated Management Module (IMM) documentation for your compute node for information and instructions.
You can create trust between your web browser and the HTTPS servers on the management processors in the chassis by importing the CA certificate into your web browser. Additionally, when you work with an external LDAP server, you can use the CMM web interface or CLI to configure either non-mutual (server only) or mutual certificate authentication.
The CA certificate in each Lenovo Flex System chassis is unique. You download CA certificates through the primary CMM in each chassis using the CMM web interface or CLI.
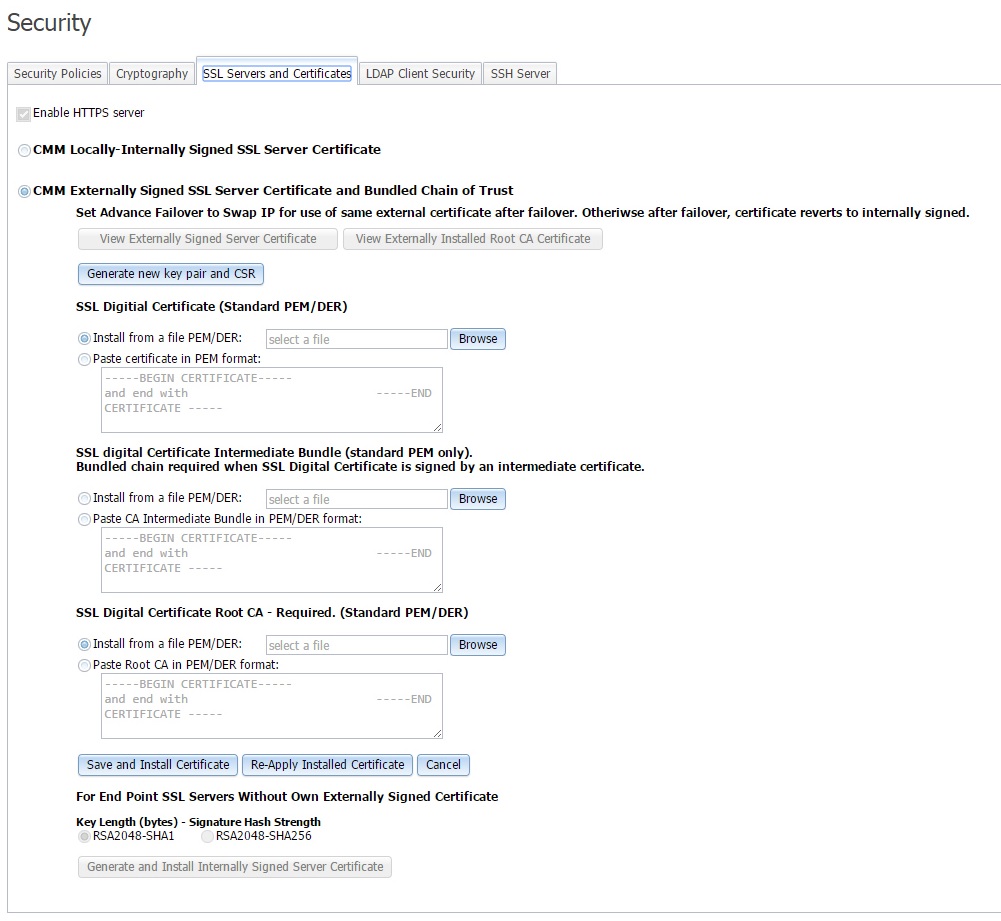
- In the CMM web interface, click Mgt Module Management > Security > SSL Servers and Certificates > CMM Externally Signed SSL Server Certificate and Bundled Chain of Trust. Select the certificate type and format, and click Save and Install Certificate.
- In the CLI, download the CA certificate into the CMM by using the sslcfg -dnld command (see sslcfg command for additional information about command use).
The following illustration shows the certificate download window.

After you download each CA certificate, you should import it into your web browser, so that the web browser will trust websites that have a certificate signed by the CA. If there are multiple users who will access the management processors in the Flex System chassis, you can share the CA certificates with the other users. You can share certificates via email or through any other file sharing mechanism. Each user that receives a CA certificate must also import it into their web browser. If your organization has a process for pushing trusted authority certificates to users, you can also use that process.
To import a CA certificate into your web browser, complete the following steps:
- Go to the area in your web browser where you configure web browser options and settings.
- Locate and select managing certificates. In some web browsers, this selection is in the Content page or in the Encryption page on the Advanced page.
- If you have old certificates that are related to this chassis, you should remove, delete, or distrust them, especially if you are experiencing errors relating to certificates. Check all tabs in the certificate page and remove all certificates related to this chassis. The
Issued by
field, if displayed, will indicate the chassis ID and time that the certificate was issued, in the formCA for chassis_uuid, time_stamp.
For browsers where certificates are grouped in a tree structure by organization name, you will find the certificates in theGenerated by Firmware
section. - Import the CA certificate as a root authority certificate (not as a server certificate, intermediate authority, or other software device). Importing the CA certificate in this way might require that you are on the Authorities page before clicking Import and that you select a particular trusted root certificate store from the import wizard. During the import process, when asked to select the file that you want to import, you might need to change the file type to
All Files
to see the file that you want to import. If you are asked why you want to trust the certificate, choose the option that trusts the CA for identifying websites. Select OK or Close in all the pages you opened. If you are importing the CA certificate from more than one chassis, repeat this step for the CA certificates from each chassis. - Close your web browser and re-open it to make sure that these changes take effect.
If you change a CA certificate, you must download the new certificate and import it into your web browser, Lenovo XClarity Administrator, the Certificate Trust Store of your Flex System Manager management software, into any Lenovo Systems Director servers that might be in your network, and into any external LDAP servers that might be configured for mutual authentication (see Importing an LDAP certificate with mutual authentication for information and instructions). This applies for all activities that can change a CA certificate such as manual changes or resetting the CMM to defaults.
If your web browser advises you that a connection is untrusted or a security certificate is invalid, or has any other issue that indicates a certificate exception issue relating to a certificate exception, follow the process given above to download and import the CA certificate, making sure to clear all old certificates from the chassis on all tabs in the certificate pages. You can also try clearing the browser cache and follow other instructions that might be suggested by the documentation for your web browser. Since some certificate issues impact only certain web browsers, you might be able to correct the condition by switching to a different web browser.
See Flex System Manager management node information center page for additional information about troubleshooting certificate issues with your browser.