Server BIOS configuration
Use information in this section to do server BIOS configuration.
Update the server VPD info
Depending on the Nutanix appliance feature code the server VPD data need to be updated with the MTM and the appliance description string (see the following).
Update the appliance name
The DMI/SMBIOS string for the Lenovo Converged HX Series appliance is the same as the appliance name.| Appliance Name | VPD String |
| Lenovo Converged HX3710-F | Lenovo Converged HX3710-F |
| Lenovo Converged HX3710 | Lenovo Converged HX3710 |
| Lenovo Converged HX2710-E | Lenovo Converged HX2710-E |
The VPD information is held in 3 places:
Product Name (maximal length: 48 bytes)
Product Part Number (maximal length: 20 bytes)
Product Extra: Machine Type-Model (maximal length: 20 bytes)
The initial values might be:
| Product Name | HX Series Type 8689 |
| Product Part Number | 868922X |
| Product Extra: Machine Type-Model | 868922X |
For the HX3710, they need to be updated to the following values:
| Product Name | Lenovo Converged HX3710 |
| Product Part Number | 8689AC1 |
| Product Extra: Machine Type-Model | 8689AC1 |
Here are the IPMI commands to first nullify and then set these values. Note that IPMI raw mode is used to set the space filled values.
| Name | |
| Part number | |
| Machine-type Mode | |
Legacy Boot Mode
To set Legacy Boot Mode on HX Series Type 8689, enter the BIOS menu (F1) and set the following:
Advanced →CSM Configuration: Change Option ROM execution to [Legacy]

After the setting is saved, the system needs to be rebooted before the change takes effect.
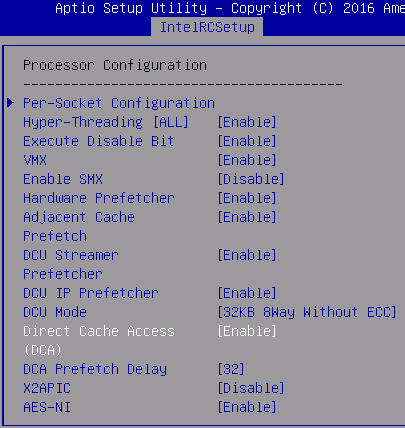
Direct Cache Access (DCA) Mode
To enable DCA on HX Series Type 8689, enter BIOS menu (F1) and set the following: IntelRCSetup→ Processor Configuration →Direct Cache Access (DCA): Change to [Enable]
The nvram_script.txt contains the following item which has to be changed:
Setup Question = Direct Cache Access (DCA)
Token =BF8 // Do NOT change this line
Offset =80
Width =01
BIOS Default =[02]Auto
Options =[00]Disable // Move “*” to the desired Option
*[01]Enable
[02]Auto
OS Controlled Power
The server needs to be configured so that the hypervisor has control over power. Many customers prefer this as it saves on OPEX.
There is nothing to change as the system defaults are already correct. The configuration item to be enabled is:
IntelRCSetup → Advanced Power Management Configuration → CPU – Advanced PM Tuning →
Energy Perf BIAS
Energy Performance Tuning.
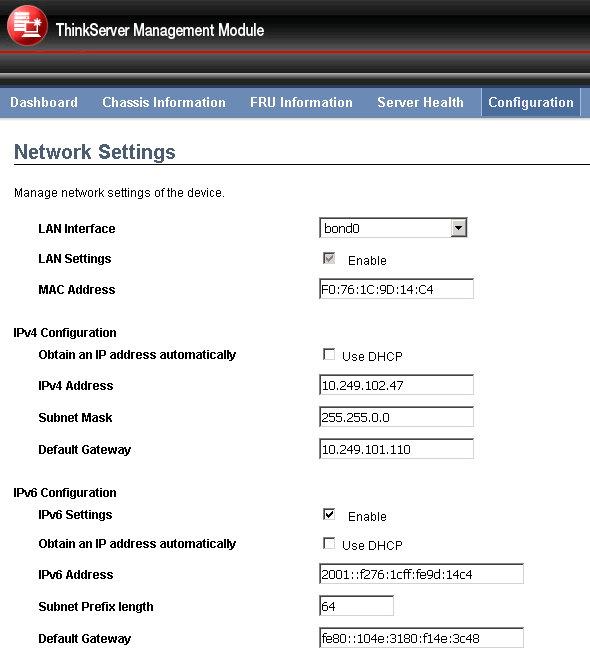
Add IPv6 Address
For HX Series Type 8689, the factory default is to get the IPv6 address from a DHCP server. The IPv6 address can be generated from the MAC address using the industry standard formula. The link-local address of fe80 should be replaced by 2001. A default subnet prefix length of 64 can be used.
The IPv6 address can be changed in the “Network” settings under the “Configuration tab in the BMC GUI.
From the command line, the following 4 steps need to be followed:
Set IPV6 source to static
ipmitool -I lanplus -U USERID -P PASSW0RD -H 10.109.37.90 raw 0x0c 0x01 0x01 0xc4 0x01(0x02 for dhcp)Set IPV6 IP derived from MAC address (e.g.3ffe:102::)
ipmitool -I lanplus -U USERID -P PASSW0RD -H 10.109.37.21 raw 0x0c 0x01 0x01 0xc5 0x00 0x3f 0xfe 0x01 0x02 0 0 0 0 0 0 0 0 0 0 0 0Set IPV6 prefix length (64)
ipmitool -I lanplus -U USERID -P PASSW0RD -H 10.109.37.21 raw 0x0c 0x01 0x01 0xc6 0x00 0x40Set IPV6 gateway to default link local address (fe80::1)
ipmitool -I lanplus -U USERID -P PASSW0RD -H 10.109.37.21 raw 0x0c 0x01 0x01 0xc7 0xfe 0x80 0x00 0x01 0 0 0 0 0 0 0 0 0 0 0 1
Modify Boot Options for Phoenix PXE Boot
The SATADOM drive should be added to the boot list and other options except PXE boot and remote image loading can be removed from the boot order. The configured boot order for factory preload should be:
PXE boot
SATADOM drive
The bare-metal Foundation calls a function in the “pyghmi” library to perform a remote image load (of a hypervisor ISO). It is therefore not necessary to add the virtual CDROM boot device to the boot list. To set Boot Option (Boot Option Priorities) on HX Series Type 8689 based server, enter the BIOS menu (F1) and select “Boot”.
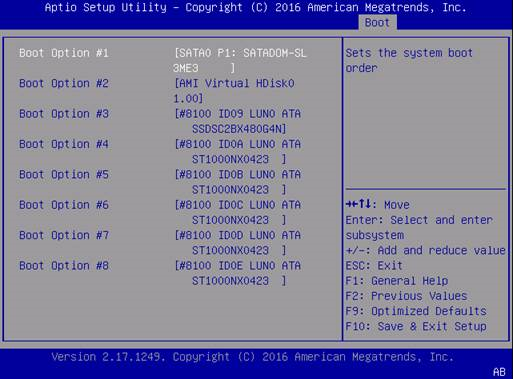
First check that the SATADOM is set as Boot Option #1 in all Hard Drives (HDD, SSD, SATADOM). This can be checked at "Hard Drive BBS Priorities" as shown in the screen shot below:
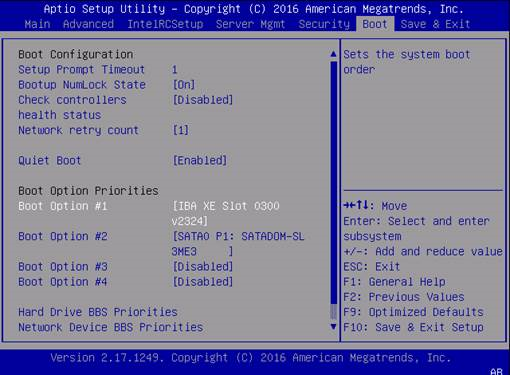
PXE boot needs to be added as the first priority boot option as shown below:
Note that when the BMC interface (Jviewer) is used to set the boot options as shown above, it introduces listed but unselected options in the NVRAM. Below is an example of the output from SCE which shows all of the boot options:
Setup Question = BBS_TYPE_HARDDRIVE Boot Option #
Token =AC // Do NOT change this line
Offset =00
Width =02
ListOrder = [0021]BBS_TYPE_HARDDRIVE 0021
[0024]BBS_TYPE_HARDDRIVE 0024
[0019]BBS_TYPE_HARDDRIVE 0019
[001a]BBS_TYPE_HARDDRIVE 001a
[001b]BBS_TYPE_HARDDRIVE 001b
[001c]BBS_TYPE_HARDDRIVE 001c
[001d]BBS_TYPE_HARDDRIVE 001d
[001e]BBS_TYPE_HARDDRIVE 001e