
Installing disk shelves with IOM12 modules for a hot-add

For each disk shelf you are hot-adding, you install the disk shelf into a rack, connect the power cords, power on the disk shelf, and set the disk shelf ID before cabling the SAS connections.

About this task

  1. Install the rack mount kit (for two-post or four-post rack installations) that came with your disk shelf using the installation flyer that came with the kit.
    Attention

    If you are installing multiple disk shelves, you should install them from the bottom to the top of the rack for the best stability.

    Do not flange-mount the disk shelf into a telco-type rack; the disk shelf's weight can cause it to collapse in the rack under its own weight.

  2. Install and secure the disk shelf onto the support brackets and rack using the installation flyer that came with the kit.

    When installing DM600S disk shelves, remove the power supplies and I/O modules (IOMs) to make the disk shelf lighter and easier to maneuver.

  3. If you are installing a DM600S disk shelf, install the components into the racked disk shelf; otherwise, go to the next step.
    If you purchased a partially populated disk shelf which does not have a drive in every drive slot, you must ensure that:
    • The first four slots (0, 3, 6, and 9) are occupied in each drawer.

      This ensures proper airflow in the disk shelf.

    • In a shelf with 30 drives, the remaining ten drives are distributed evenly throughout the shelf in slots 1 and 10 of each drawer.

    The following illustration shows how the drives are numbered from 0 to 11 in each drive drawer within the shelf. In a shelf containing 30 drives, slots 0, 1, 3, 6, 9, and 10 must contain drives.


    1. Reinstall any power supplies and IOMs you removed prior to installing your disk shelf into the rack.
    2. Open the top drawer of the shelf.
    3. Raise the cam handle on the drive to vertical.
    4. Align the two raised buttons on each side of the drive carrier with the matching gap in the drive channel on the drive drawer.
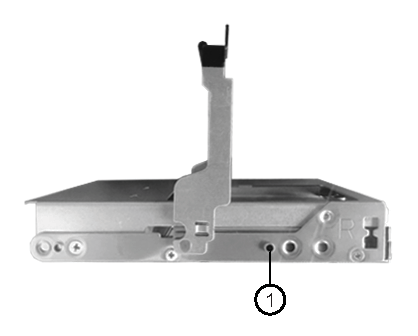
      1Raised button on the right side of the drive carrier
    5. Lower the drive straight down, and then rotate the cam handle down until the drive snaps into place under the orange release latch.
    6. Repeat the previous substeps for each drive in the drawer.
      You must be sure that slots 0, 3, 6, and 9 in each drawer contain drives.
    7. Carefully push the drive drawer back into the enclosure.
      Attention
      Possible loss of data access – Never slam the drawer shut. Push the drawer in slowly to avoid jarring the drawer and causing damage to the storage array.
    8. Close the drive drawer by pushing both levers towards the center.
    9. Repeat these steps for each drawer in the disk shelf.
  4. If you are adding multiple disk shelves, repeat the previous steps for each disk shelf you are installing.
  5. Connect the power supplies for each disk shelf:
    1. Connect the power cords first to the disk shelves, securing them in place with the power cord retainer, and then connect the power cords to different power sources for resiliency.
    2. Turn on the power supplies for each disk shelf and wait for the disk drives to spin up.
  6. Set the shelf ID for each disk shelf you are hot-adding to an ID that is unique within the HA pair or single-controller configuration.

    If you have a DM3000x, DM5000x, or DM7000x configuration, shelf IDs must be unique across the internal disk shelf and externally attached disk shelves.

    You can use the following substeps to change shelf IDs, or for more detailed instructions, use the procedure in the Changing the disk shelf ID section.

    1. If needed, run the storage shelf show -fields shelf-id command to see a list of shelf IDs already in use (and duplicates if present) in your system.
    2. Access the shelf ID button behind the left end cap.
    3. Change the shelf ID to a valid ID (00 through 99).
    4. Power-cycle the disk shelf to make the shelf ID take effect.
      Wait at least 10 seconds before turning the power back on to complete the power cycle.

      The shelf ID blinks and the operator display panel amber LED blinks until you power cycle the disk shelf.

    5. Repeat substeps a through d for each disk shelf you are hot-adding.