Use the information in this section, the rack template, and the rack installation kit that comes with the Flex System Enterprise Chassis to install it in a rack.
Rack Safety Information, Statement 2
DANGER
- Always lower the leveling pads on the rack cabinet.
- Always install stabilizer brackets on the rack cabinet.
- Always install servers and optional devices starting from the bottom of the rack cabinet.
- Always install the heaviest devices in the bottom of the rack cabinet.
Before you begin, review the
Installation guidelines.
Rack requirements:
- Make sure that the room air temperature is below 40°C (104°F).
- Do not block any air vents; usually, 15 cm (6 in.) of air space in the rear and 5 cm (2 in.) in the front provides proper airflow.
- Three or more people are required to install the device in a rack.
- Do not leave any unused space within a rack open. Fillers must be used to prevent recirculation of warm air.
- Install your Flex System Enterprise Chassis only in a rack that has perforated front and rear doors or in a rack that is equipped with a Rear Door Heat eXchanger.
- Do not extend more than one device out of the rack at the same time.
- Remove the rack doors and side panels to provide easier access during installation.
- The EIA flanges must have holes and clearances per EIA-310-D.
- If you have an adjustable rack, set the distance between the front and rear EIA flanges to 719 mm (28.3 inches) outside to outside.
- Make sure that there is sufficient room in front of the front EIA flange to provide minimum bezel clearance of 50 mm (1.97 inches).
- Make sure that there is sufficient room behind the rear of the rear EIA flanges to provide for cable management and routing.
- Leave 1U of empty space at the top of the rack, if the cables exit at the top, or leave 1U of empty space at the bottom of the rack, if the cables exit at the bottom. This will ensure that the cables don't block service assess to replaceable components.
- Rack weight-handling capacity must be sufficient for the aggregate weight of the populated chassis, power distribution units, and power cables.
- The rack must be stabilized with stabilization brackets and leveling pads so that it does not become unstable when it is fully populated.
To install the chassis in a rack, complete the following steps:
- Read Safety and Handling static-sensitive devices.
- Open the rail kit and the rack installation kit that come with the chassis:
- The rail kit box includes the following hardware:
- One right chassis support rail
- One left chassis support rail
- Eight M5x16 combi-head screws (black)
- Ten strain relief ties
- The rack installation kit includes the following hardware:
- Twelve M5 cage nuts (use on EIA flanges with square holes)
- Twelve M5 clip nuts (use on EIA flanges with round holes)
- Ten M5x16 combi-head screws (black)
- Eight M5x16 captive washer screws (silver)
- One right rear support bracket
- One left rear support bracket
- One lower rear support bracket
- If the rack has a door, remove it.
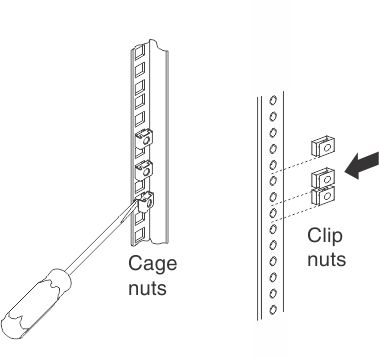
- Position the rack template that comes with the chassis on the front of the rack at the location where you want to install the chassis. Make sure that the template does not overlap any installed devices, and align the template with the holes in the rack (for an illustration of the template see Rack template). For EIA flanges with square holes, install M5 cage nuts from the rack installation kit in the holes that are indicated on the template.
If the EIA flange has round holes, install the M5 clip nuts from the installation kit instead of the M5 cage nuts.
- Position the rack template on the back of the rack, and install M5 cage nuts in the square holes that are indicated on the template. If the EIA flange has round holes, install the M5 clip nuts from the installation kit.
Make sure that a cage nut or clip nut is installed in every hole indicated on the template.
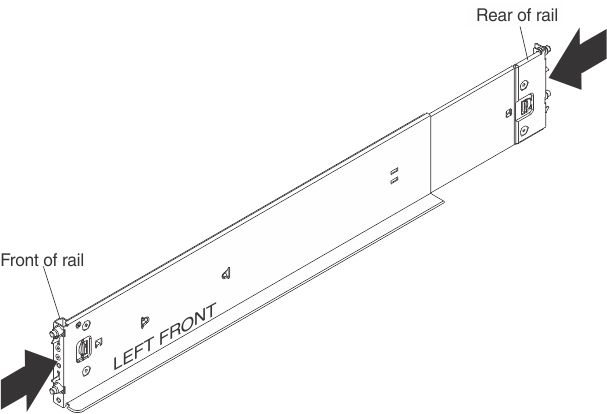
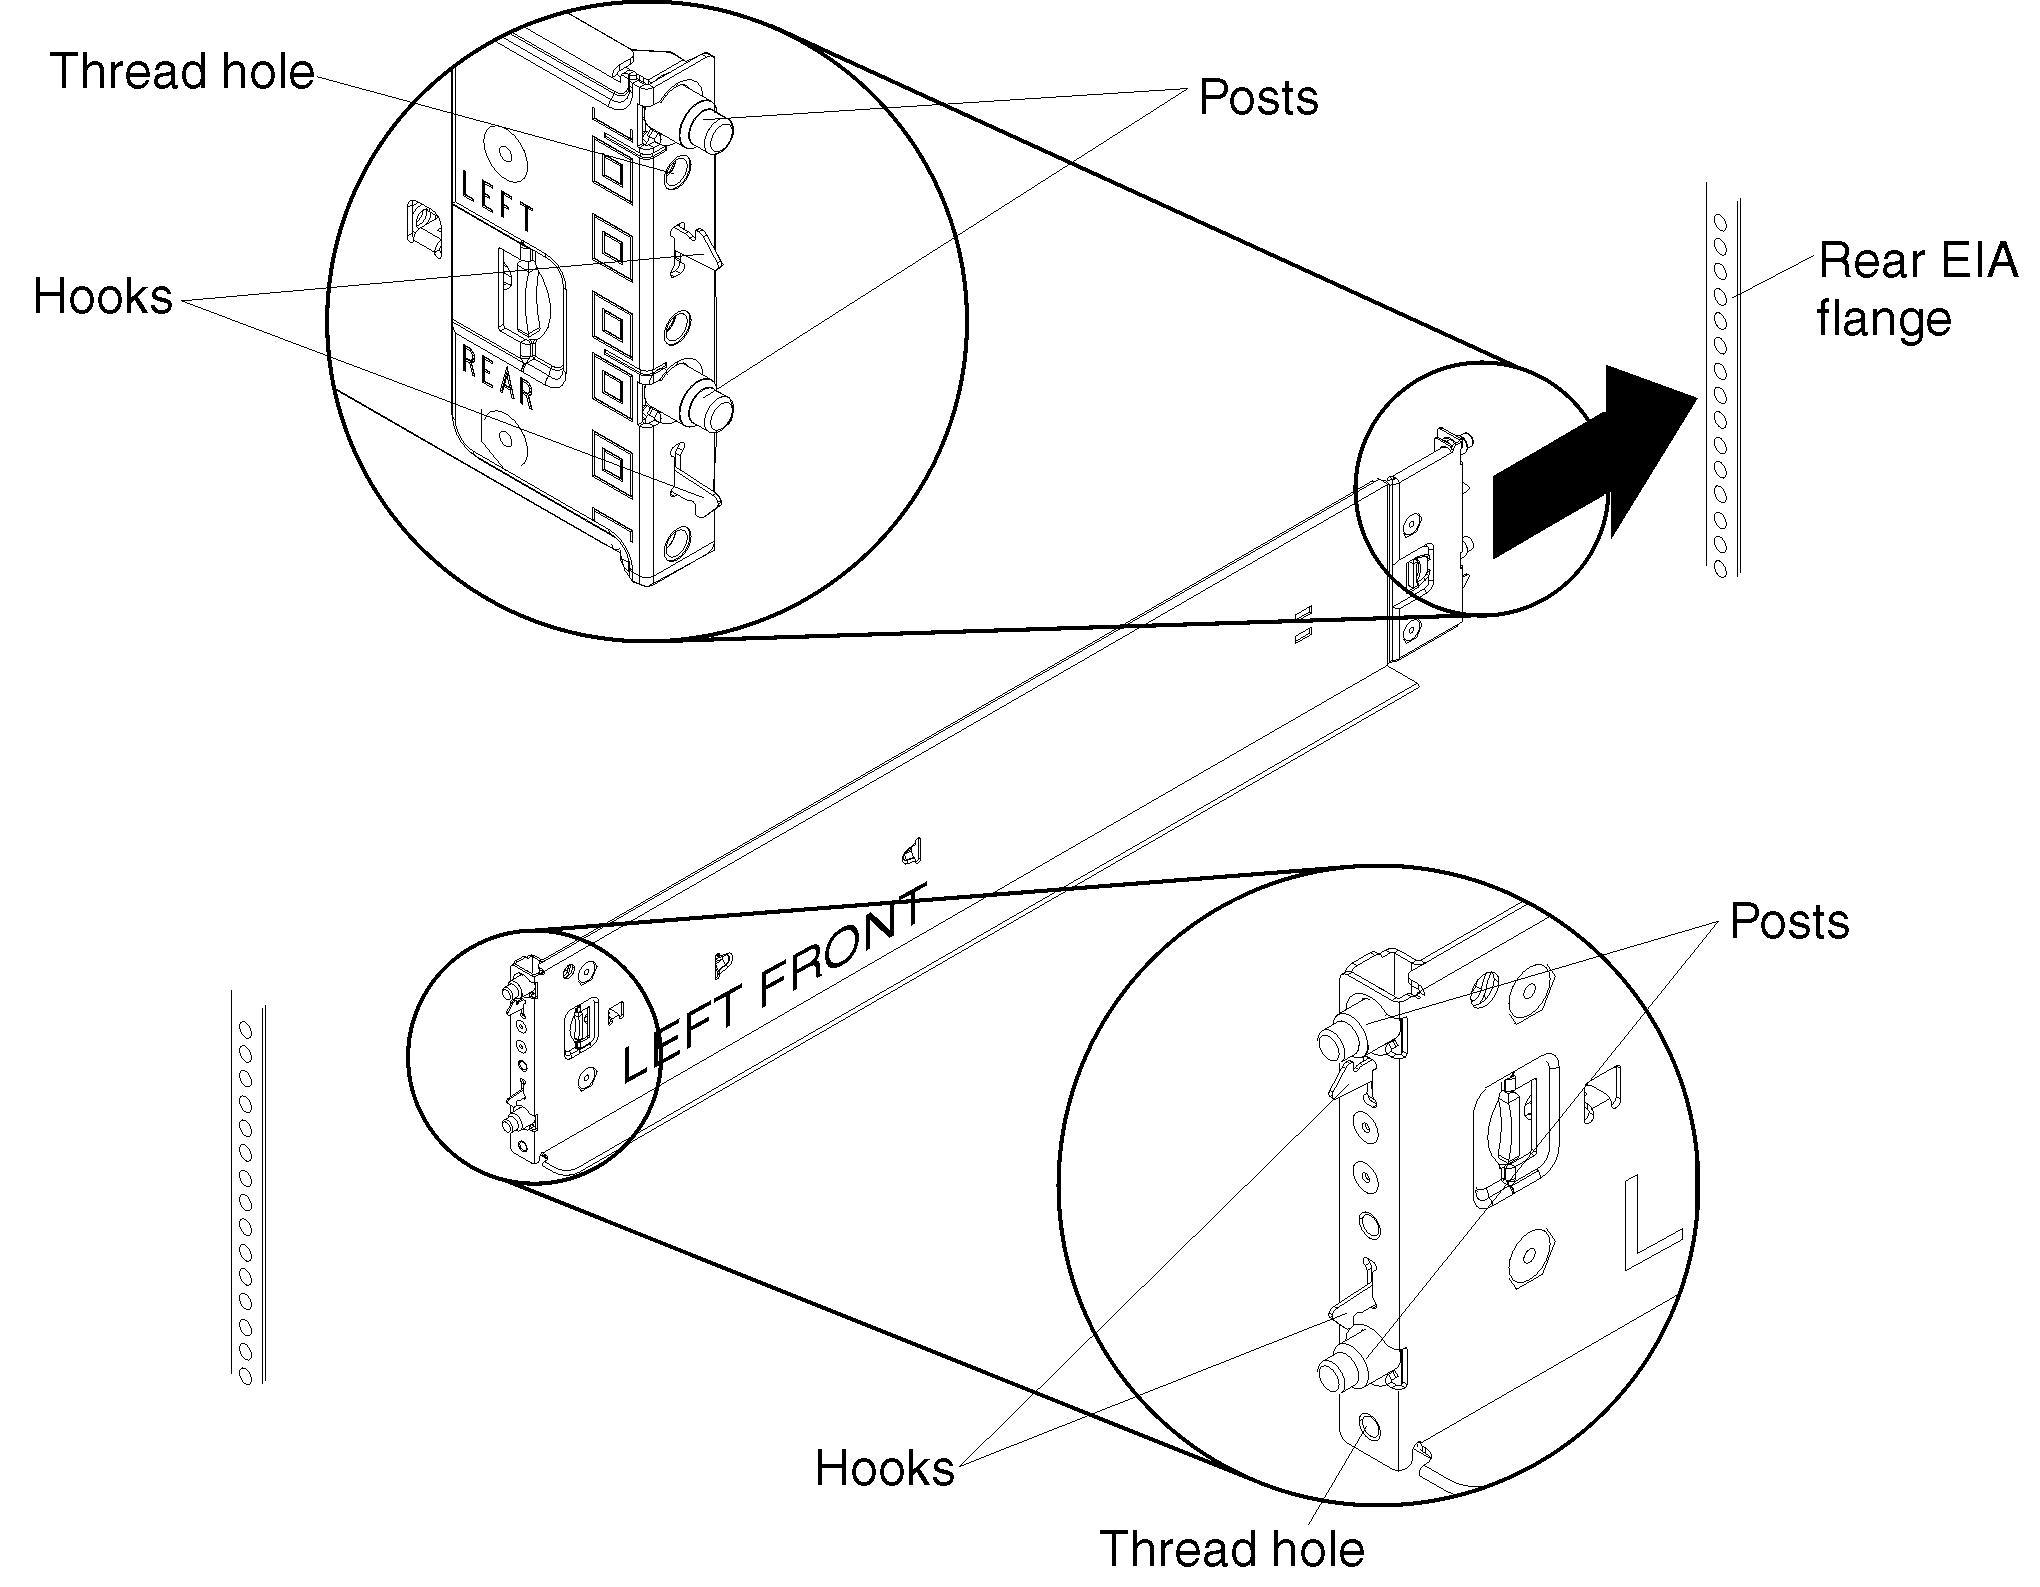
- Retract both chassis rails, if they are not already retracted. Rail posts and locking hooks are on each end of each rail.
- Position the left chassis rail in the selected location on the rear of the rack and align the posts on the chassis rail with the holes on the back EIA flange. Insert the posts on the rear of the chassis rail through the holes on the rear EIA flange until the hooks snap into place.
- Be sure to align the bottom edge of the chassis rail with the bottom U that you want the chassis to rest on.
- If you misalign the chassis rail when you insert it into the holes in the EIA flange, press the locking hooks release on the chassis rail to disengage the hooks and slide the posts out of the holes on the EIA flange. Reinsert the rail into the correct holes on the EIA flange.
- Make sure that the rail posts protrude through the holes on the EIA flanges.
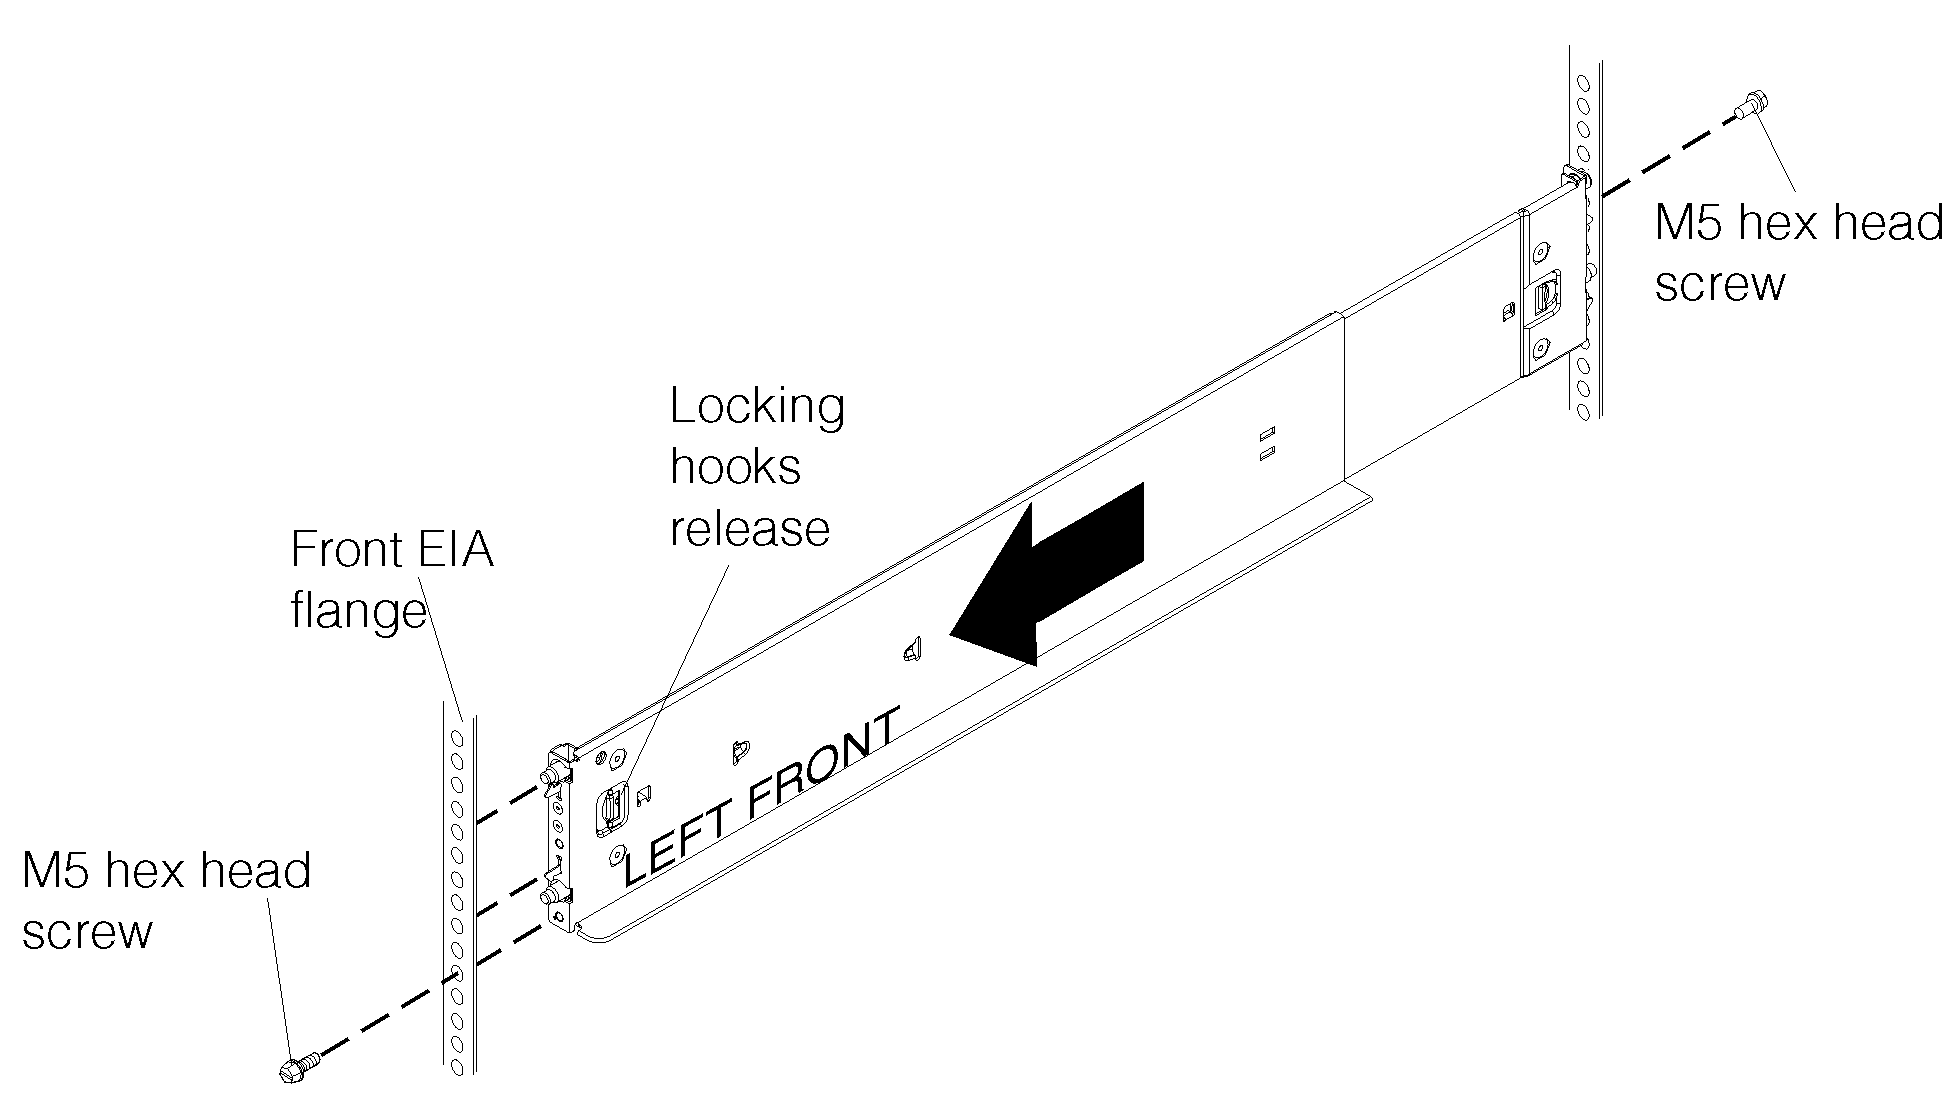
- Pull the chassis rail forward and insert the posts on the front of the rail into the corresponding holes on the front EIA flange until it snaps into place. Repeat steps 6 through 8 for the right chassis rail.
- Install M5x16 combi-head screws (black) from the rail kit to secure the rails to the EIA flange:
- At the front of the rack, install an M5x16 combi-head screw (black) in the lower threaded hole on the front of each chassis rail (two screws required, one in the right rail and one in the left rail).
- At the rear of the rack, install an M5x16 combi-head screw (black) in the upper threaded hole on the rear of each chassis rail (two screws required, one in the right rail and one in the left rail).
- Tighten the front and rear rail screws to 30 in-lbs (3.4 Nm).
- Remove the components from the chassis, to make the chassis easier to install in the rack. See Removing components for instructions. You do not have to remove the two fan logic modules in the rear of the chassis. You can also remove the chassis shelves to further reduce the weight.
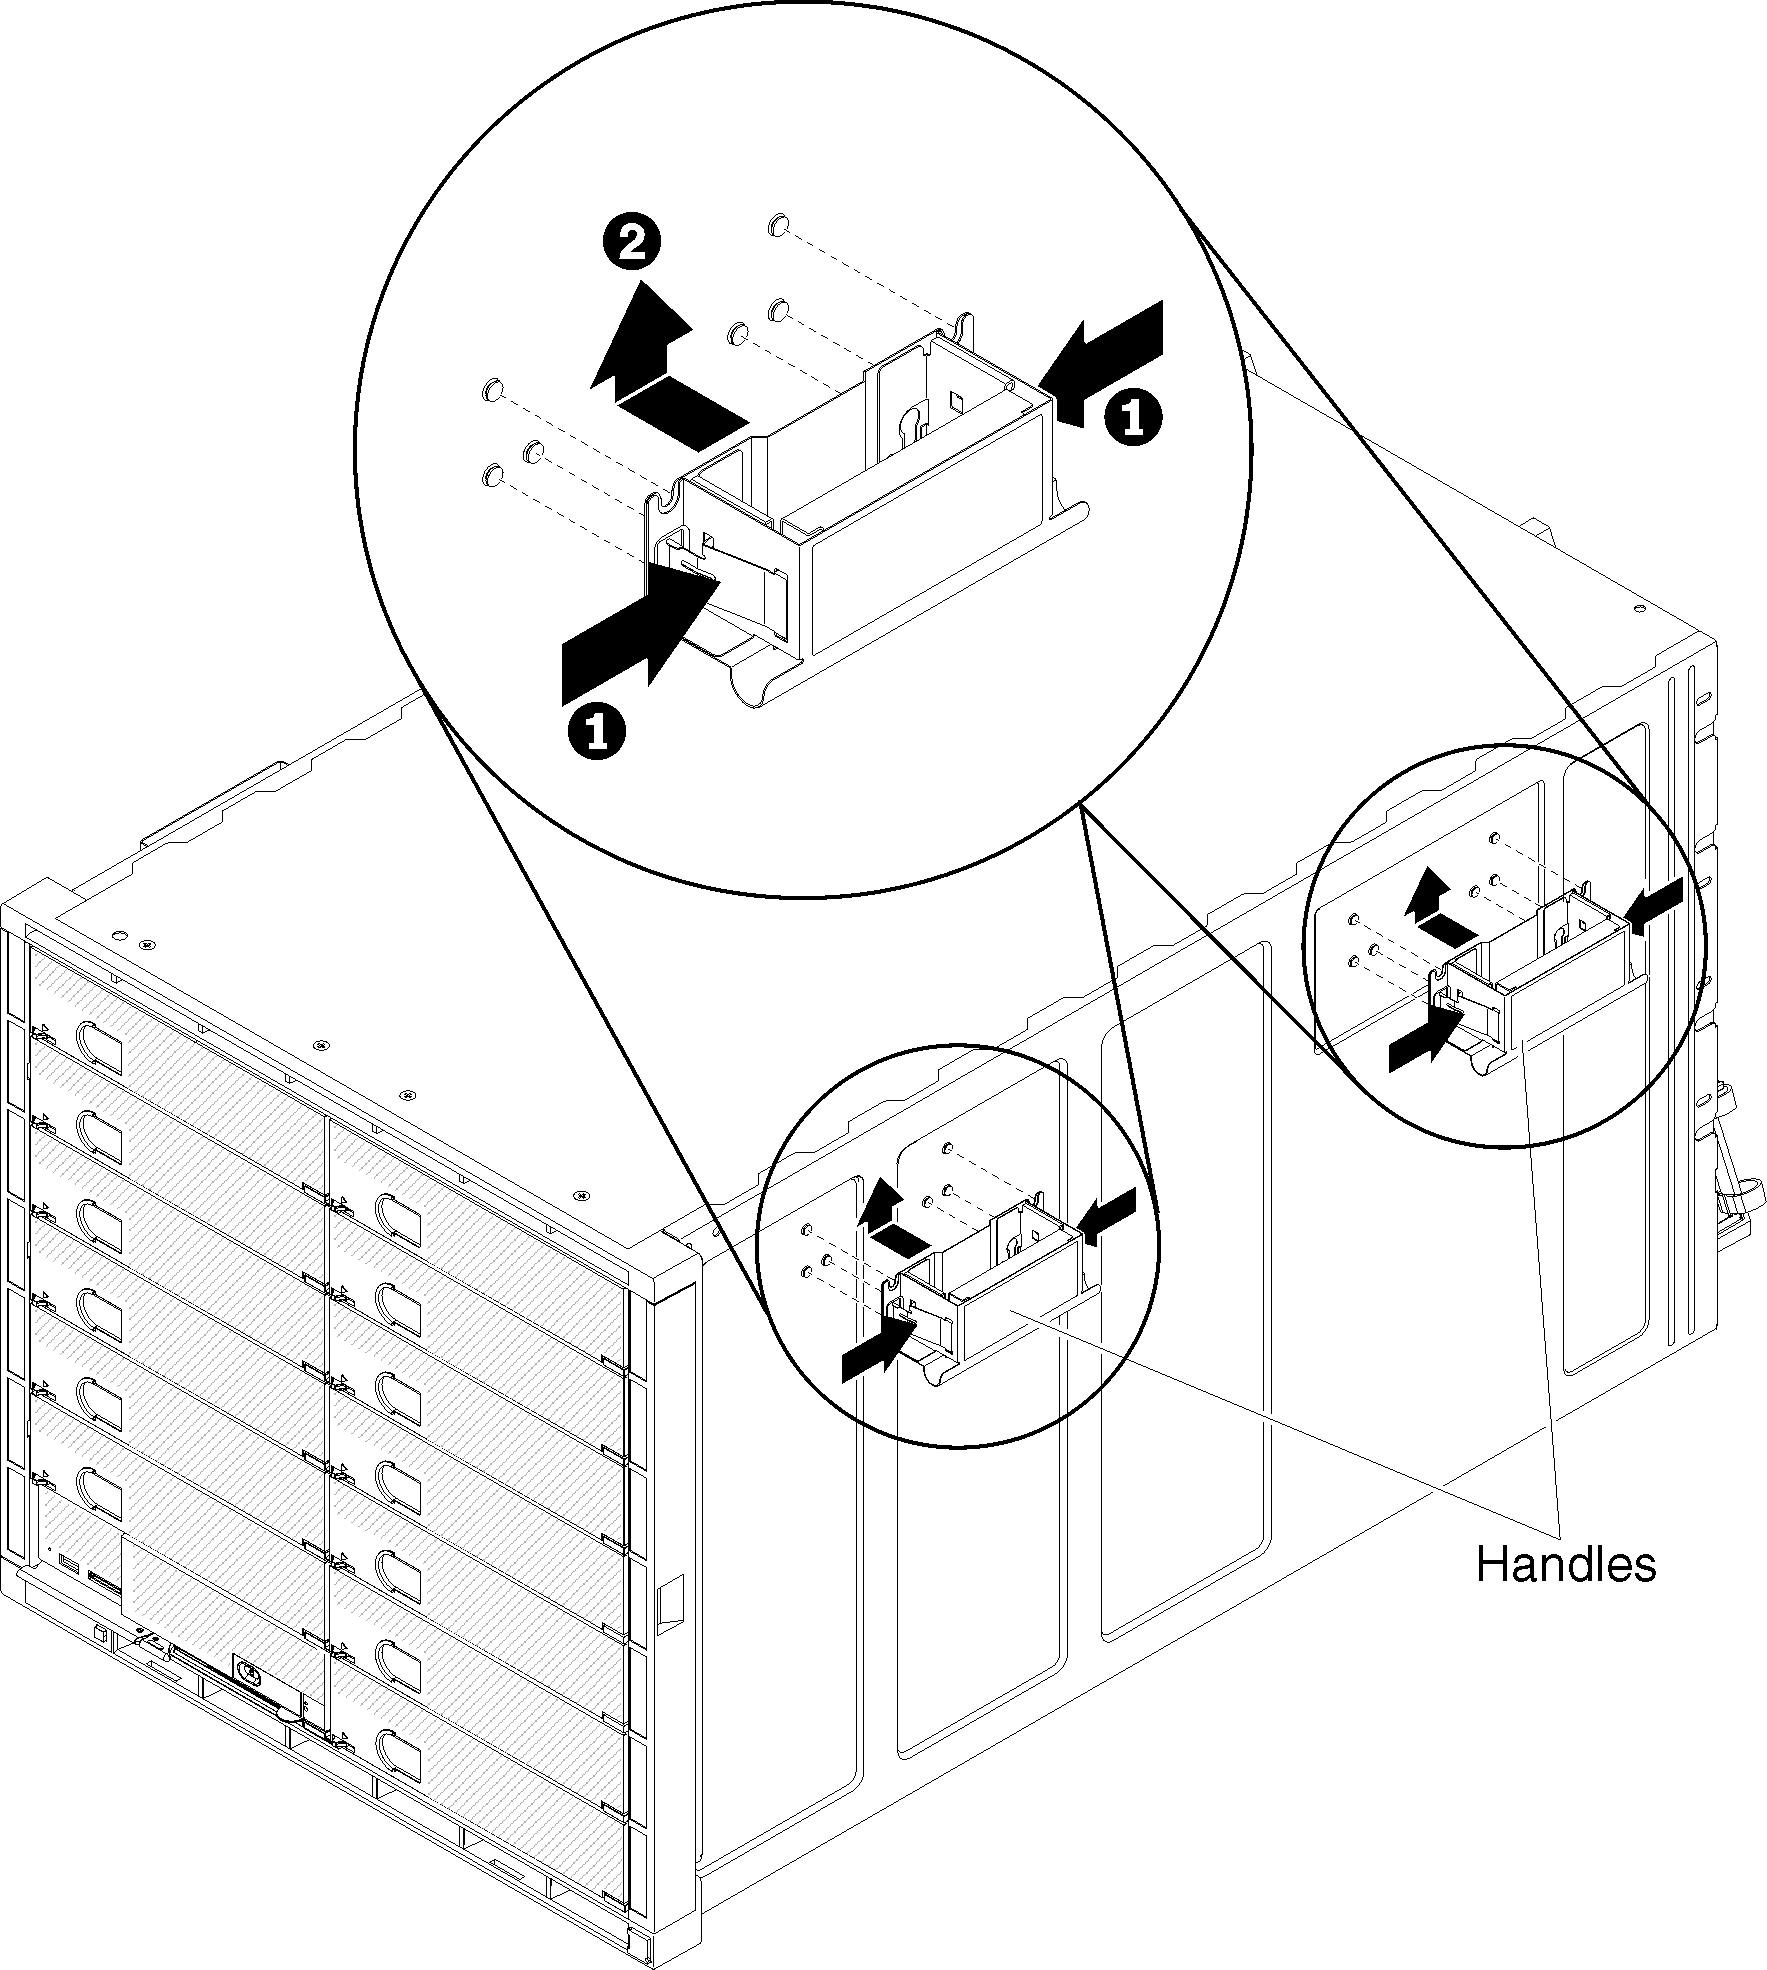
- Attach the chassis handles to the chassis. Four handles come in a box with the chassis. Align the slots on each handle with the posts on the side of the chassis and slide the handle up until it locks into place.
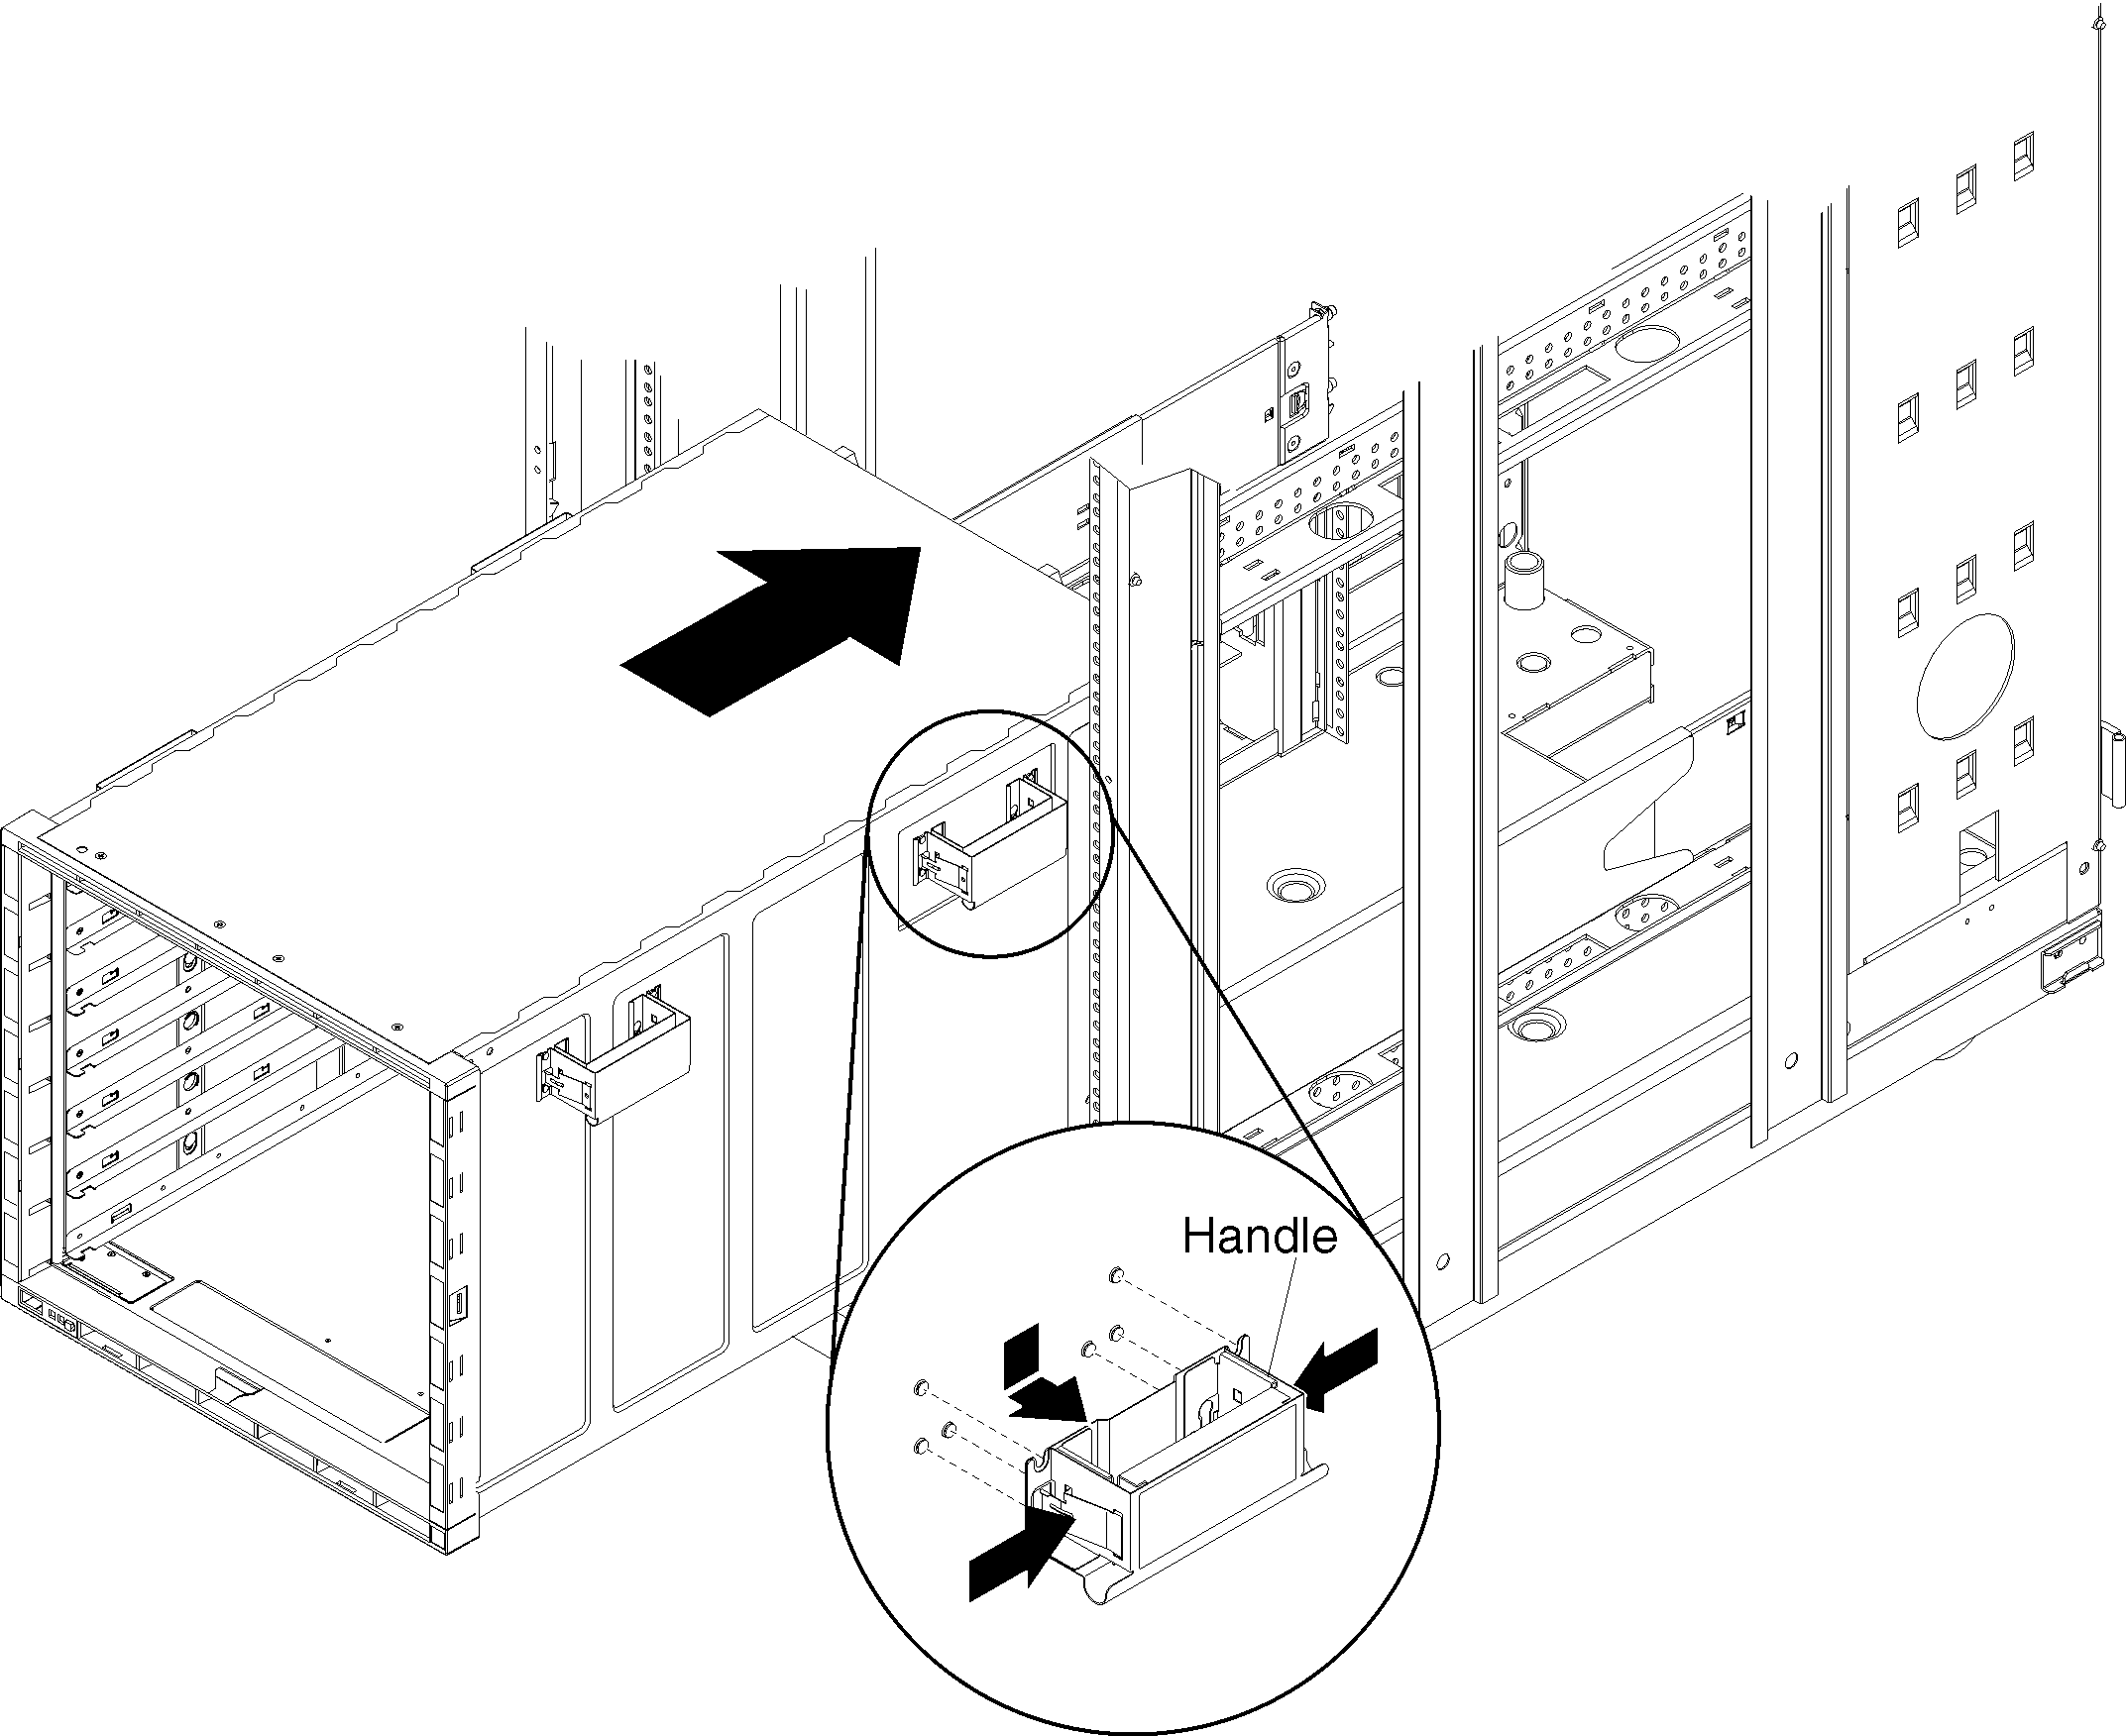
- Lift the chassis up, place the rear of the chassis onto the chassis rails, and slide the chassis into the rack until the rear chassis handles are near the front EIA flanges. While you support the chassis, remove each rear handle from the chassis (both sides) by pressing inward on the spring-latches on the handle and sliding the handles down to remove them.
- Slide the chassis farther into the rack until the front chassis handles are near the front EIA flanges, and remove the front handles. Then, slide the chassis all the way into the rack.
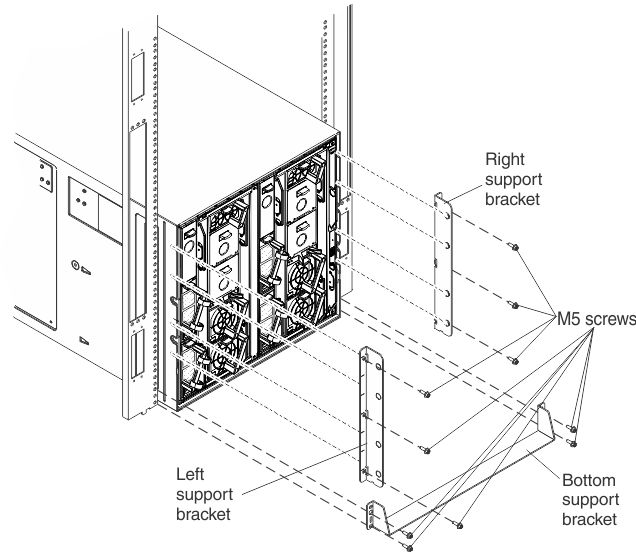
- If you plan to transport the rack to another location with the chassis installed, you must install the rear support brackets.
Rear support brackets and mounting screws are provided in the rack installation kit.
- Facing the rear of the chassis, align the left support bracket with the four slots on the outside of the chassis.
- Slide the support bracket forward until it locks into place in the slots.
- Install three M5x16 combi-head screws (black) from the rack installation kit to secure the support bracket to the rack, but do not tighten the screws.
- Repeat steps 15a through 15c for the right support bracket.
- Fit the lower support bracket to the bottom of the chassis; then, slide the support bracket forward against the rack.
- Install four M5x16 combi-head screws (black) from the rack installation kit in the lower support bracket, two screws on the right side and two screws on the left side, but do not tighten the screws.
- After the right, left, and lower support brackets and screws are installed, tighten all of the screws to 30 in-lbs (3.4 Nm).
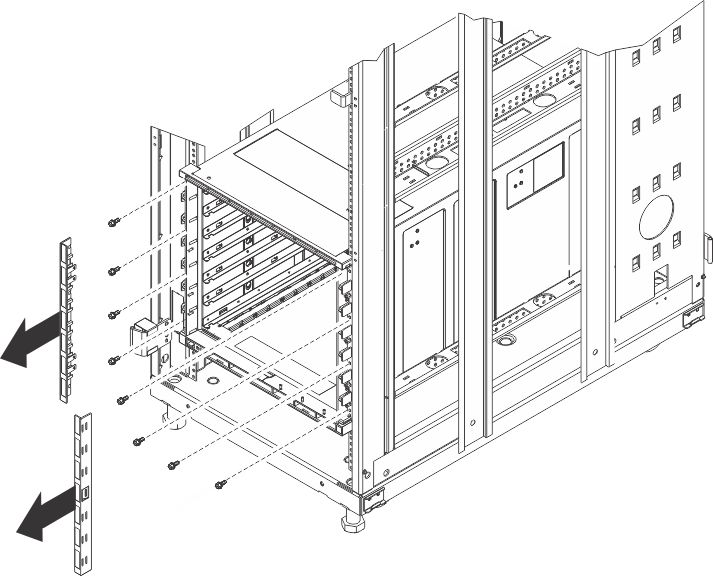
- Remove the plastic label plates from the left and right sides of the chassis.
- Install eight M5x16 captive washer screws (silver) from the rack installation kit through the front of the chassis (four screws on each side), but do not tighten the screws.
- After all of the screws are installed, tighten the screws to 30 in-lbs (3.4 Nm).
- Reinstall the plastic label plates onto the left and right sides of the chassis.
- Reinstall the chassis shelves, if you removed them earlier.
- Reinstall the components (see Installing components).

