After configuring the bridge, you can start cabling your new system.
For disk shelves, you insert a SAS cable connector with the pull tab oriented down (on the underside of the connector).
- Daisy-chain the disk shelves in each stack:
- Beginning with the logical first shelf in the stack, connect IOM A port 3 to the next shelf's IOM A port 1 until each IOM A in the stack is connected.
- Repeat the previous substep for IOM B.
- Repeat the previous substeps for each stack.
- Power on the disk shelves, and then set the shelf IDs.
- Cable disk shelves to the FibreBridge bridges.
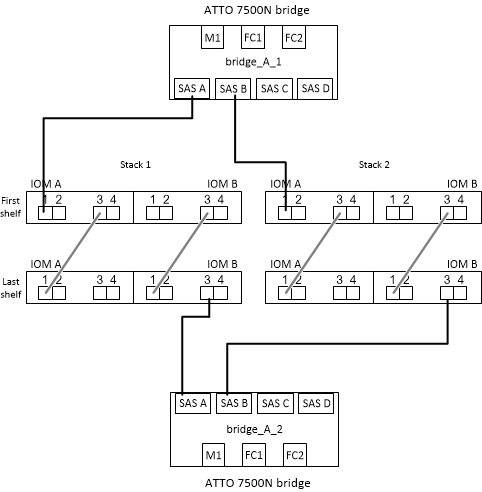
- For the first stack of disk shelves, cable IOM A of the first shelf to SAS port A on FibreBridge A, and cable IOM B of the last shelf to SAS port A on FibreBridge B.
- For additional shelf stacks, repeat the previous step using the next available SAS port on the FibreBridge bridges, using port B for the second stack, port C for the third stack, and port D for the fourth stack.
- During cabling, attach the stacks based on IOM12 and IOM3/IOM6 modules to the same bridge as long as they are connected to separate SAS ports.
Each stack can use different models of IOM, but all disk shelves within a stack must use the same model.
The following illustration shows disk shelves connected to a pair of FibreBridge 7600N bridges: