Use this information to install a DIMM.
Read the safety information in Safety and Installation guidelines.
If you are replacing a server component in the water-cooled technology tray, you need to remove the water-cooled technology tray from the chassis enclosure and refer to the Removing a water-cooled technology tray from a chassis and Installing a water-cooled technology tray in a chassis sections.
Static electricity that is released to internal server components when the server is powered on might cause the server to halt, which might result in the loss of data. To avoid this potential problem, always use an electrostatic-discharge wrist strap or other grounding system when you work inside the server with the power on.
To install a DIMM, complete the following steps.
- Remove the cover (see Removing the cover).
- Locate the DIMM connectors on the system board. Determine the connectors into which you will install the DIMMs. Install the DIMMs in the sequence shown in the following table.
Table 1. Normal mode DIMM installation sequence. Two column table documenting the number of installed microprocessor and DIMM connector population sequence.
| Number of installed microprocessor | DIMM connector population sequence |
|---|
| Two microprocessors installed | 8, 9, 1, 16, 6, 11, 3, 14, 7, 10, 2, 15, 5, 12, 4, 13 |
- Open the retaining clip on each end of the DIMM connector.
- To avoid breaking the retaining clips or damaging the DIMM connectors, open and close the clips gently.
- Unpopulated DIMM slots must be filled with DIMM fillers in order to provide proper cooling.
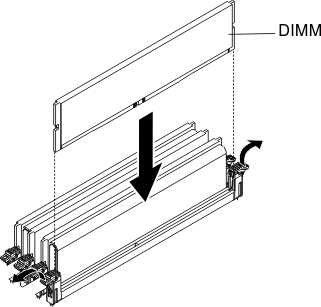
Figure 1. DIMM installation
- Touch the static-protective package that contains the DIMM to any unpainted metal surface on the outside of the server. Then, remove the DIMM from the package.
- Turn the DIMM so that the alignment slot align correctly with the alignment tab.
- Insert the DIMM into the connector by aligning the edges of the DIMM with the slots at the ends of the DIMM connector.
- Firmly press the DIMM straight down into the connector by applying pressure on both ends of the DIMM simultaneously. The retaining clips snap into the locked position when the DIMM is firmly seated in the connector.
If there is a gap between the DIMM and the retaining clips, the DIMM has not been correctly inserted; open the retaining clips, remove the DIMM, and then reinsert it.
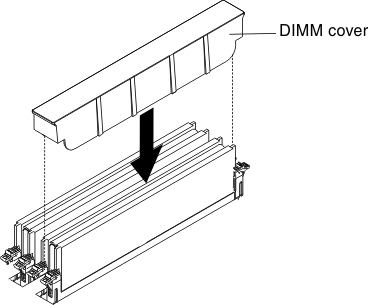
- Install the DIMM cover.
Figure 2. DIMM installation
- Reinstall the cover (see Replacing the cover).
If you have replaced a server component or installed an optional device in the server, you need reinstall the cover, slide the server into the rack, reconnect the power cords and all external cables, and turn on the server and peripheral devices.

