Procedures for installing ThinkAgile CP storage block slide rails in a square hole rack.
To install the ThinkAgile CP storage block slide rails in a square hole rack, do the following:
Ensure that you install the rear mounting rail brackets before installing the front mounting brackets.
Figure 1. Installing the rail in a square hole rack 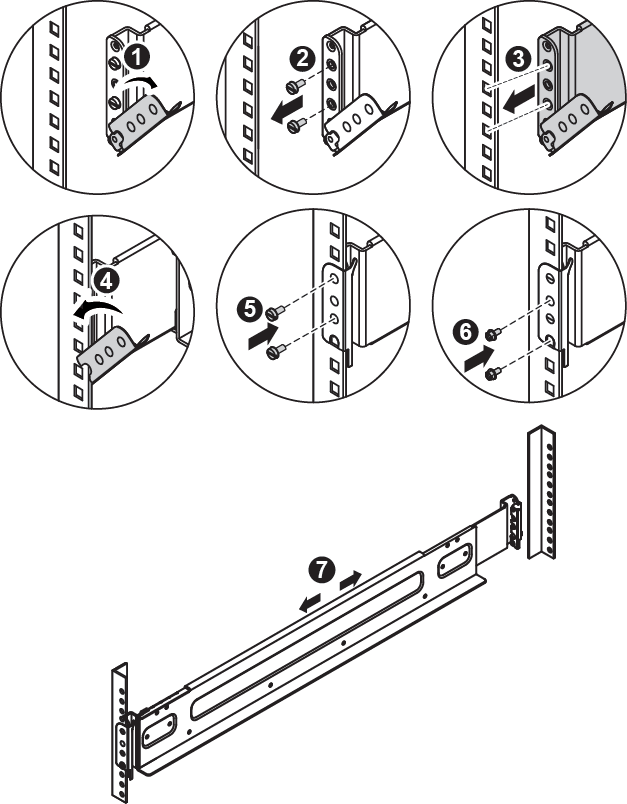
- Open the hinge bracket on the rear of the rail.
- Remove the preinstalled screw pins for round hole rack.
- Line up the holes on the rear of the rail with the corresponding holes in the rear-mounting flange of the rack.
- Close the hinge bracket to secure the rail to the rack flange.
- Secure the rear mounting bracket of the rail with two screws for square hole rack.
- Secure the rear mounting bracket of the rail with two M5 screws.
- Extend the rail until the front mounting bracket of the rail reaches the front rack.
- Repeat steps 1 through 5 to install the front rail mounting bracket to the front mounting flange.
For the front mounting bracket, the screws for square hole rack need to be fastened in the same holes as the preinstalled screws for round hole rack. Otherwise, the storage enclosure cannot be secured to the front mounting bracket.
After fastening the two screws for square hole rack, do not further secure the front mounting bracket of the rail with screws until you install the storage enclosure into the rack.
- Repeat steps 1 through 8 to install the opposite rail in the rack.
The installation of the storage block slide rails in a square hole rack is now complete.
The next step is to install the storage enclosure: Install the storage enclosure