Removing the simple-swap hard disk drive backplate assembly
Use this information to remove the simple-swap hard disk drive backplate assembly.
You must turn off the server before installing simple-swap drives in the server. Before you install a simple-swap SAS or SATA hard disk drive, read the following information. For a list of supported hard disk drives, see the Lenovo ServerProven website.
Read the safety information in Safety and Installation guidelines.
If you are replacing a server component in the server, you need to turn off the server and peripheral devices, and disconnect the power cords and all external cables.
To remove the simple-swap hard disk drive backplate assembly, complete the following steps:
- Turn off the server and peripheral devices and disconnect all power cords.
- Remove the cover (see Removing the cover).
- Pull the hard disk drives or fillers out of the server slightly to disengage them from the backplate assembly. See Removing a simple-swap hard disk drive for details.
- To obtain more working room, remove the fans (see Removing a system fan).
- Pull the hard disk drives out of the server slightly to disengage them from the backplate assembly.
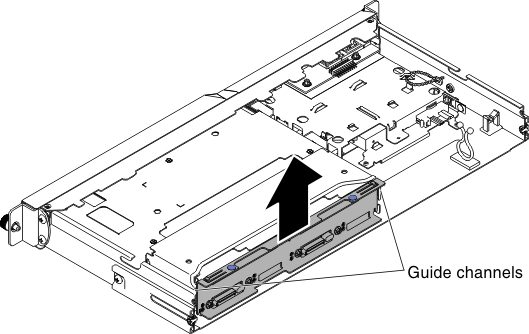
- Lift the backplate assembly out of the server.
- Make note of where the cables are attached to the backplate assembly; then, disconnect them.
- If you are instructed to return the backplate assembly, follow all packaging instructions, and use any packaging materials for shipping that are supplied to you.
Give documentation feedback