Use this information to install an optional tape drive.
Read the safety information in Safety and Installation guidelines.
If you are replacing a server component in the server, you need to turn off the server and peripheral devices, and disconnect the power cords and all external cables.
To install an optional full-height tape drive, complete the following steps.
- Unlock and remove the left-side cover (see Removing the left-side cover).
- Open the bezel (see Opening the bezel media door).
- Remove the air baffle if installed (see Removing the air baffle).
- Remove the fan cage assembly (see Removing the fan cage assembly).
- Remove the EMC shields from the drive bay, if installed.
- Touch the static-protective package that contains the tape drive to any unpainted metal surface on the server; then, remove the tape drive from the package.
- Install the blue rails on the tape drive.
- Follow the instructions that come with the drive to set jumpers or switches, if there is any.
You might find it easier to install the new drive from the front and then attach the cables.
- Align the rails on the tape drive with the guides in the drive bay; then, slide the tape drive into the drive bay until the rails click into place.
Figure 1. Slide the tape drive into the drive bay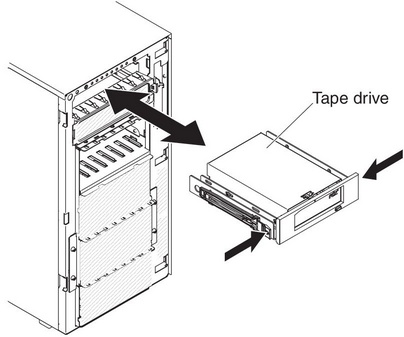
- Connect the power and signal cables to the drive and the connectors on the system board (see Internal cable routing and connectors for more information).
If you have other devices to install or remove, do so now.