Installing the full-length I/O book
This information provides notes and other information that you need to consider when you install the full-length I/O book and the instructions for installing the I/O book in the server.
The following notes provide information that you must consider when you install the full-length I/O book.
- For additional information about the supported adapters, see Installing an adapter in the standard or half-length I/O book, Supported ML2 (Ethernet) adapters, Supported RAID adapters, and Supported RAID cache cards.
The ability to hot-add the full-length I/O book is dependent on the operating system. If the operating system does not support hot-plug, the addition or removal of a full-length I/O book might cause an unrecoverable system error.
Attention- If the I/O bay is not populated with a full-length I/O book when the operating system boots or the operating system is still running, a full-length I/O book cannot be hot-added to the I/O bay (due to insufficient resources).
- If the I/O bay has a full-length I/O book installed when the operating system boots, you can hot-swap the full-length I/O book.
- If adapters are installed in the I/O book, you must first press the Power button on the full-length I/O book and power-off all three PCIe slots before you remove the I/O book from the server. The slots LED lights will be off when the slots are off-line.
- You can remove and install PCIe adapters in this I/O book without powering off the server.
- This I/O book has two PCIe auxiliary power connectors (one 6-pin for 75W extra power and one 8-pin for 150W extra power.
- When you install a double-wide adapter in one of the x16 slots on this I/O book, the x8 slot is no longer usable and the other x16 slot might not be usable due to limited power available for the I/O book.
- This I/O book supports both half-length, full-height and full-length, full-height and low-profile PCIe Gen3 and Gen2 adapters.
- When this I/O book is installed in the server, it is connected to compute book 3 or compute book 4. See Table 1.
- You can install up to two full-length I/O books in the server.
- You can also install one full-length I/O book and one half-length I/O book in the server.
- PCIe slots 2 and 5 (when two full-length I/O books are installed) are connected to compute books 3 and 4 DMI buses that have been reconfigured as x4 PCIe Gen 2 buses.
- PCIe slots 2 and 5 (when two full-length I/O books are installed) are x8 slots that are wired for x4. If you install a x8 adapter in slots 2 and 5 that can down train to x4 bandwidth, it will run at the x4 bandwidth. The x8 connector can be used for x4 or x8 adapters. Check the information that comes with your adapter for compatibility information.
- PCIe slots 1, 3, 4, and 6 (when two full-length I/O books are installed) are x16 Gen 3 adapter slots.
- Double-wide adapters can only be installed in PCIe slots 1 or 4. When you install double-wide adapters in slots 1 or 4, you cannot install an adapter in slots 2 and 5.
- This I/O book also provides two auxiliary power connectors to support adapters that need up to 300 watts of power.
- For additional information about this I/O book, see full-length I/O book.
The following table lists the I/O book PCIe slot numbering and the slots associated with each compute book (when two I/O books are installed):
| PCIe slot number (facing the rear of the server) | Compute book associated with the PCIe slot |
|---|---|
| 1 | Compute book 4 |
| 2 | Compute book 4 |
| 3 | Compute book 4 |
| 4 | Compute book 3 |
| 5 | Compute book 3 |
| 6 | Compute book 3 |
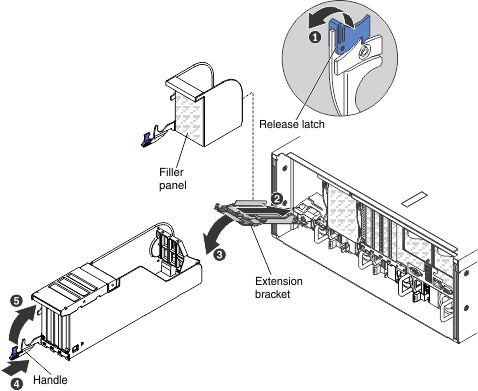
To install the full-length I/O book, complete the following steps:
- Install the extension bracket that comes with the I/O book. Insert the bracket into the slots in the I/O bay (as shown in the illustration).
If you have other devices to install or remove, do so now. Otherwise, go to Completing the installation.