Installing a compute book
This information provides notes and information that you need to consider when you install the compute book and the instructions for how to install the compute book.
- If you are installing a compute book that supports a E7-x8xx v3 or v4 series microprocessor and the server previously contained compute books that had a E7-x8xx v2 series microprocessor installed, before you install the new compute book, you must update the firmware to a minimum firmware level to support the E7-x8xx v3 or v4 microprocessor. The server will not operate without the firmware update.
The recommended minimum UEFI code level for E7-x8xx v2 and v3 is A9e130E. The recommended minimum UEFI code level for E7-x8xx v4 is A9e132W.
The recommended minimum IMM firmware level for E7-x8xx v2 and v3 is TCoo16P. The recommended minimum IMM firmware level for E7-x8xx v4 is TCoo18Q.
If you fail to update the firmware to the minimum levels, you can reinstall the compute books that had a E7-x8xx v2 series microprocessor installed; then, update the firmware, remove the old compute book, and proceed with the new compute book installation.
- You cannot mix compute books that support E7-x8xx v2 series microprocessors and compute books that support E7-x8xx v3 or v4 series microprocessors. All compute books in the server must support the same series microprocessor.
The following are notes and information that you must consider when you install the compute book in the server:
- The compute books should be installed from left to right (facing the front of the server).
- A minimum of two compute books must be installed in the 4-socket (x3850 X6) server.
- A minimum of four compute books must be installed in the 8-socket (x3950 X6) server.
- Each compute book must have a minimum of one microprocessor and one DIMM installed.
- The 4-socket (x3850 X6) server supports compute book configurations of two or four. These are the only configurations supported. The following tables list the installation sequence for the supported compute book configurations.
Table 1. Installation sequence for the two compute books configuration for a 4-socket server. Table with four columns and headers with the install sequence information for the configuration of two compute books in a 4-socket server
Compute book bay 1 bay 2 bay 3 bay 3 1 compute book 1 2 compute book 2 Table 2. Installation sequence for the four compute books configuration for a 4-socket server. Table with four columns and headers with the install sequence information for the configuration of four compute books in a 4-socket server
Compute book Bay 1 Bay 2 Bay 3 Bay 4 1 compute book 1 2 compute book 2 3 compute book 3 4 compute book 4 - The 8-socket (x3950 X6) server supports compute book configurations of four, six, or eight. These are the only configurations supported. The following tables list the installation sequence for the supported compute book configurations.
Table 3. Installation sequence for the four compute books configuration for an 8-socket server. Table with four columns and headers with the install sequence information for the configuration of four compute books in an 8-socket server
Compute book Top node (bay 1) Top node (bay 2) Top node (bay 3) Top node (bay 4) Bottom node (bay 1) Bottom node (bay 2) Bottom node (bay 3) Bottom node (bay 4) 1 compute book 1 2 compute book 2 3 compute book 3 4 compute book 4 Table 4. Installation sequence for the six compute books configuration for an 8-socket server. Table with four columns and headers with the install sequence information for the configuration of six compute books in an 8-socket server
Compute book Top node (bay 1) Top node (bay 2) Top node (bay 3) Top node (bay 4) Bottom node (bay 1) Bottom node (bay 2) Bottom node (bay 3) Bottom node (bay 4) 1 compute book 1 2 compute book 2 3 compute book 3 4 compute book 4 5 compute book 5 6 compute book 6 Table 5. Installation sequence for the eight compute books configuration for an 8-socket server. Table with four columns and headers with the install sequence information for the configuration of eight compute books in an 8-socket server
Compute book Top node (bay 1) Top node (bay 2) Top node (bay 3) Top node (bay 4) Bottom node (bay 1) Bottom node (bay 2) Bottom node (bay 3) Bottom node (bay 4) 1 compute book 1 2 compute book 2 3 compute book 3 4 compute book 4 5 compute book 5 6 compute book 6 7 compute book 7 8 compute book 8 - For more information about the compute book, see Compute book. For more information about installing DIMMs, see Installing a memory module.
- For a list of supported devices, see the Lenovo ServerProven website.
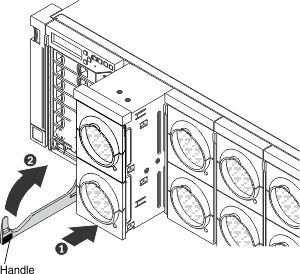
To install the compute book, complete the following steps:
- Align the compute book with the bay on the server and slide it in the server. Place one hand under the center of the compute book to support it while sliding it into the server.
If you have other devices to install or remove, do so now. Otherwise, go to Completing the installation.