DIMM installation instructions
This information provides instructions on how to install DIMMs for memory-mirroring mode.
Note
- The information and installation procedures in this documentation apply to both the 4-socket and the 8-socket configurations of the server, unless otherwise specified. Most of the illustrations in the documentation show the 4-socket configuration of the server.
- For additional information and notes that you need to consider when installing DIMMs, see Installing a memory module and eXFlash DIMMs.
Attention
Static electricity that is released to internal server components when the server is powered on might cause the server to stop, which might result in the loss of data. To avoid this potential problem, always use an electrostatic-discharge wrist strap and plug it into the electrostatic-discharge connector on the front of the server (see Front view of the server for the location of this connector) or other grounding system when you work inside the server with the power on.
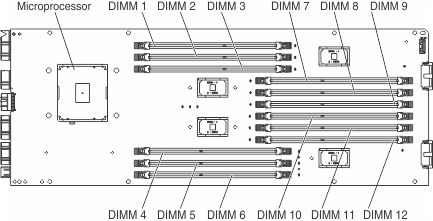
The following illustration shows the DIMM connectors on the microprocessor side of the compute book board.
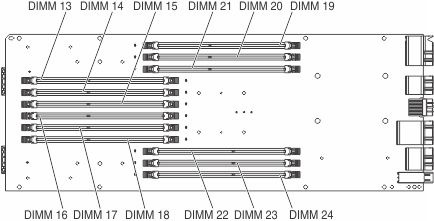
The following illustration shows the DIMM connectors on the non-microprocessor side of the compute book board.
To install a DIMM, complete the following steps.
- Before you begin, read Safety and Installation guidelines.
- Turn off the server (see Turning off the server) and all attached peripheral devices. Disconnect all power cords; then, disconnect all external cables from the server.
- Remove the compute book from the server (see Removing a compute book).
- Remove the compute book cover (left or right cover - depending on the DIMM connector in which you are installing the DIMM). Press down on both blue touch points on the cover and slide the cover toward the rear of the expansion module.AttentionRemove only one cover (on one side) at a time to protect the
compute book components on the other side of the compute book from being damaged. 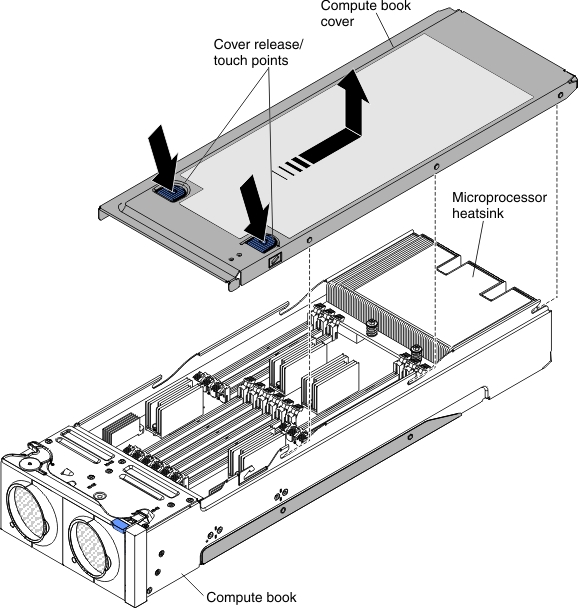
- Open the retaining clip on each end of the DIMM connector.NoteTo avoid breaking the retaining clips or damaging the DIMM connectors, open and close the clips gently.

- Touch the static-protective package that contains the DIMM to any unpainted metal surface on the outside of the server. Then, remove the DIMM from the package.
- Turn the DIMM so that the DIMM keys align correctly with the connector.
- Insert the DIMM into the connector by aligning the edges of the DIMM with the slots at the ends of the DIMM connector.
- Firmly press the DIMM straight down into the connector by applying pressure on both ends of the DIMM simultaneously. The retaining clips snap into the locked position when the DIMM is firmly seated in the connector.NoteIf there is a gap between the DIMM and the retaining clips, the DIMM has not been correctly inserted; open the retaining clips, remove the DIMM, and then reinsert it.
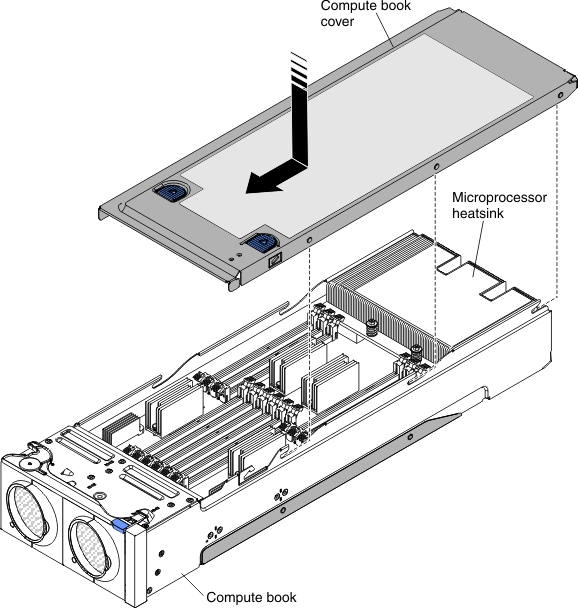
- Replace the compute book cover. Align the cover on the compute book and slide it forward toward the front to the expansion module until it is firmly seated.
- Reinstall the compute book into the server (see Replacing a compute book).
If you have other devices to install or remove, do so now. Otherwise, go to Completing the installation.
Give documentation feedback