Your system configuration determines whether you can perform a nondisruptive IOM12 module hot-swap or a disruptive IOM12 module replacement when an IOM12 module fails. When an IOM12 module fails, the system logs a warning message to the system console indicating which IOM12 module has failed. In addition, the attention (amber) LED on the operator display panel and the attention (amber) LED on the failed IOM12 module illuminate.
Before you begin
All other components in the system, including the other IOM12 module, must be functioning properly.
About this task
For multipathed (multipath HA or multipath) and quad-pathed (quad-path HA or quad-path) configurations, you can hot-swap an IOM12 module (nondisruptively replace an IOM12 module in a system that is powered on and serving data—I/O is in progress).
Best practice is to have the current versions of disk shelf (IOM) firmware and disk drive firmware on your system before adding new disk shelves, shelf FRU components, or SAS cables.
Current versions of firmware can be found on the Lenovo Support Web site.
Disk shelf (IOM) firmware is automatically updated (nondisruptively) on a new IOM12 module with a non current firmware version.
IOM firmware checks occur every ten minutes. An IOM firmware update can take up to 30 minutes.
If needed, you can turn on the disk shelf's location (blue) LEDs to aid in physically locating the affected disk shelf: storage shelf location-led modify -node node_name -shelf-name shelf_name -led-status on
A disk shelf has three location (blue) LEDs: one on the operator display panel and one on each IOM12 module. Location LEDs remain illuminated for 30 minutes. You can turn them off by entering the same command, but using the off option.
If needed, you can refer to the Monitoring disk shelf LEDs section for information about the meaning and location of disk shelf LEDs on the operator display panel and FRU components.
For DM600S, the video for this task is available at:
Unpack the new IOM12 module, and set it on a level surface near the disk shelf.
Save all packaging materials for use when returning the failed IOM12 module.
Physically identify the failed IOM12 module from the system console warning message and the illuminated attention (amber) LED on the failed IOM12 module.
Perform one of the following actions based on the type of configuration you have:
If you have a...
Then...
Multipath HA, multipath, quad-path HA, or quad-path configuration
Go to the next step.
Disconnect the cabling from the IOM12 module that you are removing.
Make note of the IOM12 module ports each cable is connected to.
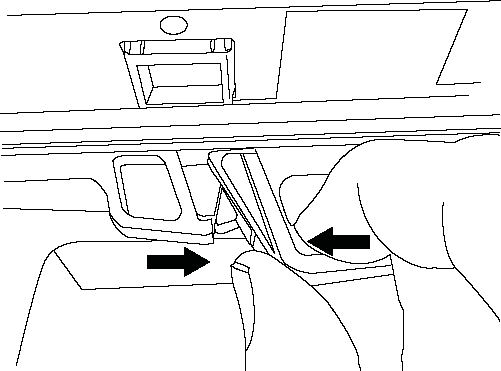
Press the orange latch on the IOM12 module cam handle until it releases, and then open the cam handle fully to release the IOM12 module from the mid plane.
Use the cam handle to slide the IOM12 module out of the disk shelf.
If you have a DM240S or DM120S disk shelf, as you remove the power supply, a plastic flap swings into place to block the empty bay, helping to maintain air flow and cooling.
Note
When handling an IOM12 module, always use two hands to support its weight.
Wait at least 70 seconds after removing the IOM12 module before you install the new IOM12 module.
Waiting at least 70 seconds enables the driver to register the shelf ID correctly.
Using two hands, with the cam handle of the new IOM12 module in the open position, support and align the edges of the new IOM12 module with the opening in the disk shelf, and then firmly push the new IOM12 module until it meets the mid plane.
Attention
Do not use excessive force when sliding the IOM12 module into the disk shelf; you might damage the connectors.
Close the cam handle so that the latch clicks into the locked position and the IOM12 module is fully seated.
Reconnect the cabling.
The SAS cable connectors are keyed; when oriented correctly into an IOM port, the connector clicks into place and the IOM port LNK LED illuminates green. You insert a SAS cable connector into an IOM port with the pull tab oriented down (on the underside of the connector).
Perform one of the following actions based on the type of configuration you have:
If you have a...
Then...
Multipath HA, multipath, quad-path HA, or quad-path configuration
Go to the next step.
Verify that the IOM12 module port links have been established.
For each module port that you cabled, the LNK (green) LED illuminates when one or more of the four SAS lanes have established a link (with either an adapter or another disk shelf).
If you are instructed to return the failed part, follow all packaging instructions and use any packaging materials that are provided.