
Hot-removing disk shelves with IOM12 modules

You can hot-remove a disk shelf with IOM12 modules—nondisruptively remove a disk shelf from a system that is powered on and serving data (I/O is in progress)—when you need to move or replace the disk shelf. You can hot-remove one or more disk shelves from anywhere within a stack of disk shelves or remove a stack of disk shelves.

Before you begin

  • Your system must be a multipath HA, multipath, quad-path HA, or quad-path configuration.

    For DM3000x, DM5000x, or DM7000x, the external storage must be cabled as multipath HA or multipath.
    Note
    For a DM3000x, DM5000x, or DM7000x single-controller system that has the external storage cabled with multipath connectivity, the system is a mixed-path configuration because the internal storage uses single-path connectivity.
  • HA pair configurations cannot be in a takeover state.
  • You must have removed all aggregates from the disk drives—the disk drives must be spares— in the disk shelves you are removing.
    Attention
    If you attempt this procedure with aggregates on the disk shelf you are removing, you could fail the system with a multidisk panic.
    Note
    Before you remove all aggregates, identify the SVMs of the aggregates and remove all port sets, ports, LUNs, and volumes allocated to the SVMs. Then, remove the SVMs.

    You can use the storage aggregate offline -aggregate aggregate_name command.

  • If you are removing one or more disk shelves from within a stack, you must have factored the distance to bypass the disk shelves you are removing; therefore, if the current cables are not long enough, you need to have longer cables available.

About this task

  • Best practice is to remove disk drive ownership after you remove the aggregates from the disk drives in the disk shelves you are removing.

    Removing ownership information from a spare disk drive allows the disk drive to be properly integrated into another node (as needed).

    The procedure for removing ownership from a disk can be found in the Disks and Aggregates Power Guide.
    Note
    The procedure for removing ownership from disk drives requires you to disable disk ownership automatic assignment. You reenable disk ownership automatic assignment at the end of this procedure.

    ONTAP 9 Disks and Aggregates Power Guide

  • For a clustered ONTAP system that is greater than two-nodes, best practice is to have reassigned epsilon to an HA pair other than the one that is undergoing planned maintenance.

    Reassigning epsilon minimizes the risk of unforeseen errors impacting all nodes in a clustered ONTAP system. Information about the role of quorum and epsilon, and the procedure for reassigning epsilon to another node in a cluster can be found in the System Administration Reference.

    Find a System Administration Guide for your version of ONTAP 9

  • If you are hot-removing a disk shelf from a stack (but keeping the stack), you recable and verify one path at a time (path A then path B) to bypass the disk shelf you are removing so that you always maintain single-path connectivity from the controllers to the stack.
    Attention
    If you do not maintain single-path connectivity from the controllers to the stack when recabling the stack to bypass the disk shelf you are removing, you could fail the system with a multidisk panic.
  1. Verify that your system configuration is Multi-Path HA, Multi-Path, Quad-path HA, or Quad-path: First access the nodesheell by running system node run node name. When the nodeshell prompts, run sysconfig.
    You run this command from the nodeshell of either controller. It might take up to a minute for the system to complete discovery.
    The configuration is listed in the System Storage Configuration field.
    Note
    For DM3000x, DM5000x, or DM7000x systems with external storage, the output is displayed as Mixed-Path HA for an HA pair, or Mixed-Path for a single-controller configuration because the internal storage is cabled differently than the external storage. For an HA pair, the internal storage is cabled as single-path HA and the external storage is cabled as multipath HA. For a single-controller configuration, the internal storage is cabled as single-path and the external storage is cabled as multipath.
  2. Verify that the disk drives in the disk shelves you are removing have no aggregates (are spares) and ownership is removed, by completing the following substeps:
    1. Enter the following command from the clustershell of either controller: storage disk show -shelf shelf_number
    2. Check the output to verify there are no aggregates on the disk drives in the disk shelves you are removing.
      Disk drives with no aggregates have a dash in the Container Name column.
    3. Check the output to verify that ownership is removed from the disk drives on the disk shelves you are removing.
      Disk drives with no ownership have unassigned in the Container Type column.
      Note
      If you have failed disk drives in the shelf you are removing, they have broken in the Container Type column. (Failed disk drive do not have ownership.)

    Example

    The following output shows disk drives on the disk shelf being removed (disk shelf 3) are in a correct state for removing the disk shelf. Aggregates have been removed on all of the disk drives in disk shelf 3; therefore, a dash appears in the Container Name column for each disk drive. Ownership has been removed on two disk drives; therefore, unassigned appears in the Container Type column. And two disk drives are failed; therefore, broken appears in the Container Type column:
    cluster::> storage disk show -shelf 3

    Usable Disk Container Container
    Disk Size Shelf Bay Type Type Name Owner
    -------- -------- ----- --- ------ ----------- ---------- ---------
    ...
    1.3.4 - 3 4 SAS unassigned - -
    1.3.5 - 3 5 SAS unassigned - -
    1.3.6 - 3 6 SAS broken - -
    1.3.7 - 3 7 SAS broken - -
    ...

  3. Physically locate the disk shelves you are removing.
    If needed, you can turn on the disk shelf's location (blue) LEDs to aid in physically locating the affected disk shelf: storage shelf location-led modify -node node_name -shelf-name shelf_name -led-status on
    Note
    A disk shelf has three location (blue) LEDs: one on the operator display panel and one on each IOM12 module. Location LEDs remain illuminated for 30 minutes. You can turn them off by entering the same command, but using the off option.
  4. If you are removing an entire stack of disk shelves, complete the following substeps; otherwise, go to the next step:
    1. Remove all SAS cables on Path A for the enclosure that you are removing. Then reattach the SAS cables back to the upstream enclosure and ensure that you have connectivity back to all enclosures on Path A. Remove the cables for path B on the enclosure you are removing. Then ensure that you have reconnected the cables of all additional enclosures back on path B to maintain your redundancy.
      This includes controller-to-shelf cables and shelf-to-shelf cables for all disk shelves in the stack you are removing.
    2. Go to 9.
  5. If you are removing one or more disk shelves from a stack (but keeping the stack), recable the path A (IOM A) stack connections to bypass the disk shelves you are removing by completing the applicable set of substeps:
    If you are removing more than one disk shelf in the stack, complete the applicable set of substeps one disk shelf at a time.
    Note
    Wait at least 10 seconds before connecting the port. The SAS cable connectors are keyed; when oriented correctly into a SAS port, the connector clicks into place and the disk shelf SAS port LNK LED illuminates green. For disk shelves, you insert a SAS cable connector with the pull tab oriented down (on the underside of the connector).
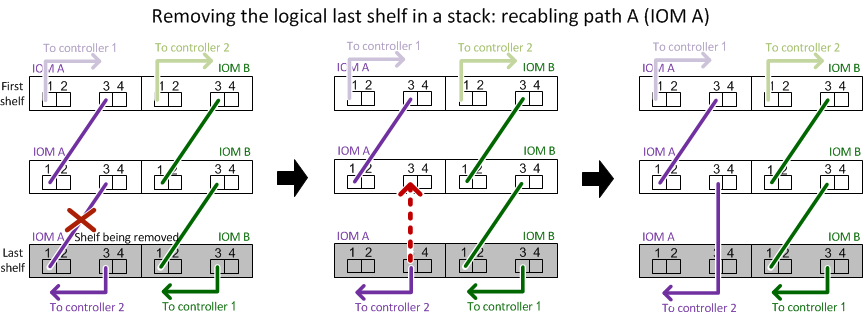
    If you are removing...Then...
    A disk shelf from either end (logical first or last disk shelf) of a stack
    1. Remove any shelf-to-shelf cabling from IOM A ports on the disk shelf you are removing and put them aside.
    2. Unplug any controller-to-stack cabling connected to IOM A ports on the disk shelf you are removing and plug them into the same IOM A ports on the next disk shelf in the stack.

      The next disk shelf can be above or below the disk shelf you are removing depending on which end of the stack you are removing the disk shelf from.

    A disk shelf from the middle of the stack

    A disk shelf in the middle of a stack is only connected to other disk shelves—not to any controllers.

    1. Remove any shelf-to-shelf cabling from IOM A ports 1 and 2 or from ports 3 and 4 on the disk shelf you are removing and IOM A of the next disk shelf, and then put them aside.
    2. Unplug the remaining shelf-to-shelf cabling connected to IOM A ports on the disk shelf you are removing and plug them into the same IOM A ports on the next disk shelf in the stack.

    The next disk shelf can be above or below the disk shelf you are removing depending on which IOM A ports (1 and 2 or 3 and 4) you removed the cabling from.

    Example

    You can refer to the following cabling examples when removing a disk shelf from an end of a stack or the middle of a stack. Note the following about the cabling examples:
    • The IOM12 modules are arranged side-by-side as in a DM240S or DM120S disk shelf; if you have a DM600S, the IOM12 modules are arranged one above the other.
    • The stack in each example is cabled with standard shelf-to-shelf cabling, which is used in stacks cabled with multipath HA or multipath connectivity.

      You can infer the recabling if your stack is cabled with quad-path HA or quad-path connectivity, which uses double-wide shelf-to-shelf cabling.

    • The cabling examples demonstrate recabling one of the paths: path A (IOM A).

      You repeat the recabling for path B (IOM B).

    • The cabling example for removing a disk shelf from the end of a stack demonstrates removing the logical last disk shelf in a stack that is cabled with multipath HA connectivity.

      You can infer the recabling if you are removing the logical first disk shelf in a stack or if your stack has multipath connectivity.


  6. Verify that you bypassed the disk shelves you are removing and reestablished the path A (IOM A) stack connections correctly: storage disk show -port

    For HA pair configurations, you run this command from the clustershell of either controller. It might take up to a minute for the system to complete discovery.

    Example

    The first two lines of output show disk drives with connectivity through both path A and path B. The last two lines of output show disk drives with connectivity through a single-path, path B.
    cluster::> storage show disk -port

    PRIMARY PORT SECONDARY PORT TYPE SHELF BAY
    -------- ---- --------- ---- ---- ----- ---
    1.20.0 A node1:6a.20.0 B SAS 20 0
    1.20.1 A node1:6a.20.1 B SAS 20 1
    1.21.0 B - - SAS 21 0
    1.21.1 B - - SAS 21 1
    ...

  7. The next step depends on the storage disk show -port command output:
    If the output shows...Then...
    All disk drives in the stack are connected through path A and path B except for the ones in the disk shelves you disconnected, which are only connected through path BGo to the next step.

    You successfully bypassed the disk shelves you are removing and reestablished path A on the remaining disk drives in the stack.

    Anything other than the aboveRepeat Step 5 and Step 6.

    You must correct the cabling.

  8. Complete the following substeps for the disk shelves (in the stack) you are removing:
    1. Repeat Step 5 through Step 7 for path B.
      Note
      When you repeat Step 7 and if you have recabled the stack correctly you should see all disk drives connected through path A and path B.
    2. Repeat Step 1 to confirm that your system configuration is the same as before you removed one or more disk shelves from a stack.
    3. Go to the next step.
  9. If when you removed ownership from the disk drives (as part of the preparation for this procedure), you disabled disk ownership automatic assignment, reenable it by entering the following command; otherwise, go to the next step: storage disk option modify -autoassign on

    For HA pair configurations, you run the command from the clustershell of both controllers.

  10. Power off the disk shelves you disconnected and unplug the power cords from the disk shelves.
  11. Remove the disk shelves from the rack or cabinet.
    To make disk shelves lighter and easier to maneuver, remove the power supplies and IOM12 modules. Avoid removing the disk drives if possible, because excessive handling can lead to internal damage.
    CAUTION
    It is recommended that you use a mechanical hoist or lift if you are moving a fully populated DS460C disk shelf, which can weigh 249 lb (113 kg).