Hot-swapping a disk drive in a DM240S or DM120S disk shelf
You can hot-swap a failed disk drive in a DM240S or DM120S disk shelf—nondisruptively replace a disk drive in a system that is powered on and serving data (I/O is in progress). When a disk drive fails, the system logs a warning message to the system console indicating which disk drive has failed. In addition, the attention (amber) LED on the operator display panel and the attention (amber) LED on the failed disk drive illuminate.
Before you begin
The disk drive that you are installing must be supported by the DM240S or DM120S disk shelf.
- All other components in the system must be functioning properly; if not, contact technical support.
- The disk drive you are removing must be failed.
You can verify the disk drive is failed by running the storage disk show -broken command. The failed disk drive appears in the list of failed disk drives. If it does not, you should wait, and run the command again.
NoteIt can take up to several hours for the disk drive to appear in the list of failed disk drives. - If you are replacing a self-encrypting disk (SED), you must follow the instructions for replacing an SED in the Disks and Aggregates Power Guide.
The instructions describe additional steps you must perform before and after replacing an SED.
About this task
- You should take steps to avoid electrostatic discharge (ESD):
- Keep the disk drive in the ESD bag until you are ready to install it.
- Open the ESD bag by hand or cut the top off with a pair of scissors.AttentionDo not insert a metal tool or knife into the ESD bag.
- Always wear an ESD wrist strap grounded to an unpainted surface on your storage enclosure chassis.
If a wrist strap is unavailable, touch an unpainted surface on your storage enclosure chassis before handling the disk drive.
- You should take steps to handle disk drives carefully:
- Always use two hands when removing, installing, or carrying a disk drive to support its weight.AttentionDo not place hands on the disk drive boards exposed on the underside of the disk drive carrier.
- You should place disk drives on cushioned surfaces, and never stack disk drives on top of each other.
- You should be careful not to bump disk drives against other surfaces.
- Always use two hands when removing, installing, or carrying a disk drive to support its weight.
- Disk drives should be kept away from magnetic devices.AttentionMagnetic fields can destroy all data on the disk drive and cause irreparable damage to the disk drive circuitry.
- Best practice is to have the current version of the Disk Qualification Package (DQP) installed before hot-swapping a disk drive.
Having the current version of the DQP installed allows your system to recognize and utilize newly qualified disk drives; therefore, avoiding system event messages about having non-current disk drive information. You also avoid the possible prevention of disk partitioning because disk drives are not recognized. The DQP also notifies you of non-current disk drive firmware.
- Best practice is to have the current versions of disk shelf (IOM) firmware and disk drive firmware on your system before adding new disk shelves, shelf FRU components, or SAS cables.
Current versions of firmware can be found on the Lenovo Support Web site.
- Disk drive firmware is automatically updated (nondisruptively) on new disk drives with non current firmware versions.NoteDisk drive firmware checks occur every two minutes.
If needed, you can turn on the disk shelf's location (blue) LEDs to aid in physically locating the affected disk shelf: storage shelf location-led modify -node node_name -shelf-name shelf_name -led-status on
A disk shelf has three location (blue) LEDs: one on the operator display panel and one on each IOM12 module. Location LEDs remain illuminated for 30 minutes. You can turn them off by entering the same command, but using the off option.
- If needed, you can refer to the Monitoring disk shelf LEDs section for information about the meaning and location of disk shelf LEDs on the operator display panel and FRU components.
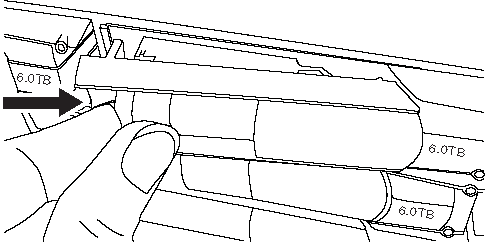
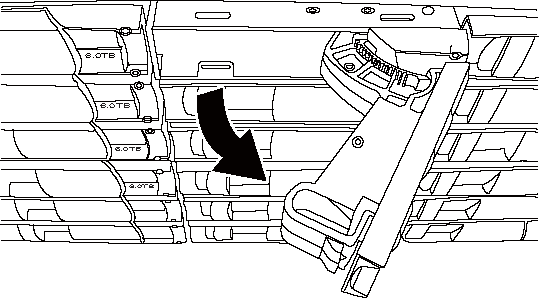
- Press the release button on the disk drive face, and then pull the cam handle to its fully open position to release the disk drive from the mid plane.
When you press the release button, the cam handle on the disk drive springs open partially.
NoteDisk drives in a DM120S disk shelf are arranged horizontally with the release button located on the left of the disk drive face. Disk drives in a DM240S disk shelf are arranged vertically with the release button located at the top of the disk drive face.The following illustrations show disk drives in a DM120S disk shelf: