This procedure explains how to add a storage controller to the ThinkAgile CP configuration, assuming a storage controller has been previously removed.
Procedure performed by: customer or field service
To install a hot-swap storage controller, complete the following steps:
The customer or field service preforms the following steps:
- Ensure that the release latch is in the open position. Slide the canister all the way into the enclosure.
- Secure the storage controller by rotating the release latch until it clicks into the closed position.
Figure 1. Hot-swap storage controller installation 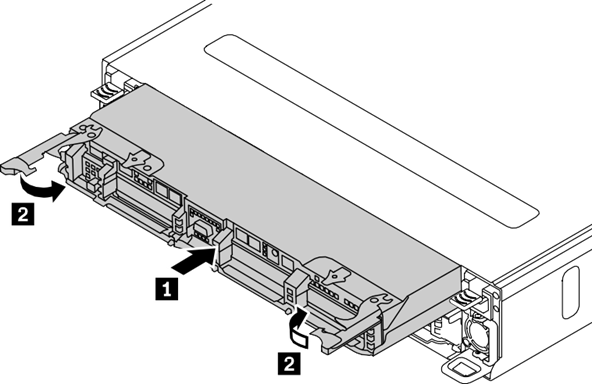
The electromagnetic interference (EMI) integrity and cooling of the storage are protected by having all bays covered or occupied. When replacing a storage controller, minimize the amount of time of the empty bay to avoid overheating or abnormal operation.
The storage controller on the upper bay is upside down. Ensure that the storage controller is in the right position (the release latch is on top) before installing.
ThinkAgile Advantage Support performs the following step:
- ThinkAgile Advantage Support updates the VPD to maintain SN/UUID for entitlement. See Update the storage node VPD.
The solution administrator performs the following steps:
- Sign in to the primary interconnect with Support Mode. For the username enter admin and enter the password set during the solution deployment.
- Run the following command on the primary interconnect:
> sudo service tacp-network-controller restart
- In the Cloud Controller dashboard, select Hardware from the left menu.
- On the node that you want to register, click Register. The Register Node page displays.
- In the Storage Block Name field, enter a unique name for the storage block.
- In the Administrator Password field, enter a password for the manager account on the storage block.
- In the Storage Pool drop-down, assign the storage block to a storage pool from the list.
In the Cloud Controller, storage resources (storage blocks) are organized into storage pools. A storage block must be added to a storage pool for it to store application instances.
To crate a storage pool:
- In the Storage Pool drop-down, select New storage pool ....
- Enter a name for the storage pool.
- Click Create.
- Click Register Storage Block to complete registration.
- Repeat this process to register all remaining storage blocks.
The installation of a hot-swap storage controller is now complete.