Installing a hot-swap drive
Use this information to install a hot-swap drive.


Procedure performed by: customer or field service
The drive bays are numbered to indicate the installation order (starting from number “01”). Follow this installation order when you install a drive.
You cannot mix drives of different capacities in one system.
In this procedure, dm-3 and nvme3 are used as examples. Replace these examples with the appropriate values for the storage drive you are installing.
To install a hot-swap drive, complete the following steps:
- To open the drive tray handle, press the release tab.Figure 1. Opening the drive tray handle

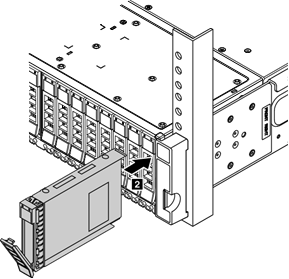
- Slide the drive into the drive bay until it snaps into position.Figure 2. Sliding the drive into the drive bay
- Close the drive tray handle to lock the drive in place.
- Check the drive status LED to verify that the drive is operating correctly.
If the yellow drive status LED is lit continuously, that drive is faulty and must be replaced.
If the green drive activity LED is flashing, the drive is being accessed.
- Continue to install additional hot-swap drives if necessary.
- Check that the new drives are detected by the storage block:
Check that the NVME namespace to verify that nvme3 appears:
# ls -l /dev/nvme
Following is an example output:
crw-------. 1 root root 243, 0 Aug 20 11:02 /dev/nvme0
crw-------. 1 root root 243, 1 Aug 20 11:02 /dev/nvme1
crw-------. 1 root root 243, 2 Aug 20 11:02 /dev/nvme2
crw-------. 1 root root 243, 3 Aug 20 12:32 /dev/nvme3
crw-------. 1 root root 243, 4 Aug 20 11:02 /dev/nvme4
crw-------. 1 root root 243, 5 Aug 20 11:02 /dev/nvme5
crw-------. 1 root root 243, 6 Aug 20 11:02 /dev/nvme6
crw-------. 1 root root 243, 7 Aug 20 11:02 /dev/nvme7
The output show that nvme3 is present in the NVME namespace.
Check the status of the RAID array:
# /usr/share/tacp/lenovo/tacp-nvme-control.py -display
Following is an example output:
discovering NVMe disks. this operation will take a few seconds.
Chassis UUID: 500e0eca08057b00
Number of canisters: 2
This is the bottom (primary) canister and has the controller id 33
The top (secondary) canister has the controller id 34
This chassis has the following controller ids: 33 , 34

NVMe devices: 8
----------------

NVMe control device: /dev/nvme0
Slot: 8
Manufacturer: SAMSUNG MZWLL800HEHP-00003
Serial number: S3HCNX0JC02194
Firmware: GPNA9B3Q
Capacity: 800166076416 bytes 800.166076416 GB
Drive Temp: 42 C
Drive Health: Ok
Total namespaces: 1
Namespace id(s): 1
Namespace 1 size: 794996768768 bytes, 794.996768768 GB
Namespace 1 is attached to controller id(s): 33

NVMe control device: /dev/nvme1
Slot: 7
Manufacturer: SAMSUNG MZWLL800HEHP-00003
Serial number: S3HCNX0JC02193
Firmware: GPNA9B3Q
Capacity: 800166076416 bytes 800.166076416 GB
Drive Temp: 42 C
Drive Health: Ok
Total namespaces: 1
Namespace id(s): 1
Namespace 1 size: 794996768768 bytes, 794.996768768 GB
Namespace 1 is attached to controller id(s): 33

NVMe control device: /dev/nvme2
Slot: 6
Manufacturer: SAMSUNG MZWLL800HEHP-00003
Serial number: S3HCNX0JC02233
Firmware: GPNA9B3Q
Capacity: 800166076416 bytes 800.166076416 GB
Drive Temp: 41 C
Drive Health: Ok
Total namespaces: 1
Namespace id(s): 1
Namespace 1 size: 794996768768 bytes, 794.996768768 GB
Namespace 1 is attached to controller id(s): 33

NVMe control device: /dev/nvme3
Slot: 5
Manufacturer: SAMSUNG MZWLL1T6HEHP-00003
Serial number: S3HDNX0JB00078
Firmware: GPNA9B3Q
Capacity: 1600321314816 bytes 1600.32131482 GB
Drive Temp: 39 C
Drive Health: Ok
Total namespaces: 0

NVMe control device: /dev/nvme4
Slot: 4
Manufacturer: SAMSUNG MZWLL800HEHP-00003
Serial number: S3HCNX0JC02189
Firmware: GPNA9B3Q
Capacity: 800166076416 bytes 800.166076416 GB
Drive Temp: 40 C
Drive Health: Ok
Total namespaces: 1
Namespace id(s): 1
Namespace 1 size: 794996768768 bytes, 794.996768768 GB
Namespace 1 is attached to controller id(s): 33

NVMe control device: /dev/nvme5
Slot: 3
Manufacturer: SAMSUNG MZWLL800HEHP-00003
Serial number: S3HCNX0JC02198
Firmware: GPNA9B3Q
Capacity: 800166076416 bytes 800.166076416 GB
Drive Temp: 40 C
Drive Health: Ok
Total namespaces: 1
Namespace id(s): 1
Namespace 1 size: 794996768768 bytes, 794.996768768 GB
Namespace 1 is attached to controller id(s): 33

NVMe control device: /dev/nvme6
Slot: 1
Manufacturer: SAMSUNG MZWLL800HEHP-00003
Serial number: S3HCNX0JC02188
Firmware: GPNA9B3Q
Capacity: 800166076416 bytes 800.166076416 GB
Drive Temp: 39 C
Drive Health: Ok
Total namespaces: 1
Namespace id(s): 1
Namespace 1 size: 794996768768 bytes, 794.996768768 GB
Namespace 1 is attached to controller id(s): 33

NVMe control device: /dev/nvme7
Slot: 2
Manufacturer: SAMSUNG MZWLL800HEHP-00003
Serial number: S3HCNX0JC02195
Firmware: GPNA9B3Q
Capacity: 800166076416 bytes 800.166076416 GB
Drive Temp: 40 C
Drive Health: Ok
Total namespaces: 1
Namespace id(s): 1
Namespace 1 size: 794996768768 bytes, 794.996768768 GB
Namespace 1 is attached to controller id(s): 33
The new drive now appears in slot 5.
- Prepare the replacement drive by running script add_disks_lenovo.py. The script creates namespaces and layout encryption.
# /usr/share/tacp/lenovo/add_disks_lenovo.py --setup_replacement_disk
Following is an example output:
Encrypted device /dev/mapper/sed3 /dev/dm-3
Please continue with the instructions to add the disk - Grow the RAID array:
# mdadm /dev/md/md5 --add /dev/dm-3
Following is an example output:
Output: mdadm: added /dev/dm-3 - Check the status of the RAID array:
# cat /proc/mdstat
Following is an example output:
Personalities : [raid1] [raid6] [raid5] [raid4] [raid0]
md124 : active raid0 md125[0]
    4657247232 blocks super 1.2 512k chunks

md125 : active raid5 dm-3[8](S) dm-7[7] dm-6[6] dm-5[5] dm-4[4] dm-2[2] dm-1[1] dm-0[0]
    4657379328 blocks super 1.2 level 5, 16k chunk, algorithm 2 [7/7] [UUUUUUU]
    bitmap: 0/6 pages [0KB], 65536KB chunk

md126 : active raid1 sda[1] sdb[0]
    118778880 blocks super external:/md127/0 [2/2] [UU]

md127 : inactive sda[1](S) sdb[0](S)
    6306 blocks super external:imsm

unused devices: <none>
To view detailed information about the status of the RAID array, use the following command:
# mdadm --detail /dev/md/md5
Following is an example output:
/dev/md/md5:
    Version : 1.2
    Creation Time : Mon Aug 20 11:03:31 2018
    Raid Level : raid5
    Array Size : 4657379328 (4441.62 GiB 4769.16 GB)
    Used Dev Size : 776229888 (740.27 GiB 794.86 GB)
    Raid Devices : 7
    Total Devices : 8
    Persistence : Superblock is persistent

    Intent Bitmap : Internal

    Update Time : Mon Aug 20 15:27:26 2018
    State : clean
    Active Devices : 7
    Working Devices : 8
    Failed Devices : 0
    Spare Devices : 1

    Layout : left-symmetric
    Chunk Size : 16K

    Consistency Policy : bitmap

    Name : any:md5
    UUID : 5f7b873c:16d6d418:7b5f6fde:247566a7
    Events : 749

Number Major Minor RaidDevice State
0      253   0     0          active sync /dev/dm-0
1      253   1     1          active sync /dev/dm-1
2      253   2     2          active sync /dev/dm-2
7      253   7     3          active sync /dev/dm-7
4      253   4     4          active sync /dev/dm-4
5      253   5     5          active sync /dev/dm-5
6      253   6     6          active sync /dev/dm-6

8      253   3     -          spare /dev/dm-3
The new drive is now added to the RAID array as a spare device.
The installation of a new hot-swap drive is now complete.