Remove failed drive (12-drive or 24-drive)
You remove a failed drive to replace it with a new one.
Before you begin
- You have an ESD wristband, or you have taken other antistatic precautions.
- You have reviewed the Requirements for handling drives topic.
When you remove a drive, you must slide the drive partly out of the shelf and wait for the drive to spin down. Then, you can remove the drive completely.
To remove failed drive (12-drive or 24-drive), do the following:
- Press the release button on the failed drive.
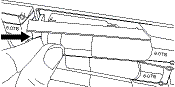
- For drives in a 12-drive controller shelf or drive shelf, the release button is located at the left of the drive.
- For drives in a 24-drive controller shelf or drive shelf, the release button is located at the top of the drive.
The cam handle on the drive springs open partially, and the drive releases from the midplane.
Give documentation feedback