Front view
The following illustration shows the controls, LEDs, and connectors on the front of the server.
Note
The front bezel is not shown so that the drive bays are visible.
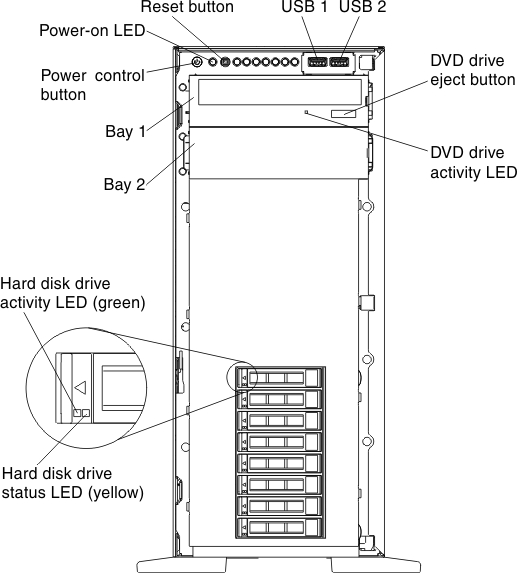
- Power-control button: Press this button to turn the server on and off manually.
- Power-on LED: When this LED is lit and not flashing, it indicates that the server is turned on. The states of the power-on LED are as follows:
- Off: Power is not present or the power supply, or the LED itself has failed.
- Flashing rapidly (4 times per second): The server is turned off and is not ready to be turned on. The power-control button is disabled. This will last approximately 5 to 10 seconds.
- Flashing slowly (once per second): The server is turned off and is ready to be turned on. You can press the power-control button to turn on the server.
- Lit: The server is turned on.
- Hard disk drive activity LEDs: These LEDs are used on hot-swap SAS or SATA hard disk drives. Each hot-swap hard disk drive has an activity LED, and when this LED is flashing, it indicates that the drive is in use.
- Hard disk drive status LEDs: This LED is used on hot-swap SAS or SATA hard disk drives. When this LED is lit, it indicates that the drive has failed. If an optional ServeRAID controller is installed in the server, when this LED is flashing slowly (one flash per second), it indicates that the drive is being rebuilt. When the LED is flashing rapidly (three flashes per second), it indicates that the controller is identifying the drive.
- DVD drive eject button: Press this button to release a DVD or CD from the DVD drive.
- DVD drive activity LED: When this LED is lit, it indicates that the DVD drive is in use.
- Operator information panel: This panel contains controls and LEDs that provide information about the status of the server. For information about the controls and LEDs on the operator information panel, see Operator information panel.
- Reset button: Press this button to reset the server and run the power-on self-test (POST). You might have to use a pen or the end of a straightened paper clip to press the button. The Reset button is in the lower-right corner of the light path diagnostics panel.
- USB connectors: Connect a USB device, such as a USB mouse, keyboard, or other device, to any of these connectors.
Give documentation feedback