
Installing 2.5-inch and 1.8-inch hot-swap drives

This topic provides instructions for installing 2.5-inch and 1.8-inch hot-swap drives.

To install a hot-swap SAS or SATA drive, complete the following steps. For information about installing drives, see Installing drives.
Note
If you install only one drive, you must install it in drive bay 0.
  1. Before you begin, read Safety and Installation guidelines.
  2. Remove the storage book (see Removing the storage book).
  3. Touch the static-protective package that contains the drive to any unpainted metal surface on the server; then, remove the drive from the package and place it on a static-protective surface.
  4. To install a 2.5-inch drive, complete the following steps:
    1. Remove the filler from the empty drive bay.
    2. Make sure that the drive-tray handle is in the open (unlocked) position.
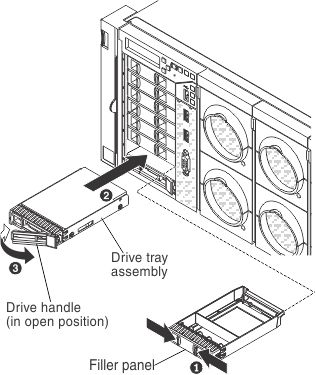
    3. Align the drive assembly with the guide rails in the bay.

      Illustration of installing a 2.5-inch hot-swap drive
    4. Gently push the drive assembly into the drive bay until the drive stops.
    5. Rotate the drive-tray handle to the closed (locked) position.
    6. Skip to step 6.
  5. To install a 1.8-inch drive, complete the following step:
    1. Remove the filler panel (EMC filler panel).
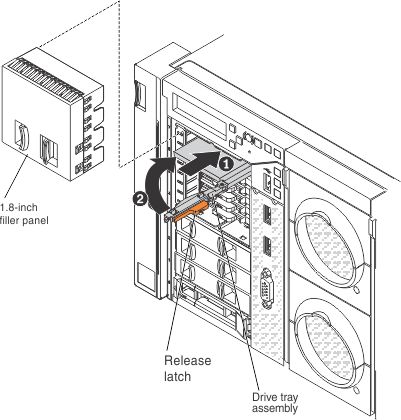
    2. Grasp the black and orange release latch on the drive tray handle of the drive tray in which you want to install the drive and slide the release latch to the right to unlock the drive tray handle; then, rotate the drive tray handle to the right.

      Illustration of installing a 1.8-inch hot-swap drive
    3. Insert the drive into the drive tray with the label side of the drive facing up and push the drive tray into the drive bay until it clicks into place and is seated firmly.
    4. Rotate the drive tray handle to the closed position and slide the release latch to the left to secure the drive tray handle in place.
    5. Replace the filler panel (EMC filler panel).
  6. Check the drive status LED to verify that the drive is operating correctly. If the amber drive status LED for a drive is lit continuously, that drive is faulty and must be replaced. If the green drive activity LED is flashing, the drive is being accessed.
    Note
    If the server is configured for RAID operation through a ServeRAID adapter, you might have to reconfigure your disk arrays after you install drives. See the ServeRAID adapter documentation for additional information about RAID operation and complete instructions for using the ServeRAID adapter.
  7. If you are installing additional hot-swap drives, do so now.
  8. Complete the additional steps in Instructions for Business Partners.

If you have other devices to install or remove, do so now. Otherwise, go to Completing the installation.