Removing the storage book
Use this information for instructions on how to remove the storage book.
To remove the storage book, complete the following steps:
- Before you begin, read Safety and Installation guidelines.
- Turn off the server (see Turning off the server) and all attached peripheral devices. Disconnect all power cords; then, disconnect all external cables as necessary to replace the device.
- Remove the drives in the front of the storage book.
- Press the blue release button on the left EIA bezel on the storage book to release the cam handle; then, lower the handle all the way down.
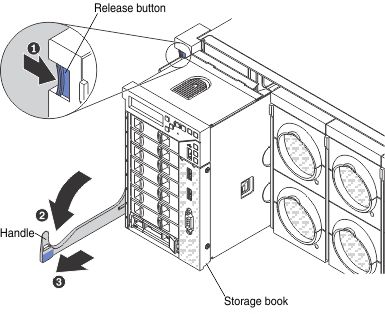
- Slide the storage book out of the server. Place one hand under the center of the storage book to support it while sliding it out of the server.
- Disconnect the cables from the storage book board, the drive backplanes, and adapters that are installed in the server.
- Remove the adapters (see Removing an adapter).
- Remove any flash power modules stored in the storage book.
- Remove the storage book board (see Removing the storage book board assembly.
- Remove the backplanes (see Removing the 4x2.5-inch hot-swap drive backplanes and Removing the 8x1.8-inch hot-swap drive backplane assembly).
- Remove the front operator panel (see Removing the front operator panel assembly).
- Remove the front I/O panel (see Removing the front I/O panel (USB/video) assembly).
- If you are instructed to return the assembly, follow all packaging instructions, and use any packaging materials for shipping that are supplied to you.
Give documentation feedback