
Removing the 8x1.8-inch hot-swap drive backplane assembly

Use this information for instructions on how to remove the 8x1.8-inch hot-swap drive backplane assembly.

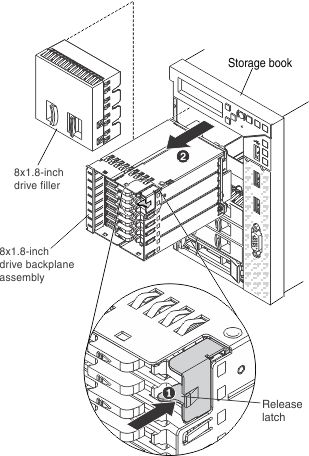
To remove the 8x1.8-inch hot-swap drive backplane assembly, complete the following steps:

  1. Before you begin, read Safety and Installation guidelines .
  2. Turn off the server (see Turning off the server) and all attached peripheral devices. Disconnect all power cords; then, disconnect all external cables as necessary to replace the device.
  3. Remove the storage book from the server (see Removing the storage book).
  4. Remove the drive filler panel.
  5. Remove the drives from the drive backplane assembly (see Removing 2.5-inch and 1.8-inch hot-swap drives) and install them in the new backplane assembly.
  6. Disconnect the cables from the drive backplane.
  7. Press the release latch to the left on the drive backplane assembly, while pushing on the rear of the drive backplane, and slide the drive backplane assembly out of the storage book.

    Illustration of removing the 1.8-inch drive backplane
  8. If you are instructed to return the drive backplane, follow all packaging instructions, and use any packaging materials for shipping that are supplied to you.