Replacing a hot-swap fan assembly
Use this information for an overview of the fans and instructions on how to install a hot-swap fan in the server.
The server supports up to 10 fan packs with dual-motor, counter-rotating, speed-controlled hot-swap cooling fans (two fans in each fan-pack for a total of 20 fans).
Note
- The fan-packs on the compute books and the Standard I/O book are not interchangeable. The fan packs have text printed on the front of the fan above the fan handle that indicates which book the fan-pack should be installed in. For example, the fan-pack for a compute books might have the text
Top - Compute Book Only
. The fan-pack for a Standard I/O book might have the textTop - Standard I/O Book Only
. - Fan-packs 1 through 8 are on the compute books (two fans per fan-pack). The server supports up to four compute books.
- Fan-packs 9 and 10 are on the Standard I/O book.
The following table shows the fan zones, fan-pack number, and the components that are cooled by the fans.
| Fan zone | Fan-pack number | Components cooled by the fans |
|---|---|---|
| 1 | 9 and 10 |
|
| 2 | 1 and 2 |
|
| 3 | 3 and 4 |
|
| 4 | 5 and 6 |
|
| 5 | 7 and 8 |
|
Note
To ensure proper operation, replace a failed hot-swap fan within 30 seconds.
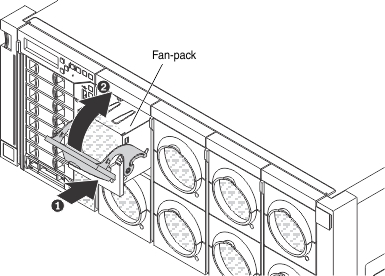
To install or replace a hot-swap fan pack, complete the following steps:
Note
These procedures for replacing a hot-swap fan assembly apply to both the standard I/O book and the compute books.
- Make sure that you are installing the appropriate fan-pack for the I/O book.NoteThe fan packs have text printed on the front of the fan above the fan handle that indicates which book the fan-pack should be installed in. For example, the fan-pack for a
compute books might have the text Top - Compute Book Only
. The fan-pack for astandard I/O book might have the text Top - Standard I/O Book Only
. The fan packs are not interchangeable. - Touch the static-protective package that contains the new fan to any unpainted metal surface on the server. Then, remove the new fan from the package.
- Align the fan with the fan bay and slide it in the bay until it is seated firmly. Rotate the fan handle up to secure the fan in the slot.
Give documentation feedback