Replacing the full-length I/O book
This information provides an overview of the full-length I/O book.
Note
- For notes and information that you must consider when you install this I/O book, see Installing the full-length I/O book.
- If you are replacing the full-length I/O book with a half-length I/O book, see Installing the half-length I/O book.
The ability to hot-add the full-length I/O book is dependent on the operating system. If the operating system does not support hot-plug, the addition or removal of a full-length I/O book might cause an unrecoverable system error.
Attention:
- If the I/O bay is not populated with a full-length I/O book when the operating system boots or the operating system is still running, a full-length I/O book cannot be hot-added to the I/O bay (due to insufficient resources).
- If the I/O bay has a full-length I/O book installed when the operating system boots, you can hot-swap the full-length I/O book.
To replace the full-length I/O book, complete the following steps:
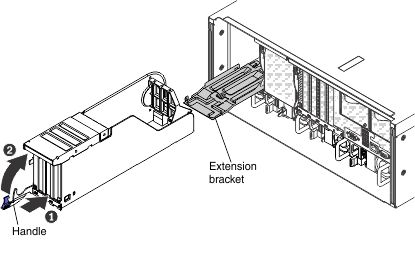
- Align the I/O book with the I/O bay on the server and slide it into the server.
Give documentation feedback