Replacing the LCD system information display panel
Use this information for instructions on how to replace the LCD system information display panel.
To install the LCD system information display panel, complete the following steps.
- Record (take a photograph of the barcode label or write down the barcode number) the 11S and FRU barcode information for the existing and replacement LCD system information display panel. The label with this information is on printed circuit board installed on the back of the LCD system information display panel. This information is required to update the customer records, service offering support information, and component VPD.
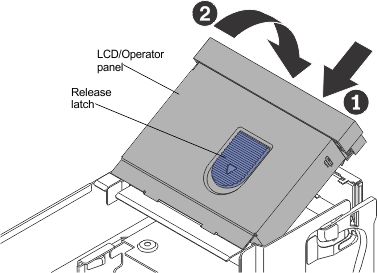
- Orient the LCD system information display panel so that the LCD connect is next to the LEDs on the operator panel.
- Lower the LCD system information display panel, while aligning the LCD retention latch with the slots on the front operator panel, push it in until it clicks in place on the operator panel.
- Reconnect the LCD display panel cable to the LCD display panel.
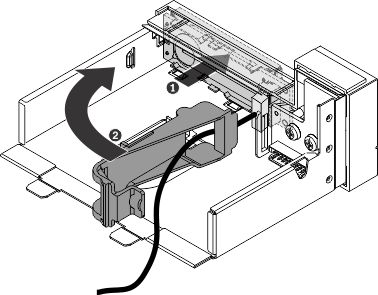
- Reinstall the front operator panel
- Reconnect the front operator panel cable to the storage book board.
- Reinstall the storage book in the server.
- Reconnect the power cords and any cables that you removed.
- Turn on the peripheral devices and the server.
- Update the LCD system information display panel part number, FRU part number, serial number, and prefix serial number in the customer records, service offering support information, and component Vital Product Data (VPD) using the Advanced Settings Utility (ASU) program. For more information about using ASU and additional command options, see Advanced Settings Utility program.
- Update component part number in customer records and service offering support information
The component part number is the first seven characters following the “11S” of the 11S barcode. In the following example, the component part number is shown in bold:
11S12X4567YJ1105A34567 - Update component part number VPD
Use the following ASU command to update the component VPD:
asu64 set VPD.CompVPD_PartNumber.4 “<p/n>[sp][sp][sp][sp][sp]”where:
<p/n> is the 7–character component part number followed by five padding spaces.
- Update component serial number and prefix serial number in customer records and service offering support information
The serial number is the last six characters of the 11S barcode. In the following example, the serial number is shown in bold:
11S12X4567YJ1105A34567The prefix serial number is the six characters of the 11S barcode that follow the first 10 characters of the 11S barcode (the six characters preceding the component serial number portion of the 11S barcode). In the following example, the prefix serial number is shown in bold:
11S12X4567YJ1105A34567 - Update component serial number and prefix serial number VPD
Use the following ASU command to update the component serial number and prefix serial number VPD:
asu64 set VPD.CompVPD_SerialNumber.4 <s/n>
asu64 set VPD.CompVPD_PrefixSerialNumber.4 <prefix_s/n>
where:
<s/n> is the 6–character component serial number.
<prefix_s/n> is the 6–character component prefix serial number.
- Update FRU part number in customer records and service offering support information
The FRU part number is the first seven characters following the “FRU:” of the FRU barcode. In the following example, the FRU part number is shown in bold:
FRU:12X4567 - Update FRU part number VPD
Use the following ASU command to update the FRU part number VPD:
asu64 set VPD.CompVPD_FRUNumber.4 “<fru_number>[sp][sp][sp][sp][sp]”where:
<fru_number> is the 7–character FRU part number above followed by five padding spaces.
- Update component part number in customer records and service offering support information
- Restart the IMM2; then, restart the server.