
Removing the front operator panel assembly

Use this information for instructions on how to remove the front operator panel.

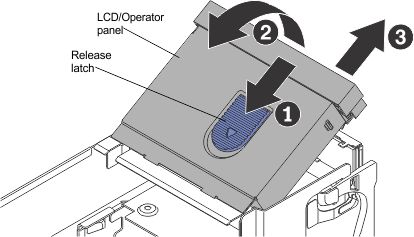
To remove the front operator panel, complete the following steps.

  1. Before you begin, read Safety and Installation guidelines .
  2. Turn off the server (see Turning off the server) and all attached peripheral devices. Disconnect all power cords; then, disconnect all external cables as necessary to replace the device.
  3. Remove the storage book from the server (see Removing the storage book).
  4. Disconnect the front operator panel cables from the storage book board and from the rear air baffle.
    Note
    You might need to use a small flat-blade screwdriver to get under the lip of the plug on the cable (the thermistor end of the cable) to remove the plug from the air baffle and set it aside to install on the new assembly.
  5. Slide the blue release latch on top of the front operator panel back to remove the operator panel.

    Illustration of the removing the front operator panel
  6. Turn the front operator panel over and disconnect the LCD system information display panel and the front operator panel cables.
  7. If you are replacing the front operator panel, remove the LCD display panel from the front operator panel assembly. Grasp tab on the LCD retention latch and pull it to the right to disengage the latch and remove the LCD display panel.

    Illustration of removing the LCD display panel
  8. If you are instructed to return the front operator panel assembly, follow all packaging instructions, and use any packaging materials for shipping that are supplied to you.