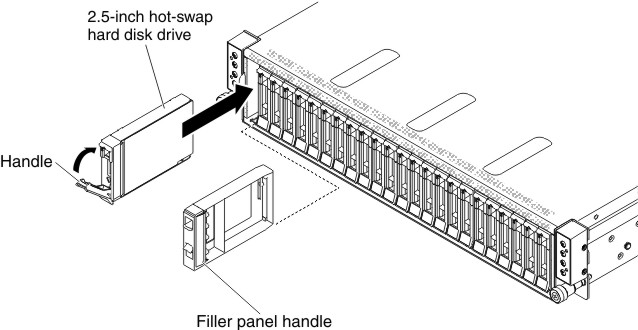
Installing a hot-swap hard disk drive
Use this information to install a hot-swap hard disk drive.
The following notes describe the type of hard disk drives that the server supports and other information that you must consider when you install a hard disk drive. For a list of supported hard disk drives, see the Lenovo ServerProven website.
- Locate the documentation that comes with the hard disk drive and follow those instructions in addition to the instructions in this chapter.
- Make sure that you have all the cables and other equipment that are specified in the documentation that comes with the drive.
- Select the bay in which you want to install the drive.
- Check the instructions that come with the drive to determine whether you have to set any switches or jumpers on the drive. If you are installing a SAS or SATA hard disk drive, be sure to set the SAS or SATA ID for that device.
- You can install up to six 2.5-inch hard disk drives for each node hot-swap SAS or SATA hard disk drives in the server.
- The electromagnetic interference (EMI) integrity and cooling of the server are protected by having all bays and PCI and PCI Express slots covered or occupied. When you install a drive, PCI, or PCI Express adapter, save the EMC shield and filler panel from the bay or PCI or PCI Express adapter slot cover in the event that you later remove the device.
- For a complete list of supported optional devices for the server, see the Lenovo ServerProven website.
The following table describes the hard disk drive slot IDs.
| Hard disk drive (HDD) location vs. hard disk drive signal mapping table | ||||||||
| HDD location | (Front HDD) HDD0 | (Front HDD) HDD1 | (Front HDD) HDD2 | (Front HDD) HDD3 | (Front HDD) HDD4 | (Front HDD) HDD5 | (internal connector) SATA1 / SATADOM | (internal connector) SATA2/Not use |
| PCH SATA mode | SATA port 3 | SATA port 4 | SATA port 5 | SATA port 6 | sSATA port 1 | sSATA port 2 | SATA port 1 | SATA port 2 (Not use) |
| PCH SW RAID mode (RSTe) | ID 2 | ID 3 | ID 4 | ID 5 | ID 0 | ID 1 | SATA port 1 | SATA port 2 (Not use) |
| HBA adapter installed (RAID mode) | Slot 0 | Slot 1 | Slot 2 | Slot 3 | Slot 4 | Slot 5 | SATA port 1 | SATA port 2 (Not use) |
Read the safety information in Safety and Installation guidelines.
To install a hot-swap SAS or SATA hard disk drive, complete the following steps:
Note
If you have only one hard disk drive, you must install it in the left drive bay.
Attention
To avoid damage to the hard disk drive connectors, make sure that the server cover is in place and fully closed whenever you install or remove a hard disk drive.
- Remove the filler panel from the empty drive bay. Keep the filler panel in a safe place.
- Touch the static-protective package that contains the drive to any unpainted metal surface on the server; then, remove the drive from the package and place it on a static-protective surface.
- Install the hard disk drive in the drive bay:
- If you are installing additional hot-swap hard disk drives, do so now.
Give documentation feedback
