ホット・スワップ M.2 ドライブ・アセンブリーの取り付け
ホット・スワップ M.2 ドライブ・アセンブリーを取り付けるには、このセクションの説明に従ってください。
このタスクについて
安全に作業を行うために、取り付けのガイドラインおよび 安全検査のチェックリストをお読みください。
ドライブが入っている帯電防止パッケージをソリューションの塗装されていない金属面に接触させます。次に、ドライブをパッケージから取り出し、それを帯電防止面の上に置きます。
ドライブをサーバーから取り外す前に、特に RAID アレイの一部である場合は、必ずドライブ上のデータを保管したことを確認します。
ドライブ・コネクターを損傷しないように、ドライブを取り付けるか取り外すときは必ず、サーバーのトップ・カバーが定位置にあり、完全に閉じていることを確認します。
システムを適切に冷却するために、各ベイにドライブまたはドライブ・ベイ・フィラーを取り付けない状態で、2 分以上サーバーを動作させないでください。
ドライブ、ドライブ・コントローラー (システム・ボードに組み込まれたコントローラーを含む)、ドライブ・バックプレーン、またはドライブ・ケーブルを変更する前に、ドライブに保管されているすべての重要なデータをバックアップしてください。
RAID アレイのいずれかのコンポーネント (ドライブ、RAID カードなど) を取り外す前には、すべての RAID 構成情報をバックアップしてください。
- この章の説明のほかに、ドライブに付属の資料に記載されている説明に従ってください。
- ソリューションの電磁気干渉 (EMI) 保全性および冷却は、すべてのベイと PCI および PCIe スロットをカバーするか、または占拠することによって保護されます。ドライブ、PCI、または PCIe アダプターを取り付けるときは、後でデバイスを取り外す場合に備えて、ベイまたは PCI、あるいは PCIe アダプター・スロット・カバーの EMC シールドとフィラー・パネルを保管しておきます。
- サーバーにサポートされているオプション・デバイスの完全なリストについては、Lenovo ServerProven Web サイトを参照してください。
- ドライブ・ベイには、取り付け順序を示す番号が付いています (番号「0」から開始)。
- サーバーの前面に取り付けるホット・スワップ M.2 ドライブ・アセンブリーについては、前面図でドライブ・ベイの番号を参照してください。
- ホット・スワップ M.2 ドライブ・アセンブリーをサーバーの背面に取り付ける場合、左側のベイは M.2 ベイ 0、右側のベイは M.2 ベイ 1 です。
ご使用のサーバーでのファームウェアとドライバーの最新の更新を確認するには、ThinkSystem SR630 V4 のドライバーおよびソフトウェアのダウンロード Web サイト を参照してください。
ファームウェア更新ツールについては、ファームウェアの更新を参照してください。
手順
- ドライブ・ベイにドライブ・トレイが取り付けられている場合は、トレイを取り外します。
 リリース・ラッチをスライドさせてハンドルのロックを解除します。
 ハンドルをオープン位置まで回転させます。
 ハンドルをつかんで、トレイをドライブ・ベイから引き出します。
図 1. M.2 ドライブ・トレイの取り外し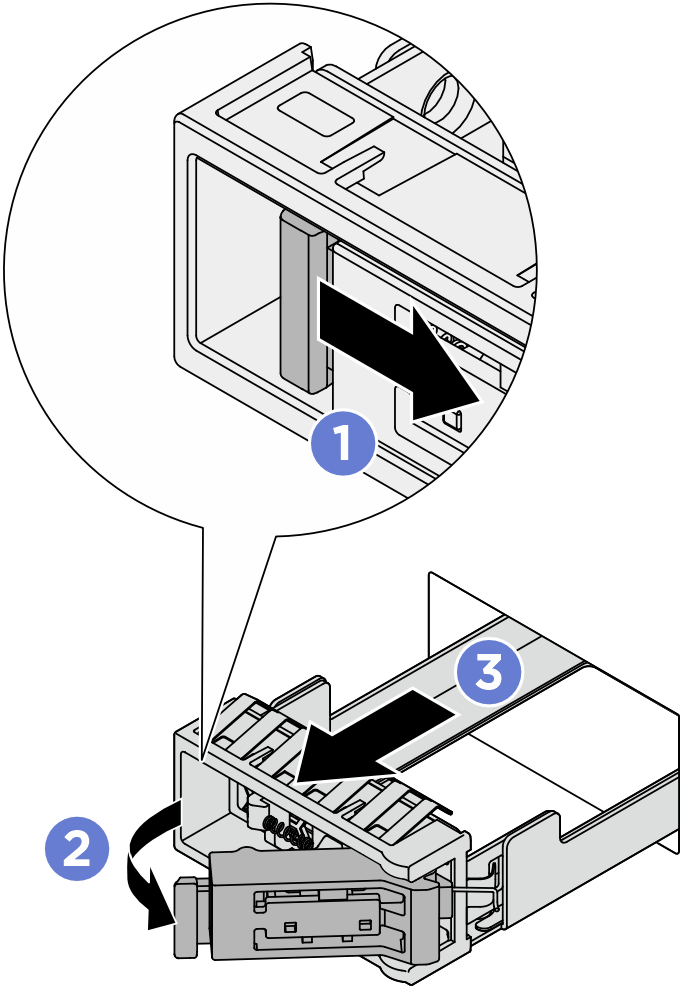
- ホット・スワップ M.2 ドライブ・アセンブリーを取り付けます。
- ハンドルが開くの位置になっていることを確認します。次に、ドライブ・アセンブリーをベイ内のガイド・レールに合わせ、ドライブ・アセンブリーが止まるまでベイに静かに押し込みます。
- カチッと音が鳴るまでハンドルを回転させ、閉じるの位置にします。
図 2. M.2 ドライブ・アセンブリーの取り付け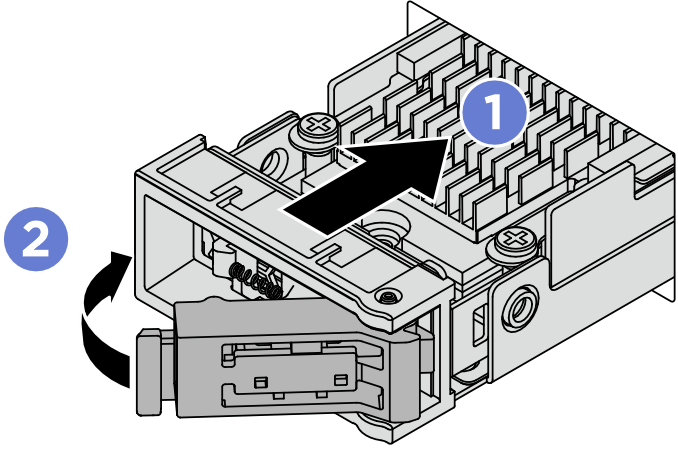
完了したら
ThinkSystem RAID アダプターを使用して、サーバーが、RAID 操作用に構成されている場合は、ドライブを取り付けた後に、ディスク・アレイを再構成しなければならない場合があります。RAID 操作の詳細と、ThinkSystem RAID アダプターの使用に関する詳細な指示に関する追加情報は、ThinkSystem RAID アダプターの資料を参照してください。
デモ・ビデオ