Installing the operating temperature enhancement kit
Use this information to install the operating temperature enhancement kit.
Attention
To ensure proper cooling and airflow, do not operate the server for more than 30 minutes with the side cover removed.
To install the operating temperature enhancement kit on 4U server models with non-hot-swap power supplies, complete the following steps. For the 5U server model with hot-swap power supplies, please see the next sub-section.
- Read the safety information in Safety and Installation guidelines.
- Turn off the server and all attached devices; then, disconnect all power cords and external cables.
- Remove the bezel (see Removing the bezel).
- Carefully turn the server on its side so that it is lying flat, with the cover facing up.AttentionDo not allow the server to fall over.
- Remove the side cover (see Removing the side cover).
- Insert the thermal sensor board into the thermal sensor holder. Attach the holder onto the server and make sure that the cabling goes through the hole as shown in the illustration.Figure 1. Thermal sensor installation for 4U server models with non-hot-swap power supplies
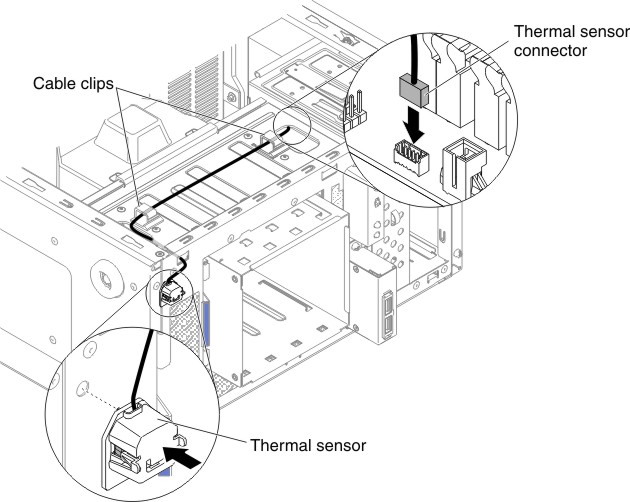
- Connect the thermal sensor connector to the system board and remember to close the cable clips to secure the cable.Figure 2. Installing thermal sensor connector to system board for 4U server model with non-hot-swap power supplies
- If you have other devices to install, do so now. Otherwise, go to Completing the installation.
To install the operating temperature enhancement kit on 5U server models with hot-swap power supplies, complete the following steps. For the 4U server model with non-hot-swap power supplies, please see the above sub-section.
- Read the safety information in Safety and Installation guidelines.
- Turn off the server and all attached devices; then, disconnect all power cords and external cables.
- Unlock and remove the side cover (see Removing the side cover).
- Remove the lower bezel (see Removing the lower bezel).
- Remove the upper bezel (see Removing the upper bezel).
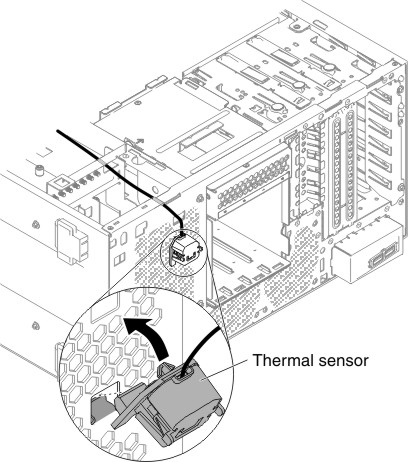
- Insert the thermal sensor board into the thermal sensor holder. Attach the holder onto the server by fitting it onto the hook. Make sure that the cabling goes through the respective holes and cable clips, as shown in the illustration.Figure 3. Thermal sensor board installation for 5U server model with hot-swap power supplies

- Connect the thermal sensor connector to the system board.
- If you have other devices to install, do so now. Otherwise, go to Completing the installation.
Give documentation feedback