Use this information to replace the 3.5-inch simple-swap hard disk drive backplate assembly.
Read the safety information in Safety and Installation guidelines.
If you are replacing a server component in the server, you need to slide the server out from the rack enclosure, turn off the server and peripheral devices, and disconnect the power cords and all external cables.
To replace the 3.5-inch simple-swap hard disk drive backplate assembly, complete the following steps:
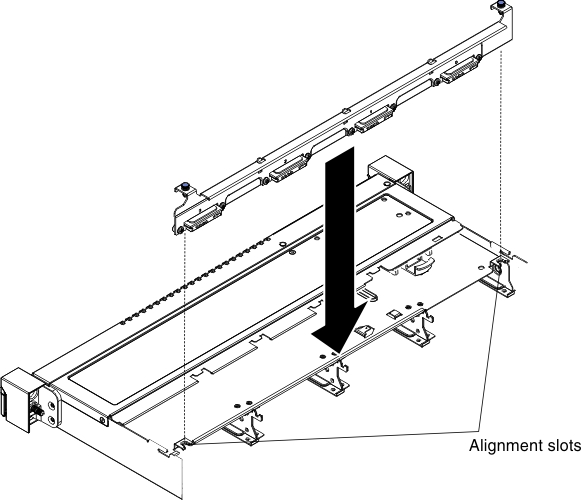
- Lower the backplate assembly into the alignment slots in the chassis.
- Align the tabs of the drive backplate assembly with the backplate assembly slots at the back of the backplate assembly cage.
Figure 1. 3.5-inch simple-swap hard disk drive backplate assembly alignment
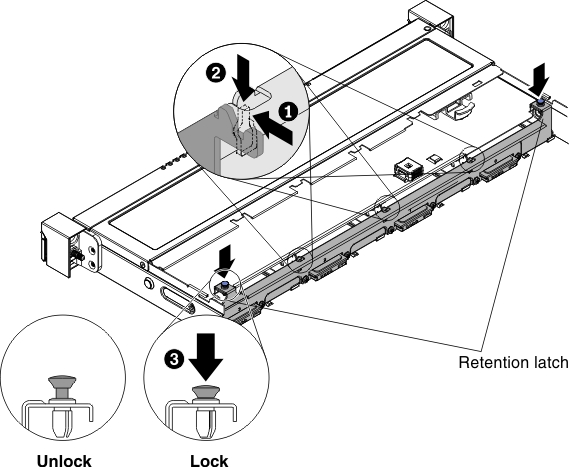
- Insert the drive backplate assembly slots into the tabs of the backplate assembly cage. Rotate the drive backplate assembly forward and push down the retention latch on top of the drive cage until the backplate assembly is latched.
Figure 2. 3.5-inch simple-swap hard disk drive backplate assembly installation
- Connect the cables to the RAID adapter or system board (see Internal cable routing and connectors).
- Reconnect the power cable.
- Make sure the relevant cables pass through the cable clips.
- Reinstall the hard disk drives and filler panels (see Replacing a simple-swap hard disk drive).
- Reinstall the PCI riser-card assembly if applicable (see Replacing the PCI riser-card assembly).
- Reinstall the cover (see Replacing the cover).
What to do next
- Install the server into the rack enclosure and push the server into the rack until it clicks into place.
- Reconnect the power cords and any cables that you removed.
- Turn on the peripheral devices and the server.

