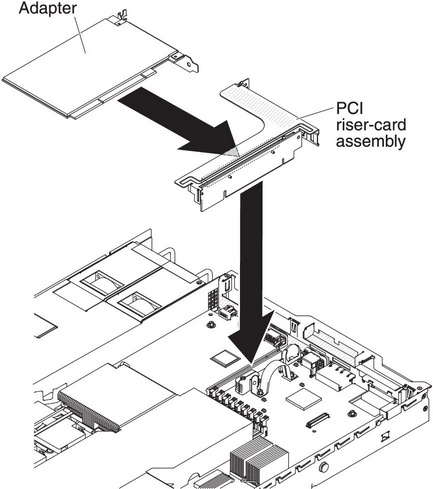
Replacing an adapter
Use this information to replace an adapter.
The following notes describe the types of adapters that the server supports and other information that you must consider when you install an adapter:
- Locate the documentation that comes with the adapter and follow those instructions in addition to the instructions in this section.
- The server provides one SAS/SATA RAID riser-card slot on the system board. See System-board optional device connectors for the location of the SAS/SATA RAID riser-card slot. The ServeRAID-BR10il v2, ServeRAID-M1015, ServeRAID-M5014, or ServeRAID-M5015 adapter comes installed on some models of the server. You can replace the IBM ServeRAID SAS/SATA adapter with an optional IBM ServeRAID SAS/SATA adapter in the slot. For configuration information, see the ServeRAID documentation at Lenovo Data Center Support.ImportantTo ensure that any of your ServeRAID 10i, 10is, or 10M adapters function properly on UEFI-based servers, make sure that the adapter firmware level is updated to at least 11.x.x-XXX , and the supporting drivers.AttentionSome cluster solutions require specific code levels or coordinated code updates. If the device is part of a cluster solution, verify that the latest level of code is supported for the cluster solution before you update the code.
- Do not set the maximum digital video adapter resolution above 1600 x 1200 at 75 Hz for an LCD monitor. This is the highest resolution that is supported for any add-on video adapter that you install in the server.
- Any high-definition video-out connector or stereo connector on any add-on video adapter is not supported
- The server does not support full-length, full-height PCI-X adapters or legacy 5 V PCI adapters.
- When you install any PCI adapter, the power cords must be disconnected from the power source before you remove the PCI Express riser-card assembly and the PCI-X riser-card assembly. Otherwise, the active power management event signal will be disabled by the system-board logic, and the Wake on LAN feature might not work. However, after the server is powered-on locally, the active power manager active power management event signal will be enabled by the system-board logic.
- If you switch the PCI adapter from slot 1 riser assembly to slot 2, you will need to remove the screw from the standard bracket and then replace the standard bracket with the low-profile bracket.
- The server provides two PCI riser-card slots on the system board. A PCI riser assembly with a bracket is installed in slot 2. The following information indicates the riser-card slots and the type of adapters that the riser cards support:
- Standard models of the server come with two PCI Express riser-card assemblies installed. If you want to replace them with PCI-X riser-card assemblies, you must order the PCI-X riser-card assembly option, which includes the bracket.
- A PCI Express riser-card assembly has a black connector and supports PCI Express adapters, and a PCI-X riser-card assembly has a white (light in color) connector and supports PCI-X adapters.
- PCI riser slot 1 (the farthest slot from the power supplies). This slot supports only low-profile adapters.
- PCI riser slot 2 (the closest slot to the power supplies). This slot supports only full-height, half-length adapters. You must install a PCI riser-card assembly in slot 2 even if you do not install an adapter.
The following table lists the supported configurations for the PCI rise-cardr slots.Table 1. PCI riser slots supported configurations PCI riser-card slot number Configuration 1 Configuration 2 Configuration 3 Configuration 4 Slot 1 PCI Express Gen 2 (x16) card with a PCI Express riser card with a low-profile bracket PCI Express Gen 2 (x16) card with a PCI Express riser card with a low-profile bracket PCI-X 1.0a 64-bit/133 MHz care with a PCI-X riser card with a low-profile bracket PCI-X 1.0a 64-bit/133 MHz card with a PCI-X riser card with a low-profile bracket Slot 2 PCI Express Gen 2 (x16) card with a PCI Express riser card with a standard bracket PCI-X 1.0a 64-bit/133 MHz card with a PCI-X riser card with a standard bracket PCI Express Gen 2 (x16) card with a PCI Express riser card with a standard bracket PCI-X 1.0a 64-bit/133 MHz card with a PCI-X riser card with a standard bracket
Note
- The instructions in this section apply to any PCI adapter (for example, video graphics adapters or network adapters).
- Do not set the maximum digital video adapter resolution above 1600 x 1200 at 75 Hz for an LCD monitor. This is the highest resolution that is supported for any add-on video adapter that you install in the server.
- Any high-definition video-out connector or stereo connector on any add-on video adapter is not supported.
To install an adapter, complete the following steps:
Give documentation feedback
